You will learn to Install & Activate Divi Theme along with the installation instructions for getting your Rejuve Website Kit (child theme) uploaded to your website.
Getting Started
Set up your hosting & domain, purchase Divi & get your Divi license, Install Divi Theme
Hosting & Divi License
To get started with a Website Kit, you need to have:
1- Self-Hosted WordPress
2- A Divi Theme License
Need Step-By Step help setting up Hosting/Domain with Bluehost?
BlueHost Hosting Setup Tutorial (contains affiliate links)
Need Divi Theme License?
Click here to purchase your own Divi Theme website license (affiliate link)
No idea what Divi Theme is and want to learn more?
Read my blog post “Divi: The Ultimate WordPress Themes”
Install Divi Theme
2-1 Install the Divi Theme
Installing the Divi theme is simple! Watch the following video or read the steps below.
Find The File: Divi.Zip
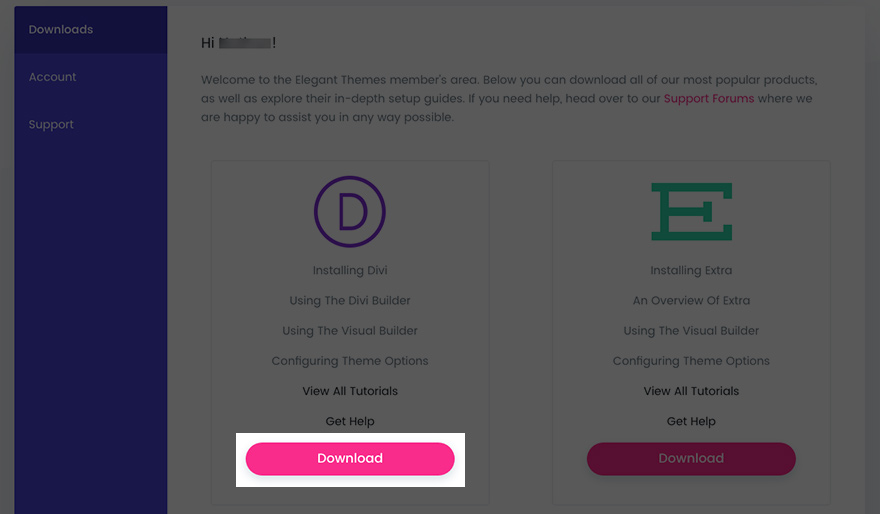
You will need to download the Divi.Zip file located in your Elegant Themes account dashboard to complete the next step.
If you have not yet downloaded your Divi.zip file, you’ll need to: Login to your Divi Account to retrieve it.
In your Elegant Themes dashboard, click, downloads and download under the Divi symbol. Don’t exit your account just yet, you’ll need it for the last step in this process.
Installing Divi Theme on Your WordPress
- Click over to your WordPress Dashboard > Appearance > Themes.
- Next, click “Add New”
- Click “Upload Theme”
- Choose the Divi .zip file and upload.
- Click “Activate”
Divi Theme is now installed!
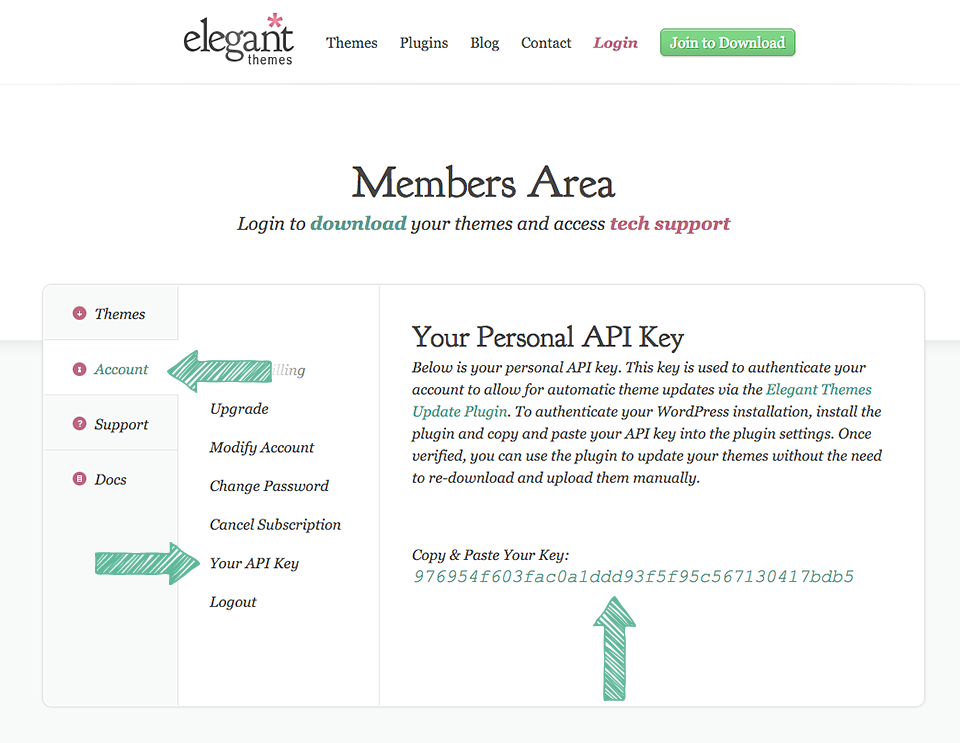
2-2 Add your Username & API key to Divi to receive updates
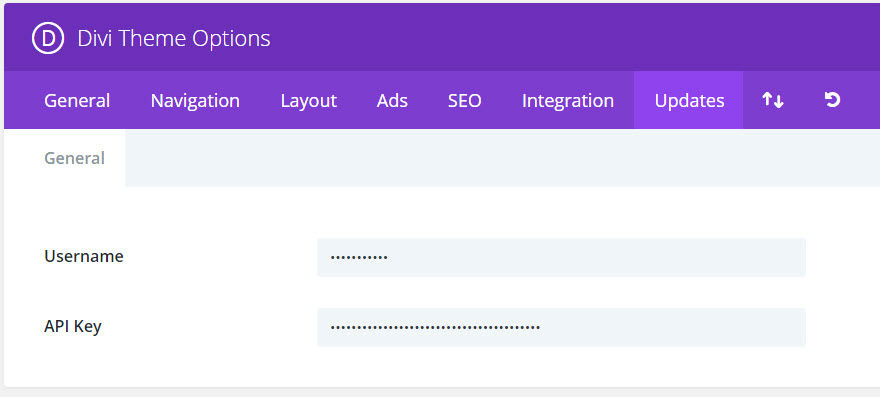
- In your WordPress Dashboard, scroll down to Divi and click > Theme Options
- Click the tab labeled “Updates”
- Enter your elegant themes username
- Enter your API Key (found in your Elegant Themes account and pictured below)
- Click “Save Changes”
Your Divi Theme will now be able to accept updates as they come through.
Video Walkthrough:
Installing Rejuve Child Theme, Importing Rejuve Pages, Settings, etc
Step 1: Install "Rejuve" Child Theme
Install the Rejuve Divi Child Theme
Now that you have Divi Theme installed, can now upload the Rejuve Child Theme. (A child theme contains the pre-made styling and coding to the “parent theme” Divi. Parent themes come as a blank slate and the child theme contains what you need to make it look like the Transcend demo site)
You will follow the same process as installing and activating the Divi theme. Watch the following video or read the steps below for guidance.
Find The File: Rejuve.zip
For this step, you will need the Rejuve.Zip file located in the Rejuve Website Kit downloaded from the Launched Website after purchase. If you need to retrieve the file again, log in to your account dashboard on Launched Creative and download.
Click over to your WordPress Dashboard and on left sidebar click > Appearance, then click > Themes.
- Click “Add New”
- Click “Upload Theme”
- Choose the Rejuve-child.zip file and upload.
- Click “Activate”
Your Rejuve Child Theme is now installed and you are totally rocking this!
Step 1-2 Import Builder Layouts/Settings
Import Kit Settings, Page Templates, and Theme Build Settings
Now that your Child Theme is installed on your website, you will need to upload a few additional files to get you set up.
Find The Folder: Imports
In your Rejuve.zip file, there is a folder labeled “Imports”. You will need the files within that folder for the following steps.
1-2a Import Rejuve Theme Options
Find The File: Divi Theme Options.json
Found in your Rejuve.Zip folder under “Imports”.
- In your WordPress Dashboard, scroll down to Divi and click > Theme Options
- Click the up and down (export/import) arrows on the right-hand side.
- Click “Import”
- Upload “Divi Theme Options.json”
- Once uploaded, Set your default color palette in the “Color pickers default color palette” box on the Theme Options Page
- Click a color circle
- Type Your Color Selection Hex Code into box
- Click Next Circle & Input next color hex code
- Repeat for each color
1-2b Import Rejuve Customizer Settings
Find The File: Divi Customizer Settings.json
Found in your Rejuve.Zip folder under “Imports”.
- In your WordPress Dashboad, scroll down to Divi and click > Theme Customizer
- Click the up and down (export/import) arrows on the left-hand side.
- Click “Import”.
- Upload “Divi Customizer Settings.json”
- Click “publish” and then click to exit the customizer once changes have been saved.
1-2c Import Theme Builder Templates
Find The File: Divi_Theme_Builder_Templates.json
Found in your Rejuve.Zip folder under “Imports”.
- In your WordPress Dashboad, scroll down and hover over Divi and click > Theme Builder
- Click the up and down (export/import) arrows on the right hand side
- Click “Import”.
- Select the file “Divi_Theme_Builder_Templates.json”
- Check the box “Import Presets”
- Click to Upload
- Click “Save Changes” once the templates have successfully uploaded to this page.
1-2d Import Divi Builder Layouts
Find The File: Divi Builder Layouts.json
Found in your Rejuve.Zip folder under “Imports”.
- In your WordPress Dashboad, scroll down to Divi and click > Library
- Click the Import/Export button on the top right hand corner of the page.
- Click “Import”
- Select the file “Divi Builder Layouts.json”
- Check the box “Import Presets”
- Click to upload
You can expect these files to take several minutes to load. If your screen goes blank and hangs for a while, you can click refresh. If your files have uploaded, they will show in your Divi Library.
Etsy Purchasers Step 1-2: Import Custom Settings
Import Kit Settings, Page Templates, and Theme Build Settings
Now that your Child Theme is installed on your website, you will need to upload a few additional files to get you set up.
Find The Zipped Files: Rejuve_Imports, Rejuve_Builder_Imports1, and Rejuve_Builder_Imports2
Within each of these files is a folder labeled “Imports”. You will need the files within that folder for the following steps.
All files need to be unzipped or removed from main folder to be uploaded as a single file to each area listed below.
1-2a Import Rejuve Theme Options
Find The File: Divi Theme Options.json
Found in your Rejuve_Imports.Zip folder under “Imports”.
- In your WordPress Dashboard, scroll down to Divi and click > Theme Options
- Click the up and down (export/import) arrows on the right-hand side.
- Click “Import”.
- Upload “Divi Theme Options.json”
1-2b Import Rejuve Customizer Settings
Find The File: Divi Customizer Settings.json
Found in your Rejuve_Imports.Zip folder under “Imports”.
- In your WordPress Dashboad, scroll down to Divi and click > Theme Customizer
- Click the up and down (export/import) arrows on the left-hand side.
- Click “Import”.
- Upload “Divi Customizer Settings.json”
- Click “publish” and then click to exit the customizer once changes have been saved.
1-2c Import Theme Builder Templates
Find The File: Divi_Theme_Builder_Templates.json
Found in your Rejuve_Imports.Zip folder under “Imports”.
- In your WordPress Dashboad, scroll down and hover over Divi and click > Theme Builder
- Click the up and down (export/import) arrows on the right hand side
- Click “Import”.
- Upload “Divi_Theme_Builder_Templates.json”
- Click “Save Changes” once the templates have successfully uploaded to this page.
1-2d Import Divi Builder Layouts
Find The File: Divi Builder Layouts.json
Found in your Rejuve_Builder_Imports1.Zip and Rejuve_Builder_Imports2 folder under “Imports”.
- In your WordPress Dashboad, scroll down to Divi and click > Library
- Click the Import/Export button on the top right hand corner of the page.
- Click “Import”.
- Upload “Divi Builder Layouts1.json”
- Follow above directions to Upload “Divi Builder Layouts2.json”
You can expect these files to take several minutes to load. If your screen goes blank and hangs for a while, you can click refresh. If your files have uploaded, they will show in your Divi Library.
Technical Stuff
Set Link Structure (permalinks)
Video Walkthrough:
Setting Permalinks (the link structure of your website)
Step 2: Set Permalinks Structure (Your website links)
Updating Your Permalink Structure
This will update the way your links are structured for your website.
In the wordpress dashboard, scroll down to Settings > Permalinks
Choose whichever structure you want, we prefer “Post name” which gives your pages and posts a URL such as https://launchedcreative.com/kits instead of https://launchedcreative.com/?p=123
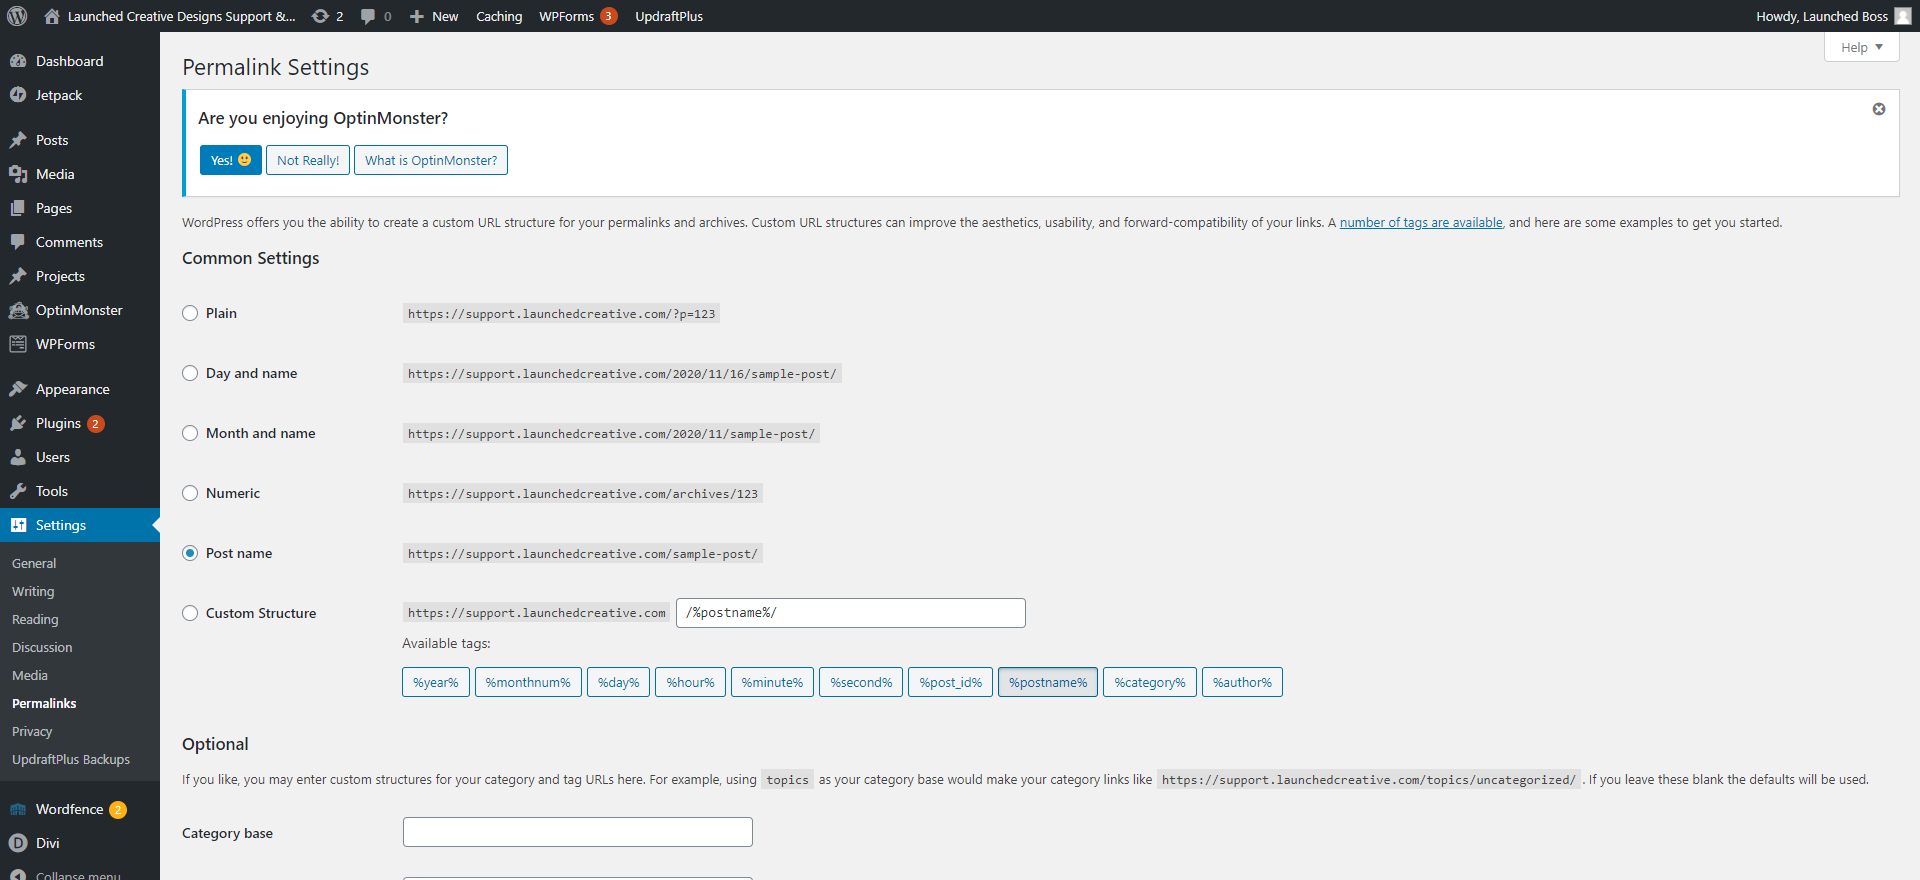
After you choose your permalink structure, click “Save Changes”.
Video Walkthrough:
Setting up Rejuve Kit Menu
Step 3: Setting Navigation Menu
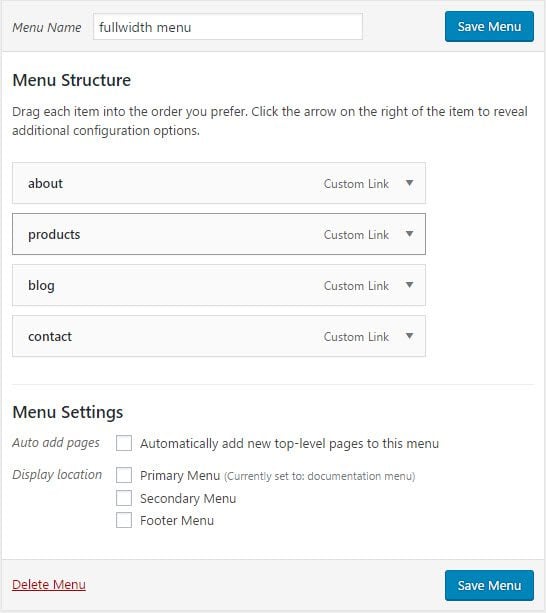
Before you can use the full-width Menu Module in Divi Builder (for your Complete Website Kit Header and Footer), you will need to create Menus in the WordPress Menu settings.
2-1 Creating Your Menu
- Once in your Menu area of your website, you will be promoted to give your menu a name > name your Menu (e.g. “main menu”) > click “create menu”
2-2 Adding To Your Menu
- In the left hand column of the menu page > add menu items > click “view all” > check each page you would like to add to your menu that you have customized and published
- To add custom links (like for FAQ section), in the left hand column, click “custom links” > type in URL (e.g. https://yourwebsite.com/services/#faq) to add the FAQ section to your menu > Link Text: FAQ
- Be sure to input YOUR website hyperlink in place of “yourwebsite.com
2-3 Setting Main Menu
- Scroll down to “Menu Settings” > click “primary menu” checkbox > click “save menu”
2-4 Creating additional Menus (footer menu, blog menu, etc) for
- While in your Menu area , you will be prompted to give your menu a name > name your Menu (e.g. “blog menu”, “footer menu”) > click “create menu”
- You will be able to set
2-2 Adding To Your Blog Menu
- In the left hand column of the menu page > add menu items > click “Categories” then select “view all” > check each Category you would like to add to your menu bar on your blog page.
Need more info? See more about setting up your menu here