Customize the Contact Page to fit your Business Replace placeholder content & images with your own!
Follow along to see how to make these changes in the easy steps below.
To Get Started Making Contact Page Changes:
Navigate To Your WordPress Dashboard > Pages > Click All Pages > Hover Over “Contact” > Click “Edit With Divi” >
You are now in the Front End Builder of Your Home Page and will make all changes to home page here.
Video Tutorial
Please review Quick Customization Tools guide prior to getting started on page customizations (it will save you loads of time in design changes!)
Reset Anchor Links In Buttons
For purchases of Spectrum Kit prior to 1/15/21, please use the following instructions to change anchor links within buttons:
** Anchor Link: has a #towards the end, which tells your website to drop down to a specific area of the page with that CSS identifier loaded into it. For more detailed information on Anchor Links, please read Anchor Links Info
Changing Anchor Links To Direct To Your Website:
Open up button settings > under content tab, scroll down to “link” > if the placeholder link does not say “page” and instead has an address typed in like this: https://spectrum.launchedcreative.com/services/#faq then it is an anchor link
**Please take note of what the /page/#anchor link is
To Change anchor link to your page, erase the “https://spectrum.launchedcreative.com portion but leave in the desired page and anchor link. Ex: /services/#faq

Click save
Anchor Link Legend for Contact Page:
(to reset to your website, simply use these anchor links in the link area. You do not need to include your web address before the /)
FAQ Button: /services/#faq
Step 1- Changing Placeholder Text & Divider Color
1-1 Replacing Headings and Text with Your content
- Once in your contact page, you will hover over each text module that you want to replace the text > click grey gear/setting icon > Content > replace the content with your text > click save
- Alternatively, you can click the text area you would like to change and start typing directly into the box > click save changes at bottom of page.
1-2 Resizing Placeholder Text
Most placeholder body text is set to the default font size of 16px. Some placeholder content is set to 18px to emphasize importance. If you would like to change these areas that are are not set to default, or to change any area you prefer to make larger:
- Hover over the text module you’d like to change > click grey settings icon > click Design Tab > text > text size > input your desired text size > click save.
- To change heading sizes, follow the steps above and scroll to > heading text to change sizing > click save.
1-3 Changing Divider Line Color
- To change divider line color, hover over the divider line > click settings icon > Design Tab > Line > Line Color > select your line color by inputting RGB color code > click save.
Step 2- Changing Placeholder Images
2-1 Changing Placeholder Images
- Hover over grey Image Module setting icon > click image > replace with your uploaded image or from your library > click save.
2-2 Changing Image Frame Color
- While still in the image module settings, click > design >scroll down to border > change border color to desired color
Step 3- Changing Background Colors
3-1 To Change the background of Header & “Spectrum ABA Therapy” Section:
- Click the blue section settings > Content Tab > background > input your desired background color.
3-2 To change background color/border of “Get In Touch” Box:
- Click the grey module settings > Content Tab > background > input your desired background color > click design tab> borders > change to desired color, width, and roundness.
Step 4- Contact Form
4-1 Changing Placeholder Content In Contact Form
- Hover over the contact form and click the grey settings icon > to change each field settings once in the Contact Form settings > click grey settings icon of desired field you’d like to change > change Title to desired title
- To change Services options > click services settings icon > field options > click in the box of the option you’d like to change and input your desired service title or click the delete button to remove > click the + button to add additional service
4-2 Email Address
- To input YOUR email address (the email address that all form submissions will be sent to), while still in the content form settings described above > scroll down to email > input YOUR email address
4-3 To change “success” message
- To change the message your site visitor receives upon successfully submitting the message form, while still in the form settings described above > click Text > success message > change to your desired success message. Click save
Step 5- Contact Info Boxes
5-2 To Change the background of Side Contact Info Boxes
- Click the grey module settings > Content Tab > background > input your desired background color.
5-2 To Change the placeholder content of Side Contact Info Boxes
- Click the grey module settings > Content Tab > body > input desired info.
- To remove icon, follow steps above, highlight object in body text box, remove by hitting backspace. To add your own image >while still in body text box, click > add media > upload your desired icon.
Placeholder Text Not Set To Default Settings
Documentation: The following areas have placeholder text that will not be changed with Theme Customizer setting changes. You will have to manually reset the font selection when changing the placeholder text out for the following area:
Header “Comprehensive Evidence-Based ABA Services” Tagline: Change in Text Settings.
“Quality Behavioral Therapy Services” Heading: Change in Heading H1 Settings.
Additional Contact Form Help:
Troubleshooting Contact Form
If you are having trouble with using or testing the contact form, please:
- Be sure to EXIT Visual Builder before performing any testing. You cannot click buttons or fill out forms successfully while in the visual builder
- Double check email address for form submissions to be sure you input correct email address to receive submissions.
- Check your SPAM folder for test submissions
- If you cannot see success message after submitting form, please be sure your success message text settings (under design tab in contact form) are not set to same color as background.
- If these tips do not resolve your issue with the contact form, please contact Elegant Themes for support, as this is an issue with the theme itself and not the website kit. Elegant Themes Support
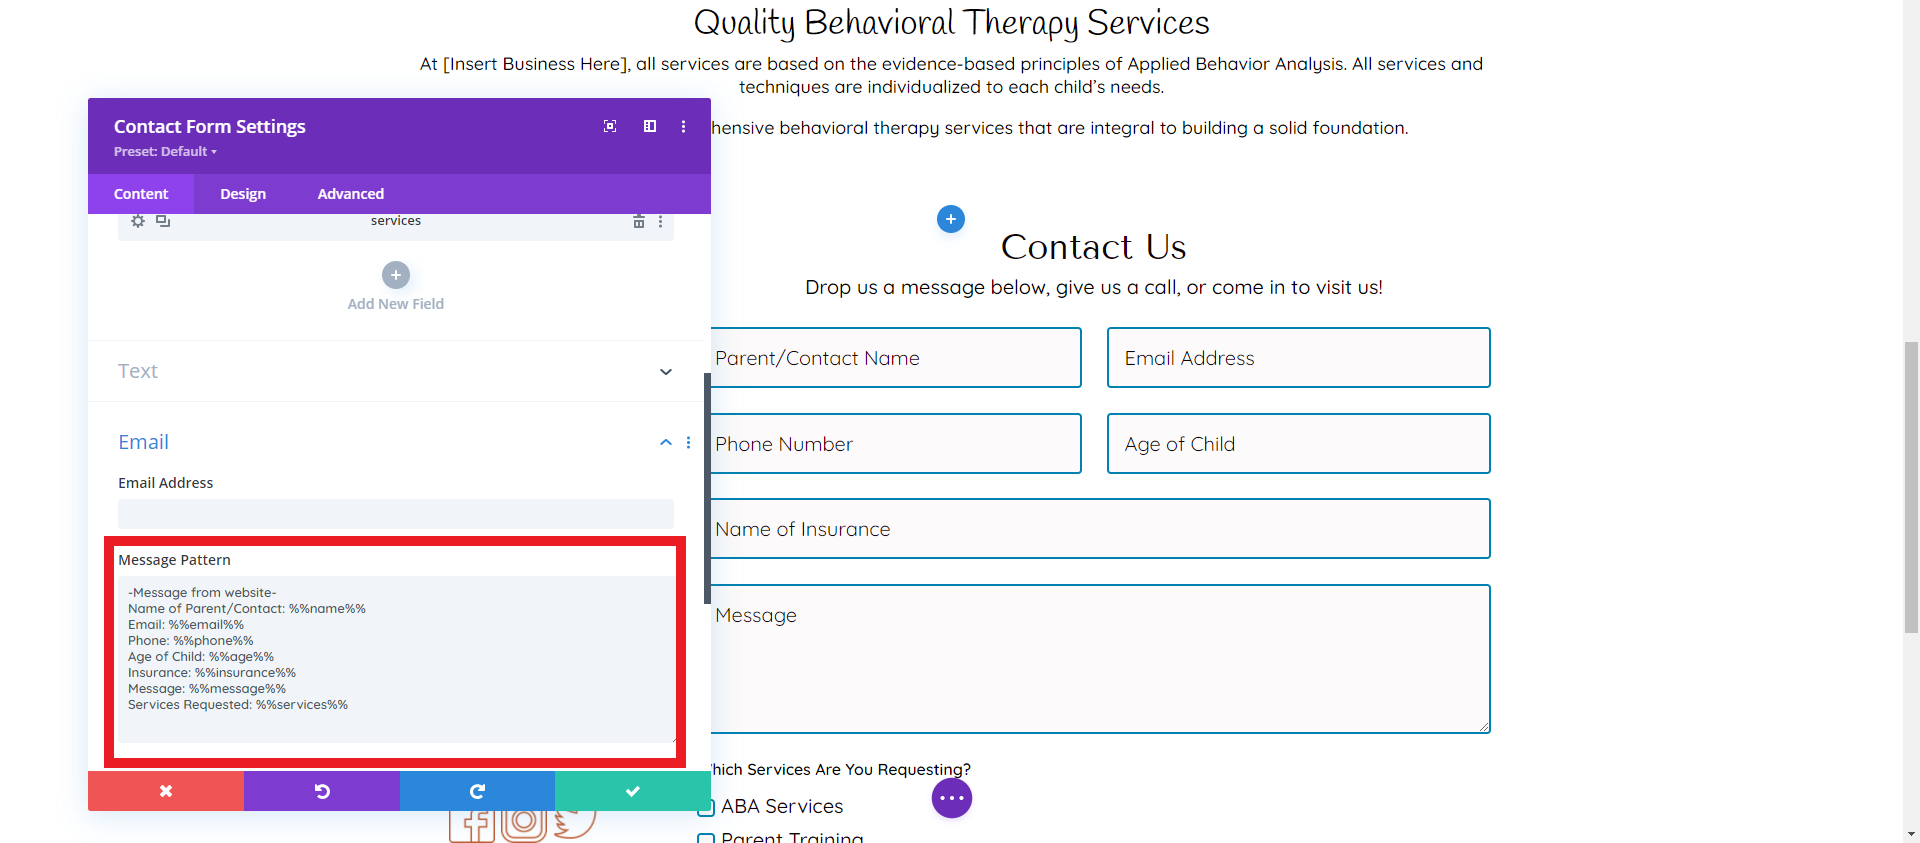
Contact Form Message Pattern
If you accidentally delete the contact form submission message structure, you can copy and paste this structure here to input on your website:
-Message from website-
Name of Parent/Contact: %%name%%
Email: %%email%%
Phone: %%phone%%
Age of Child: %%age%%
Insurance: %%insurance%%
Message: %%message%%
Services Requested: %%services%%
The field id of each field added into your form must be named and included in the message pattern in order for you to receive the submission content via email. If you add a new field to the form, just be sure to add the %%id%% into your message pattern.
Contact Form Settings > Content > Field Settings > Field id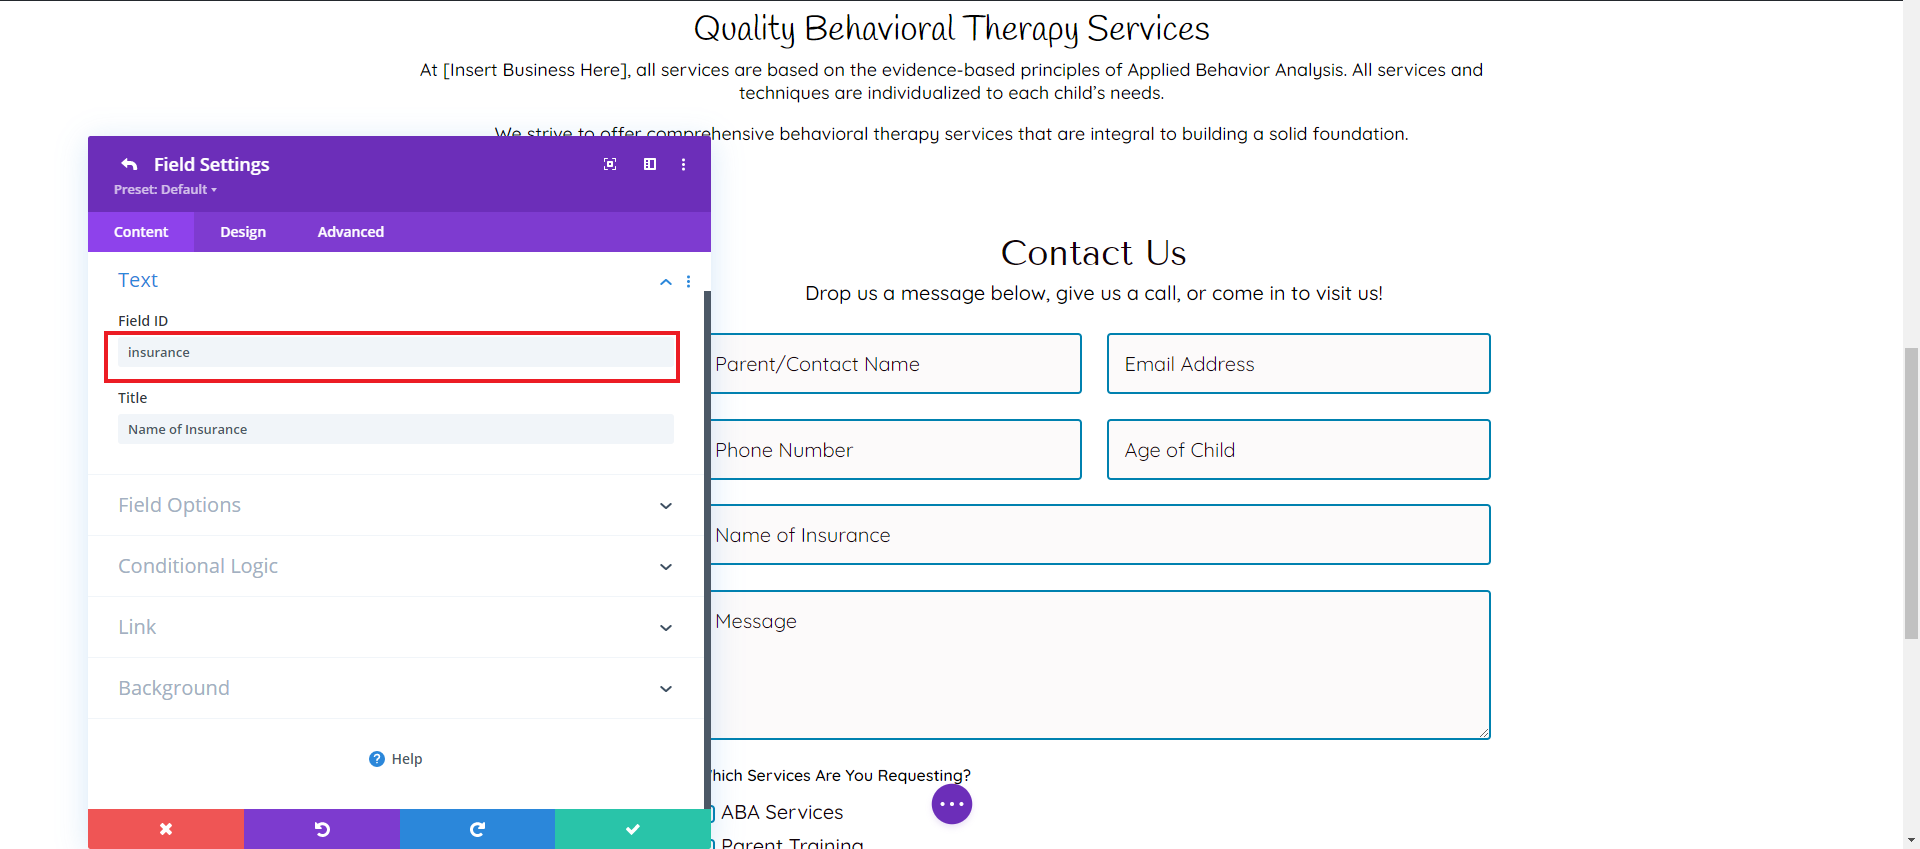
Contact Form Settings > Content > Email > Message Pattern