Hey There...
Are you here because you purchased a template pack? Awesome! Keep scrolling for instructions.
Did you land here and don’t know what to do with Canva but want to make your life even easier by purchasing a template pack from me before reading instructions?
(You don’t have to purchase to read the instructions, I am glad you’re here whether you buy from me or not.)
Canva Basics
Step 1: Create a free Canva Account here to get started.
Every Canva template purchased from Launched Creative is designed using only free or basic elements within Canva, so you only need a free account with Canva to use & customize your template.
Canva Basic is always free, so no signup or free-trial periods required unless you want to use the Pro version.
What is Canva?
Canva is an easy-to-use web-based design application featuring effortless drag-and-drop interface.
Zero design experience needed.
Canva has a ton of FAQ and tutorials on their website to help guide you:
Below, you can watch a quick video or read through written instructions I wrote up about Canva Basics.
In the video & instructions below, learn how to:
- Open purchased Template in Canva
- Edit SINGLE template from a template pack
- Access Templates from Canva Home Page
- Edit Text Boxes, Text Color, Text Size
- Resize and Ungroup Text Boxes
- Adjust Overflowing Text and Add New Text Boxes
- Customize or Replace Placholder Images
- Customize Icon/Background/Shape Colors
- Save Files, Check Print Bleed/Download File
Special Template Instructions
Printables
Or, watch a quick video on how to edit a Template.
Logos
Canva Basics
Opening Purchased or Saved Templates
Opening Purchased Template For First Time
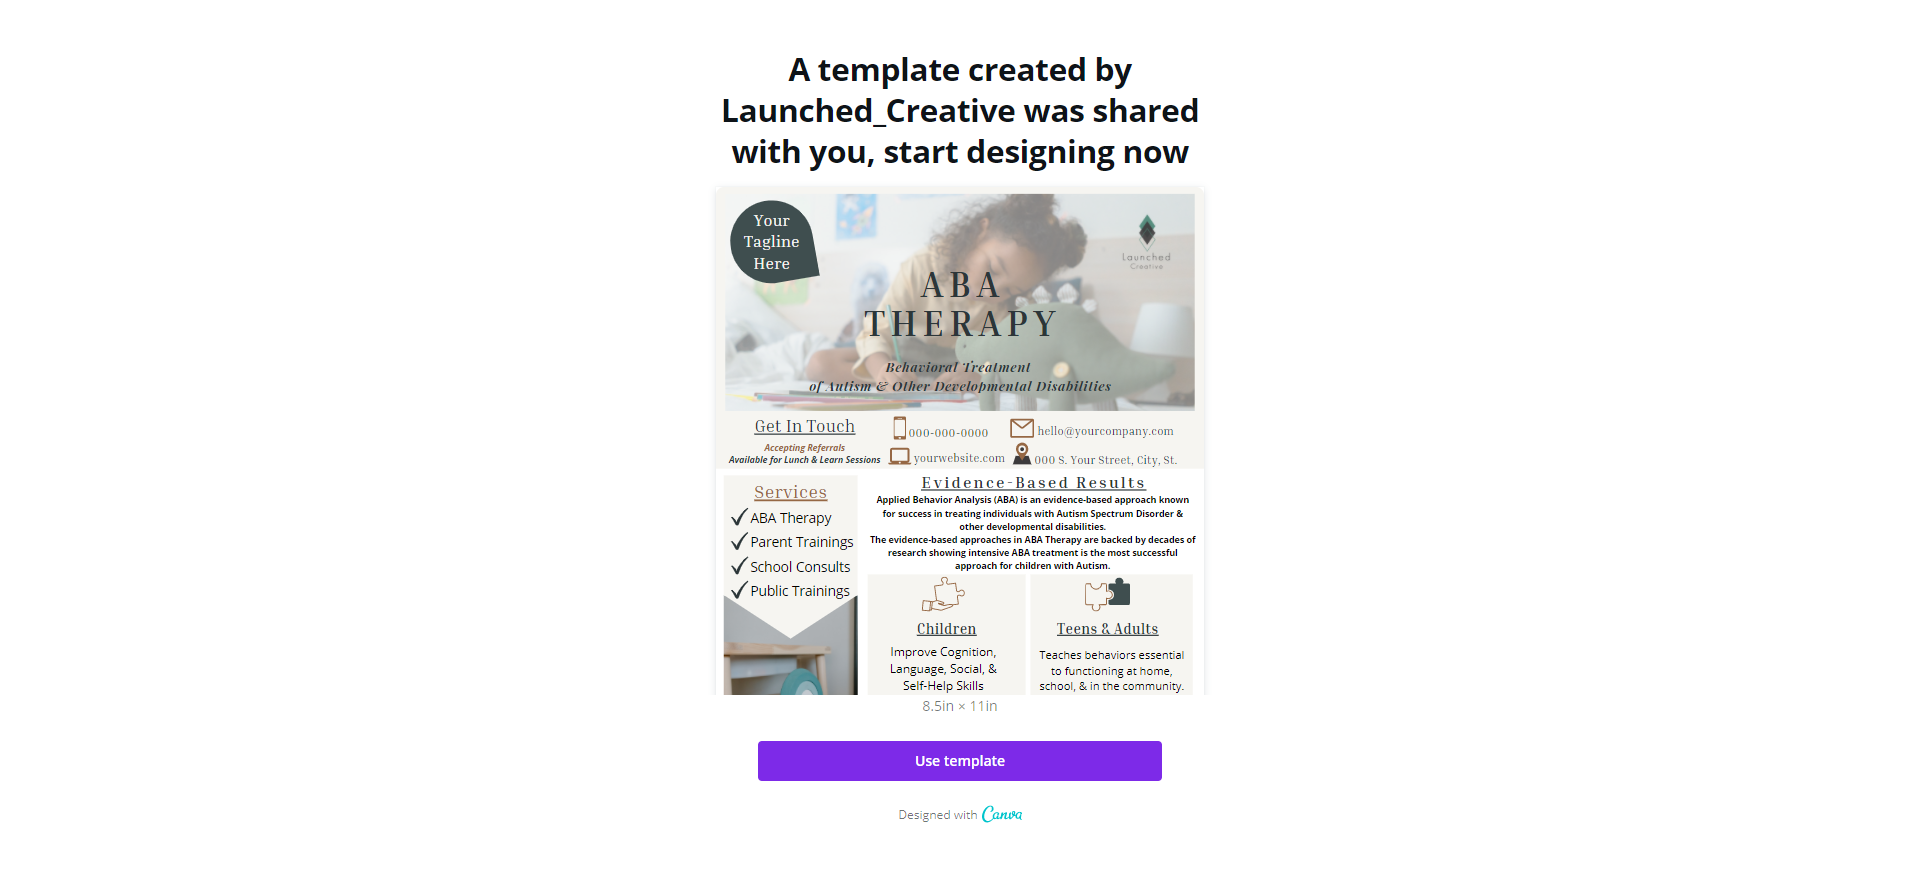
Click the link found in your download after purchase > then click “use Template” once you are in Canva. (you must have a canva account to use purchased Template).
Opening Your Templates or Your Saved Designs
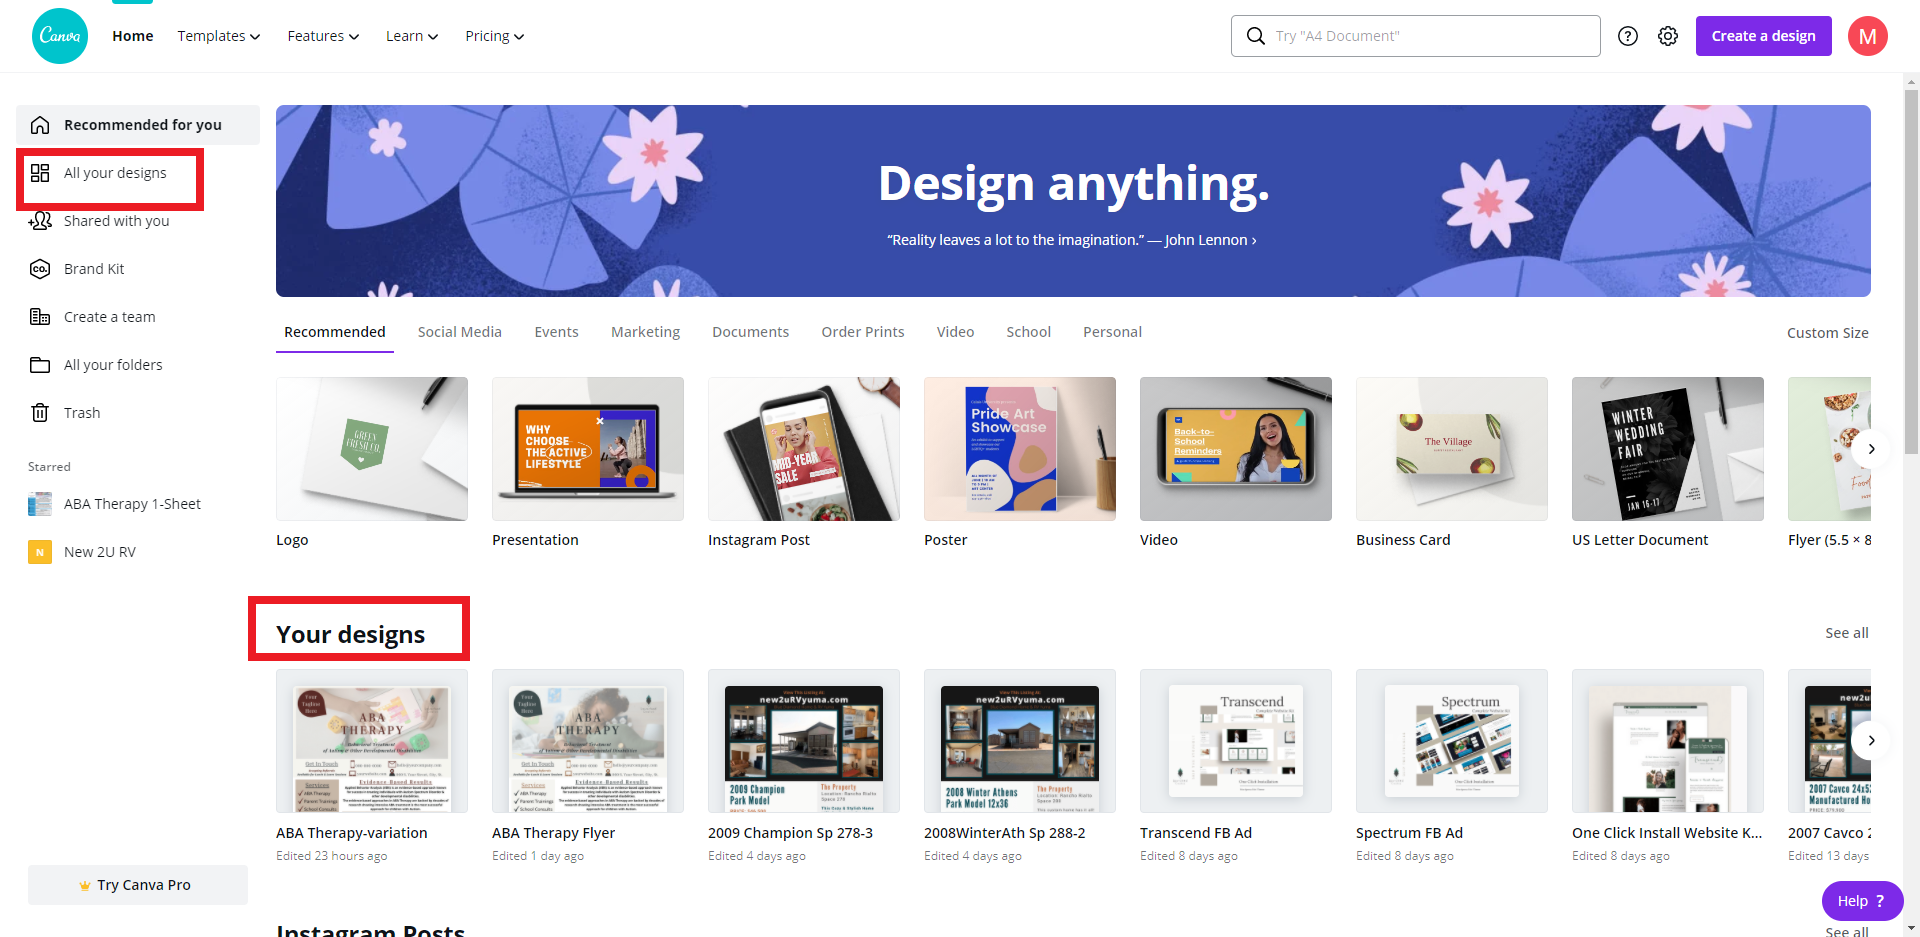
Go to Canva.com and click on “your designs”
All designs you’ve saved or worked on will show up in this area. To edit a template, simply click on the desired template.
Editing Single Template From Template Pack
Opening/Editing Single Template From a Template Pack
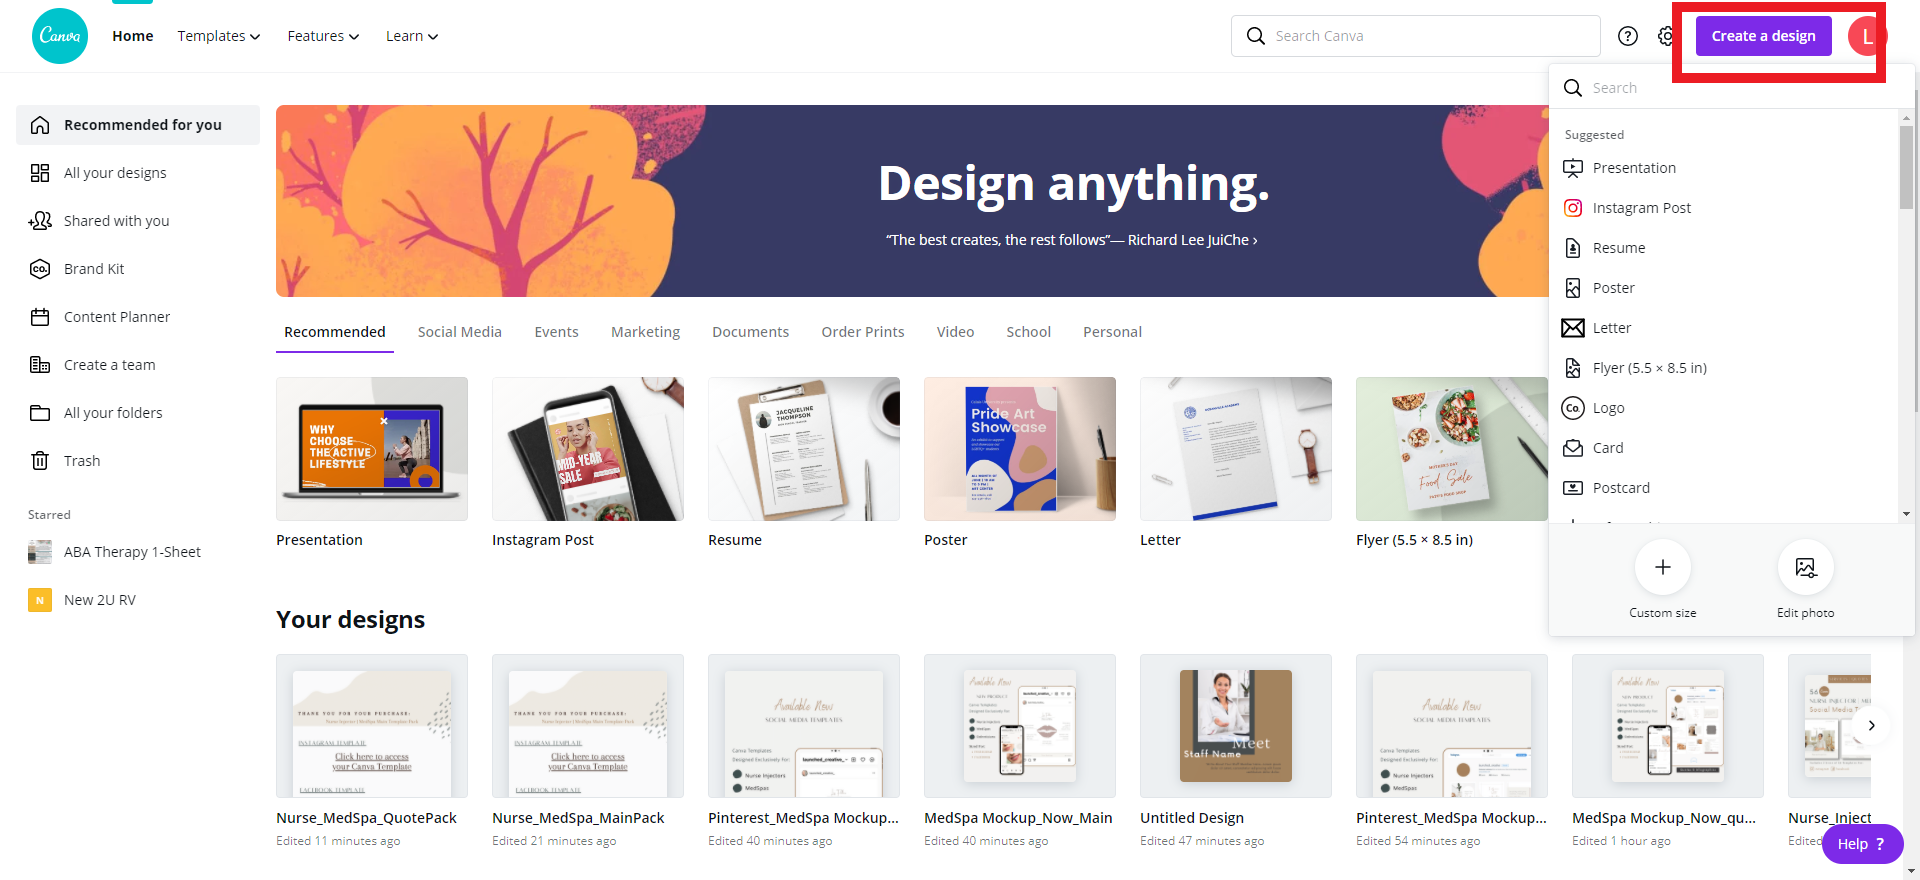
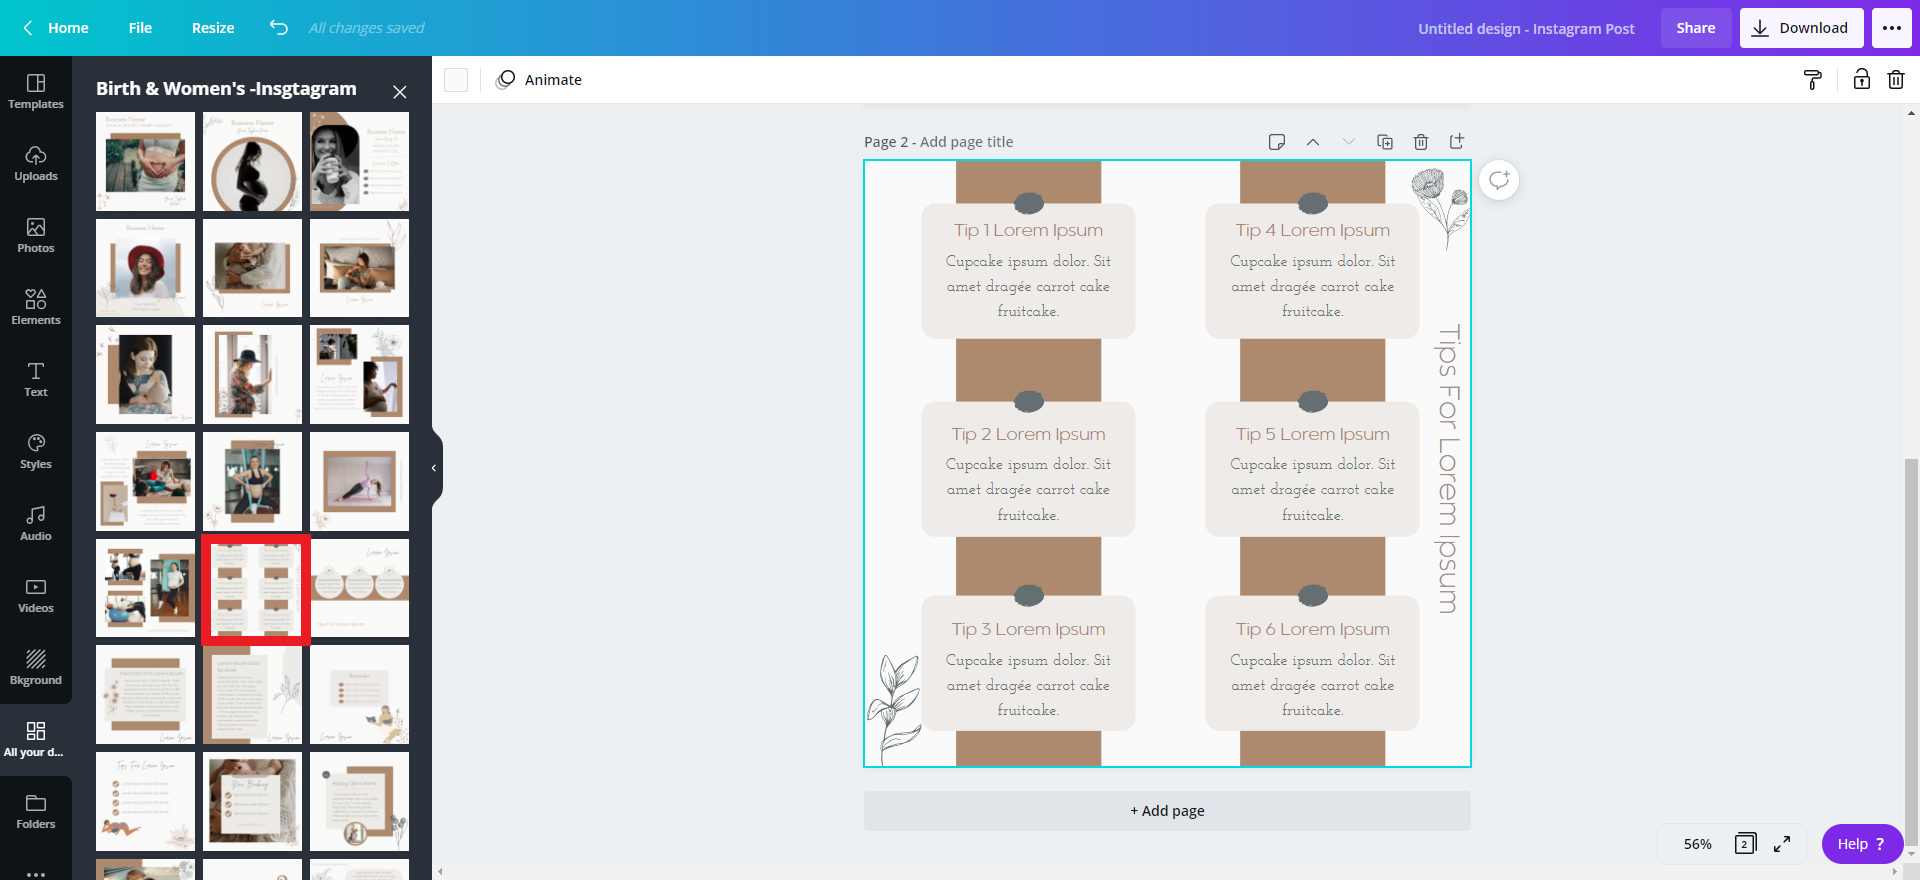
In Canva, make sure you are at the “Home” page. Click > Create Design > select size of design you’d like to create (be sure it’s the correct option for the template pack you purchased).
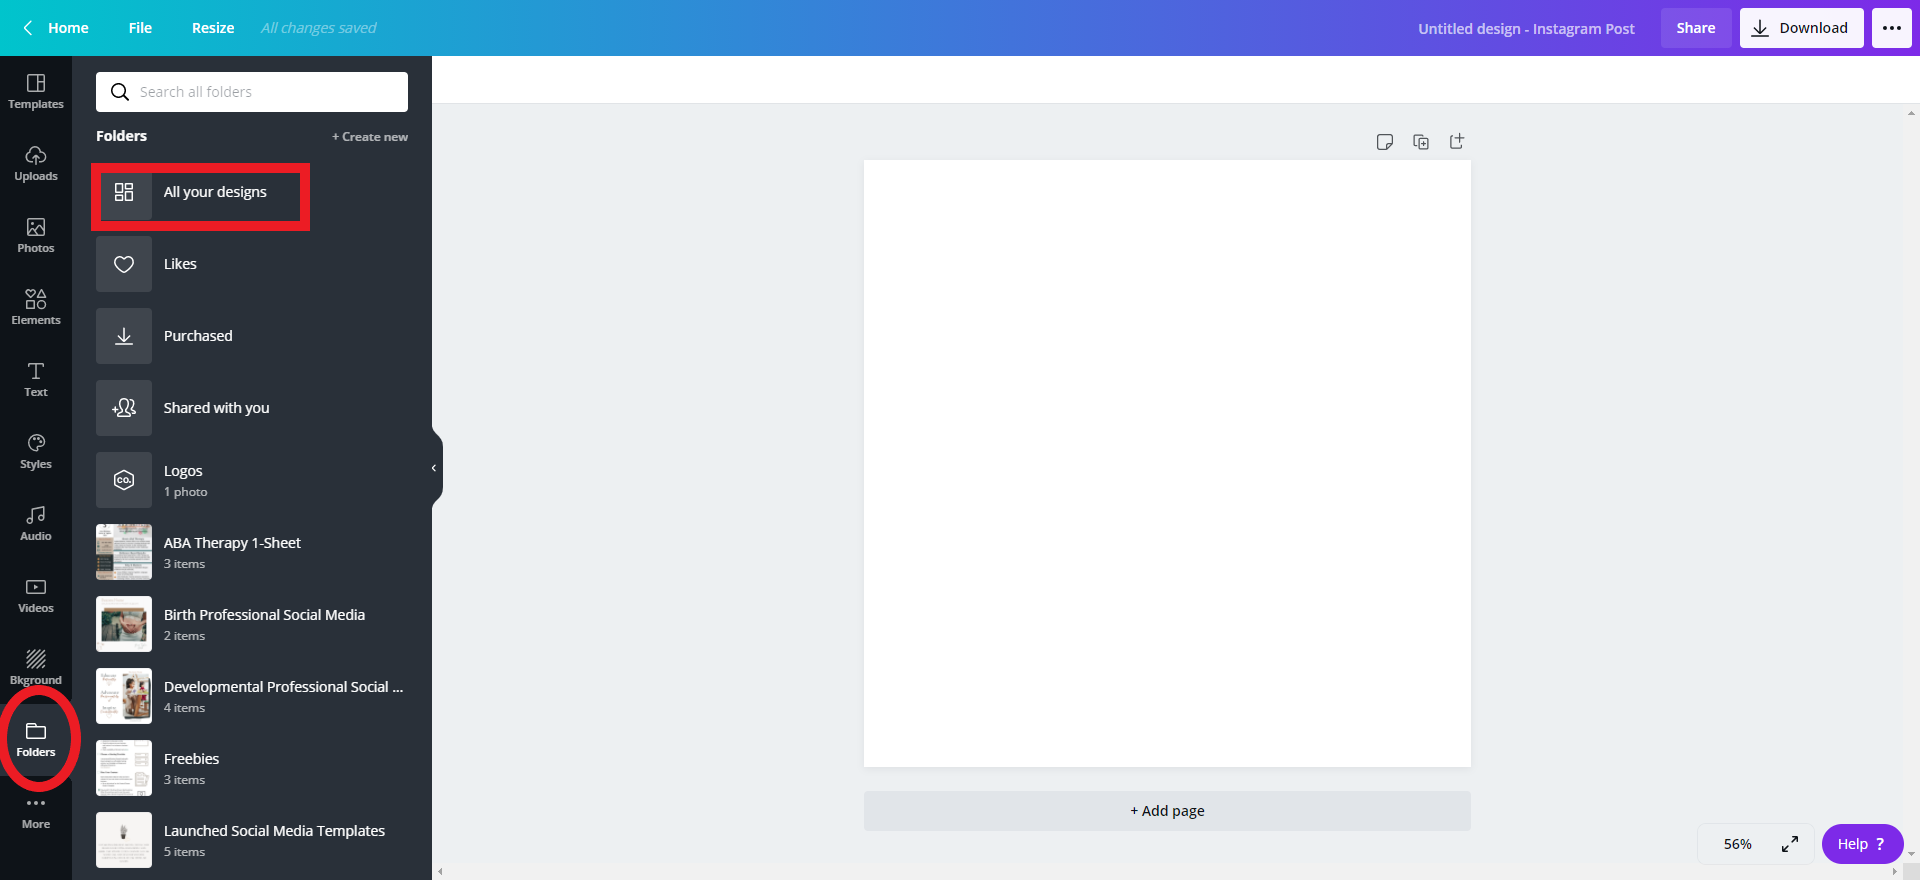 Once in the blank post, select “folders” from left navigation panel > “all your designs” > select the template pack you’d like to select from > select the individual post template you’d like to cutsomize > begin customizing > download.
Change Placeholder Text & Styles
Changing placeholder text content & styles
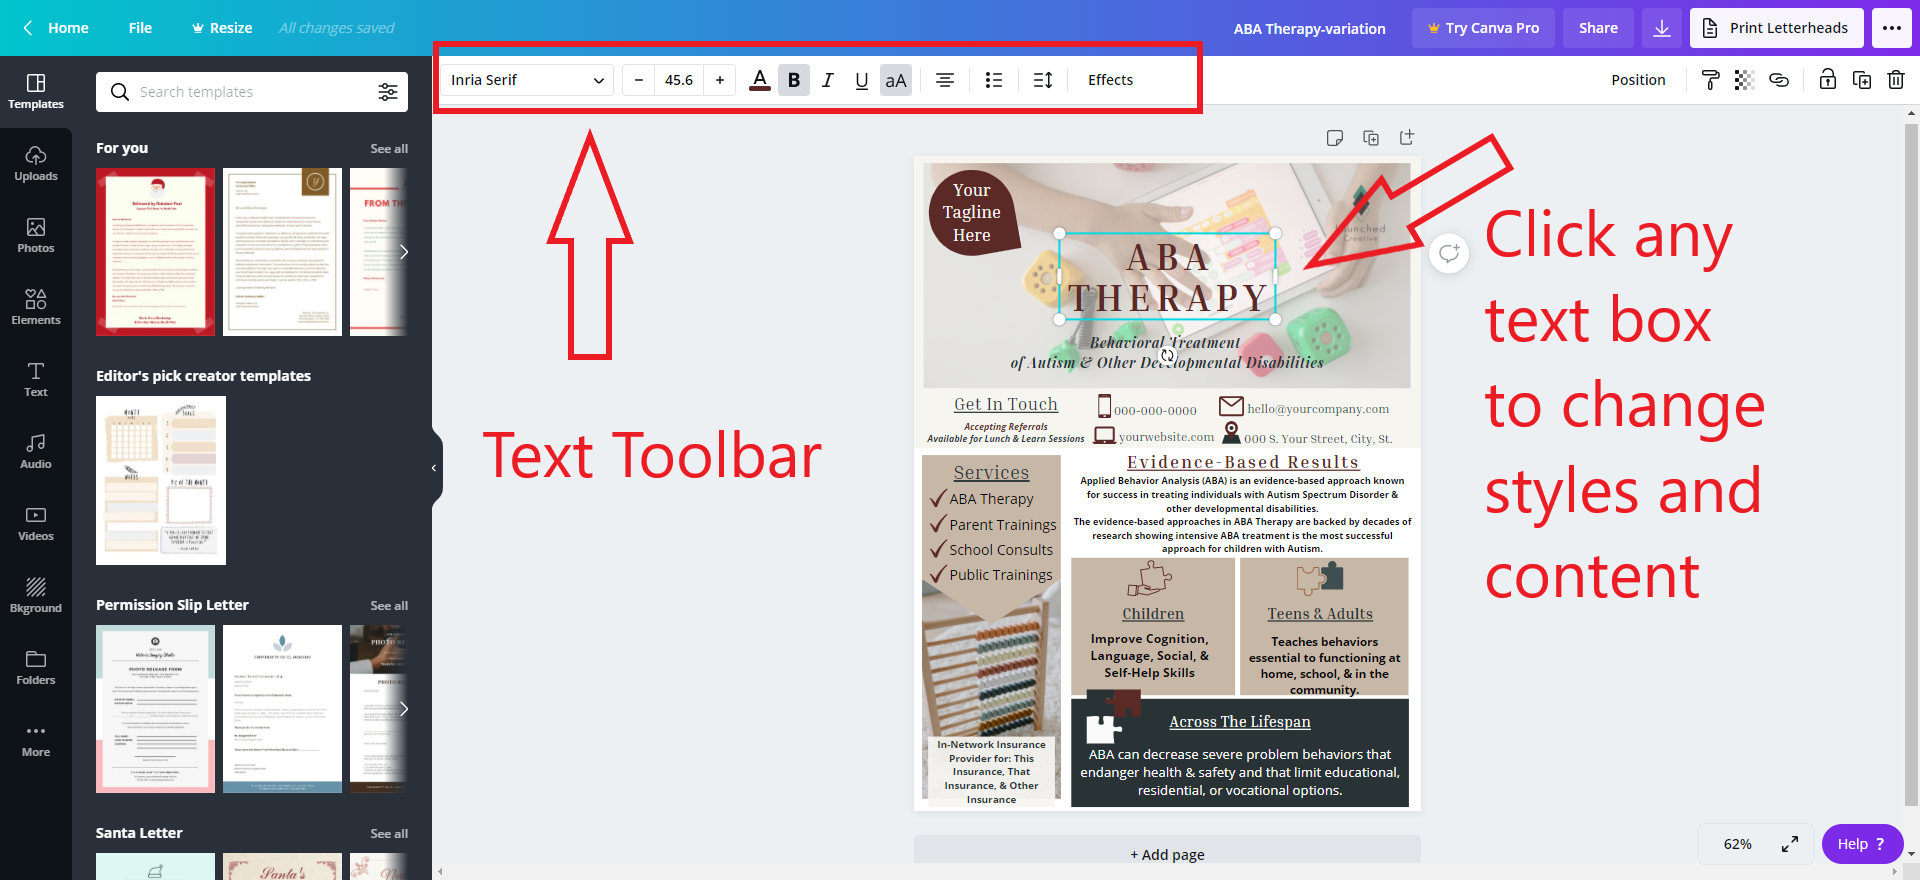
Once you have a template open, simply click each text box area to adjust styles and replace content. Repeat for each text box.
Changing Placeholder Images
Changing placeholder images
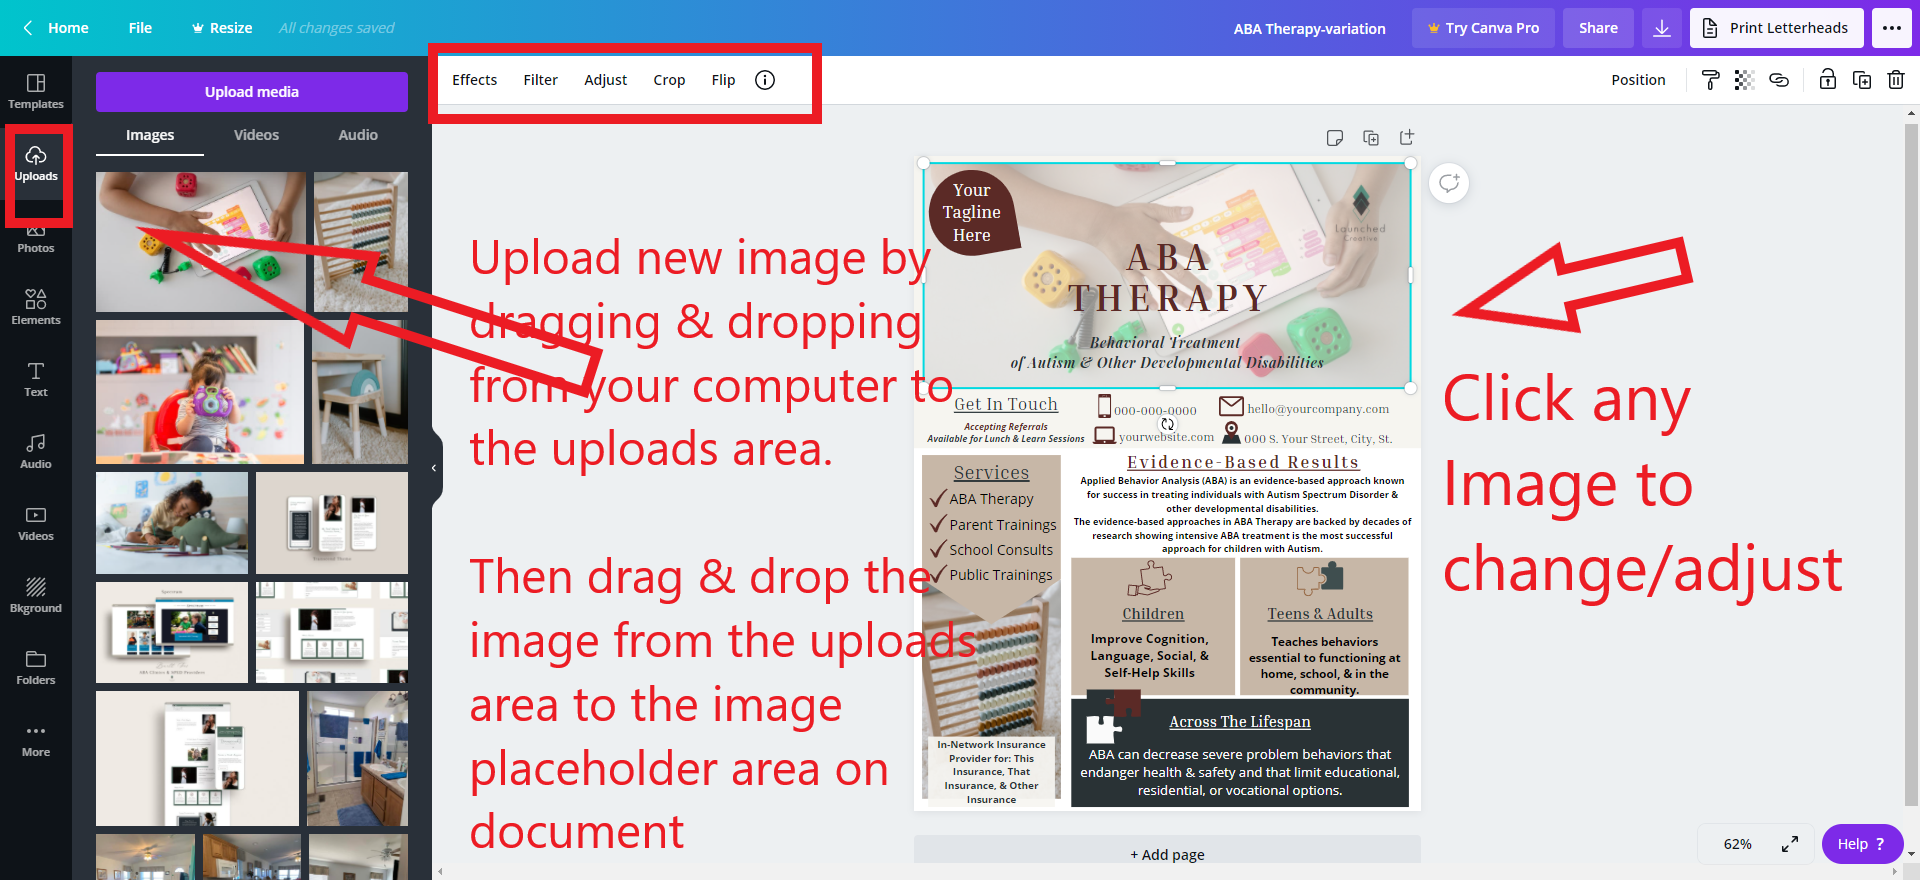
To change a placeholder image with your own image:
> drag and drop an image from your files on your computer to the Uploads area of the left toolbar > once the image has loaded to the Canva uploads, just drag and drop the image to the placeholder image area in your document > you can adjust the image or apply a filter to the image by using the image toolbar at the top.
Changing Icon or Shape Colors
Changing icon or shape colors
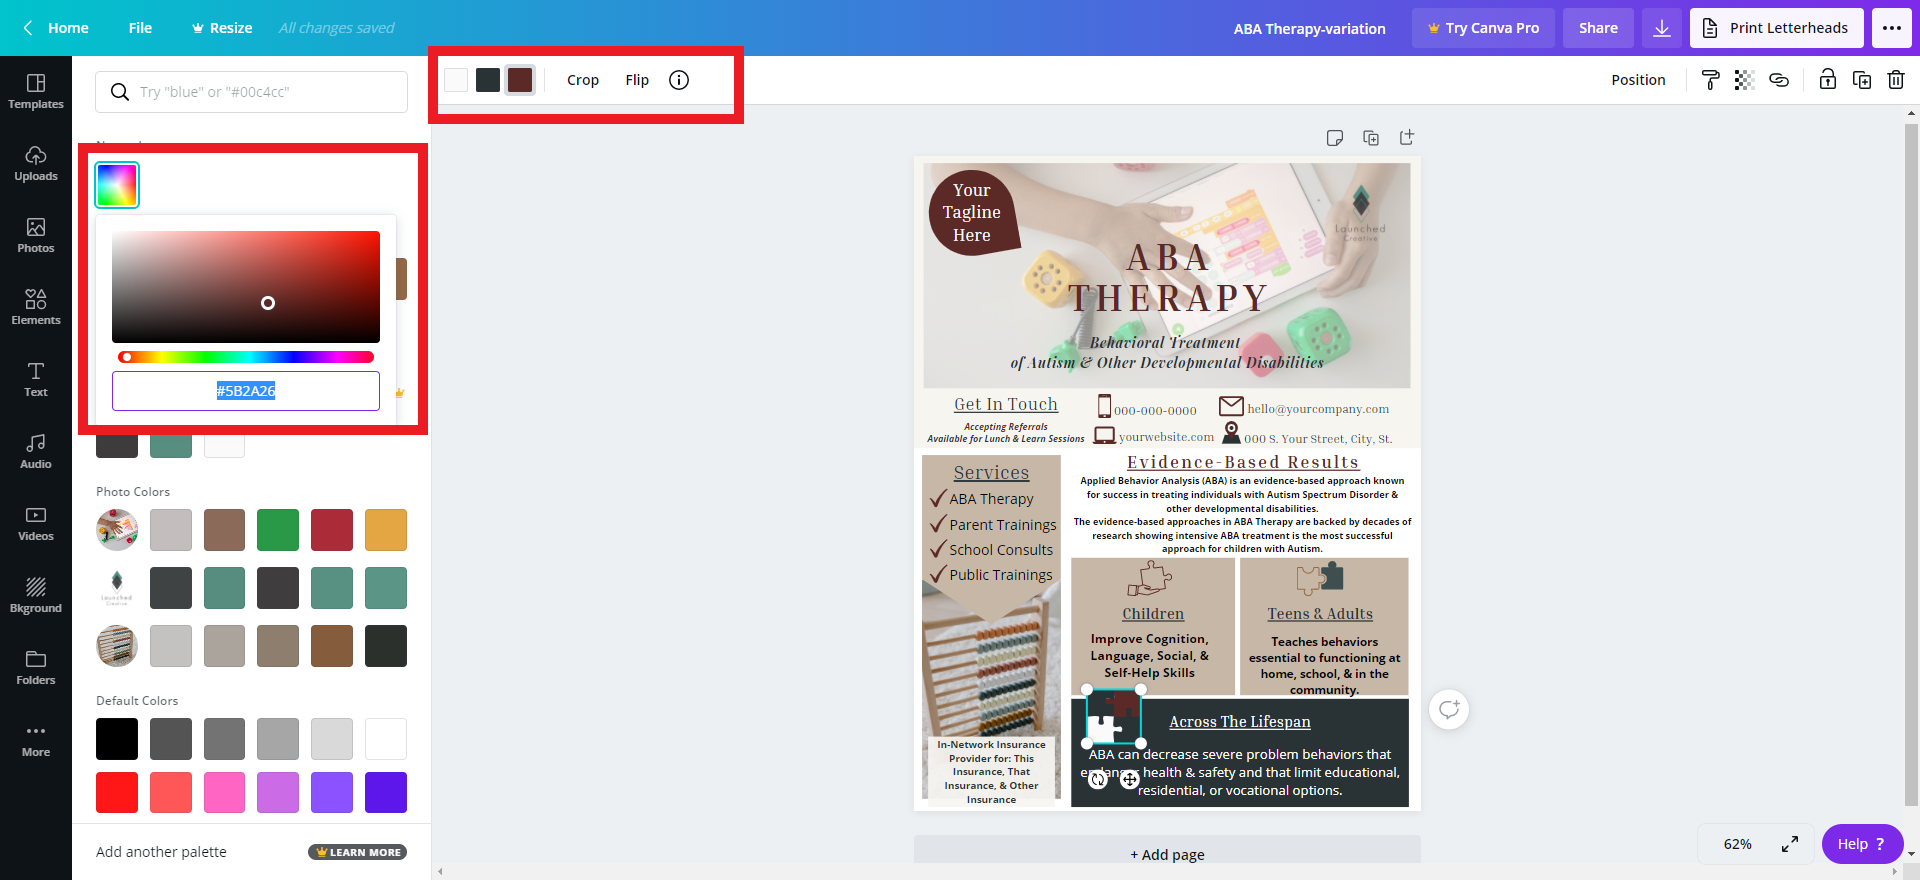
To edit a shape, background, or icon color:
> click the area you’d like to adjust > the toolbar at the top will pop up with the set colors of the object or background (some objects will consist of multiple colors) > click the color box in the toolbar you’d like to change > in the left toolbox, colors will appear for you to select, or ifyou’d like to enter a custom color hex code or the color picker, select the rainbow box and the color picker will appear
*For objects consisting of multiple colors: once you’ve changed the colors in one color box, simply select the next color box in the top toolbar to adjust that color repeating the same steps above
Saving & Downloading File
Saving File
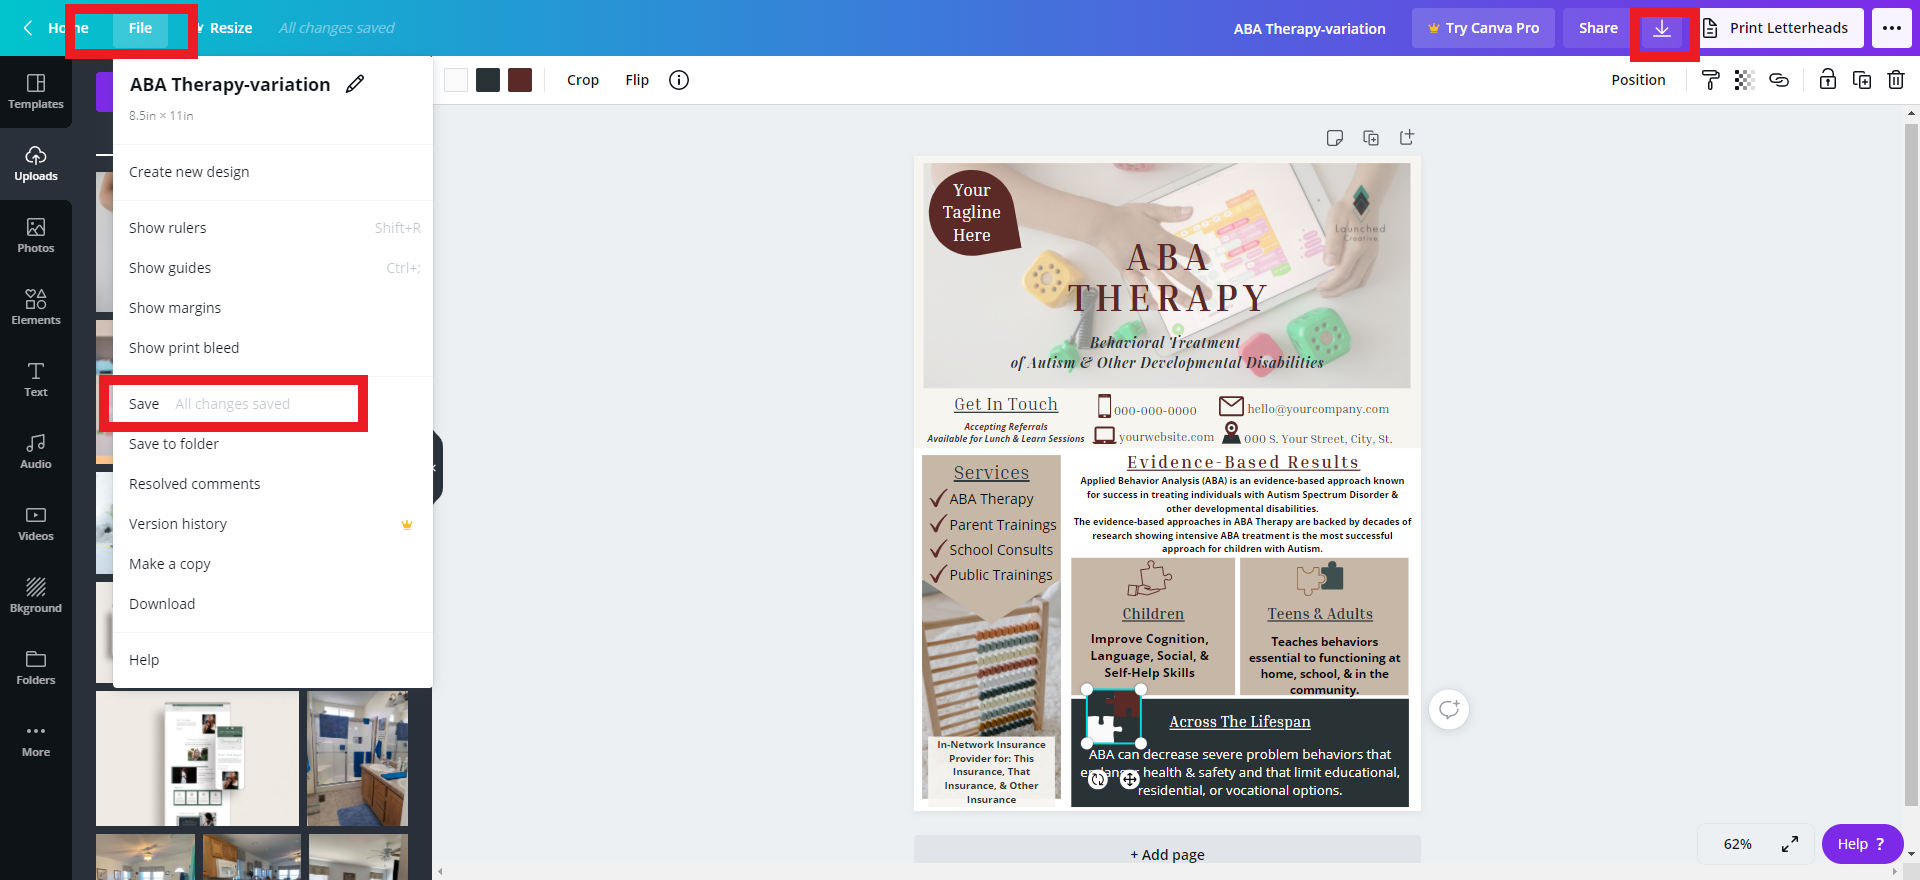
In the top toolbar, click file> save
You can also check the print bleed area by clicking print bleed, or guides/margins by clicking those options in the file area.
Downloading File
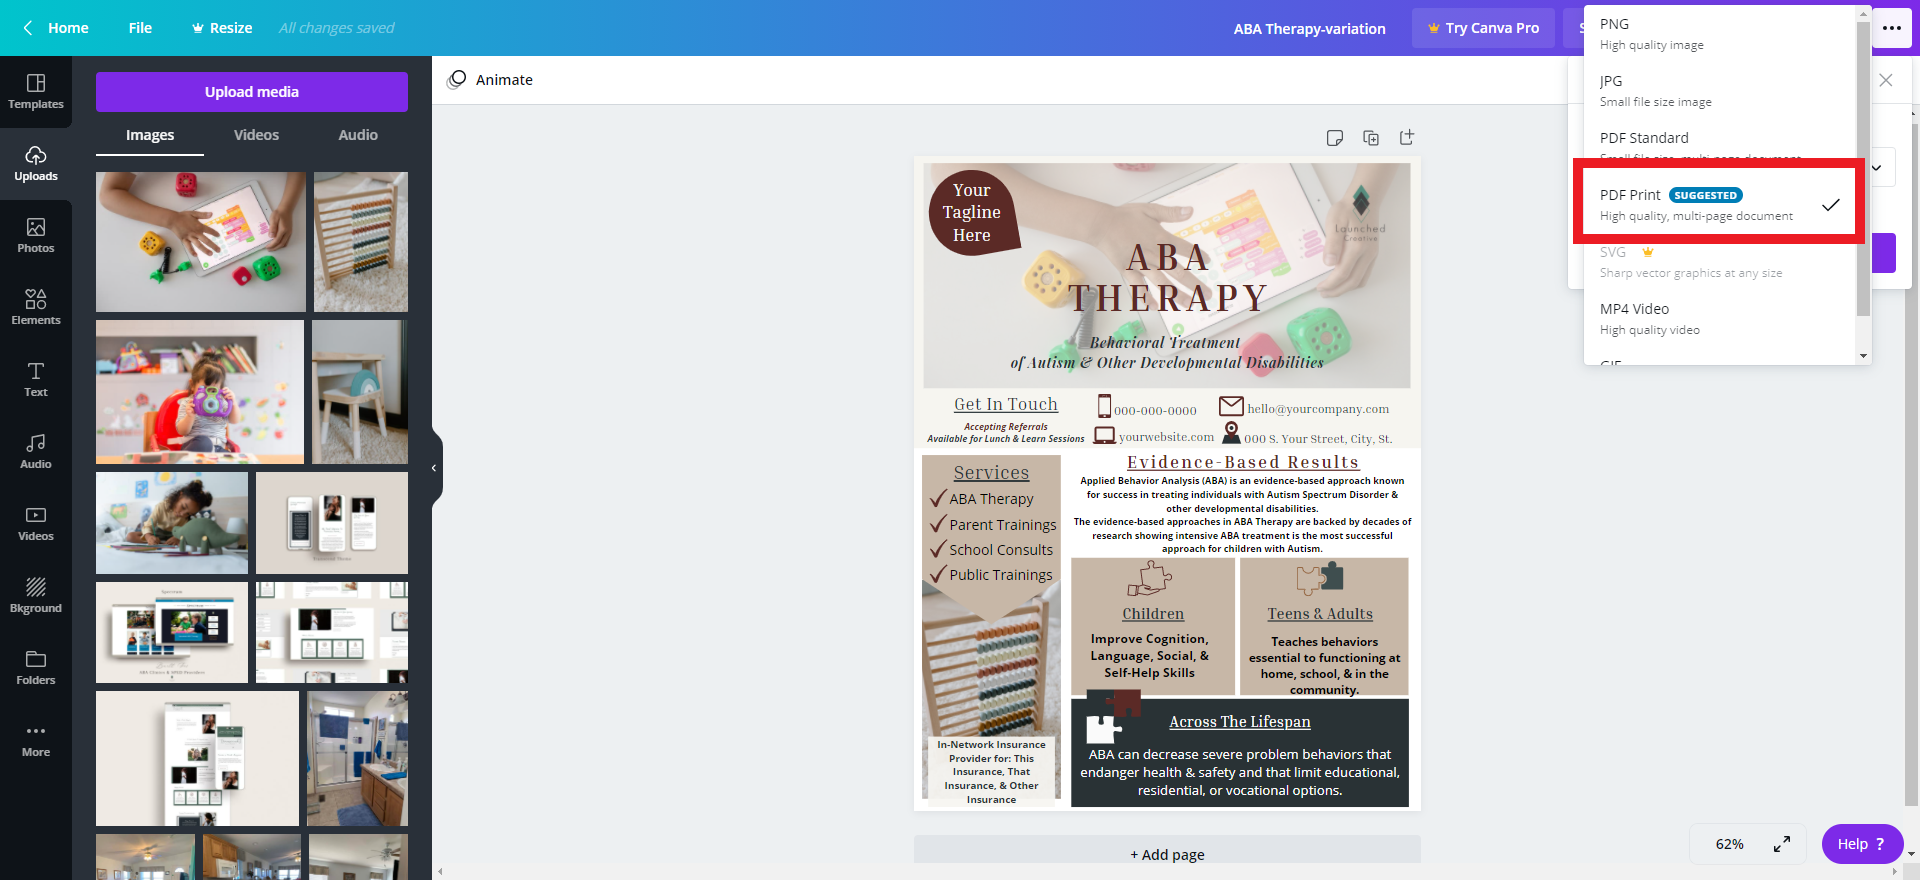
In the top toolbar, click the down arrow icon > save to high quality PDF (or any file type you’d like).
Customizing & Downloading Animated Memes
How to customize animated meme template with new giphy or static image & how to download it as an animated meme or static image.
Customizing Template With New Image (animated or static)
Opening Purchased Template For First Time
Click the link found in your download after purchase > then click “use Template” once you are in Canva. (you must have a canva account to use purchased Template).
Opening Your Templates or Your Saved Designs
Go to Canva.com and click on “your designs”
All designs you’ve saved or worked on will show up in this area. To edit a template, simply click on the desired template.
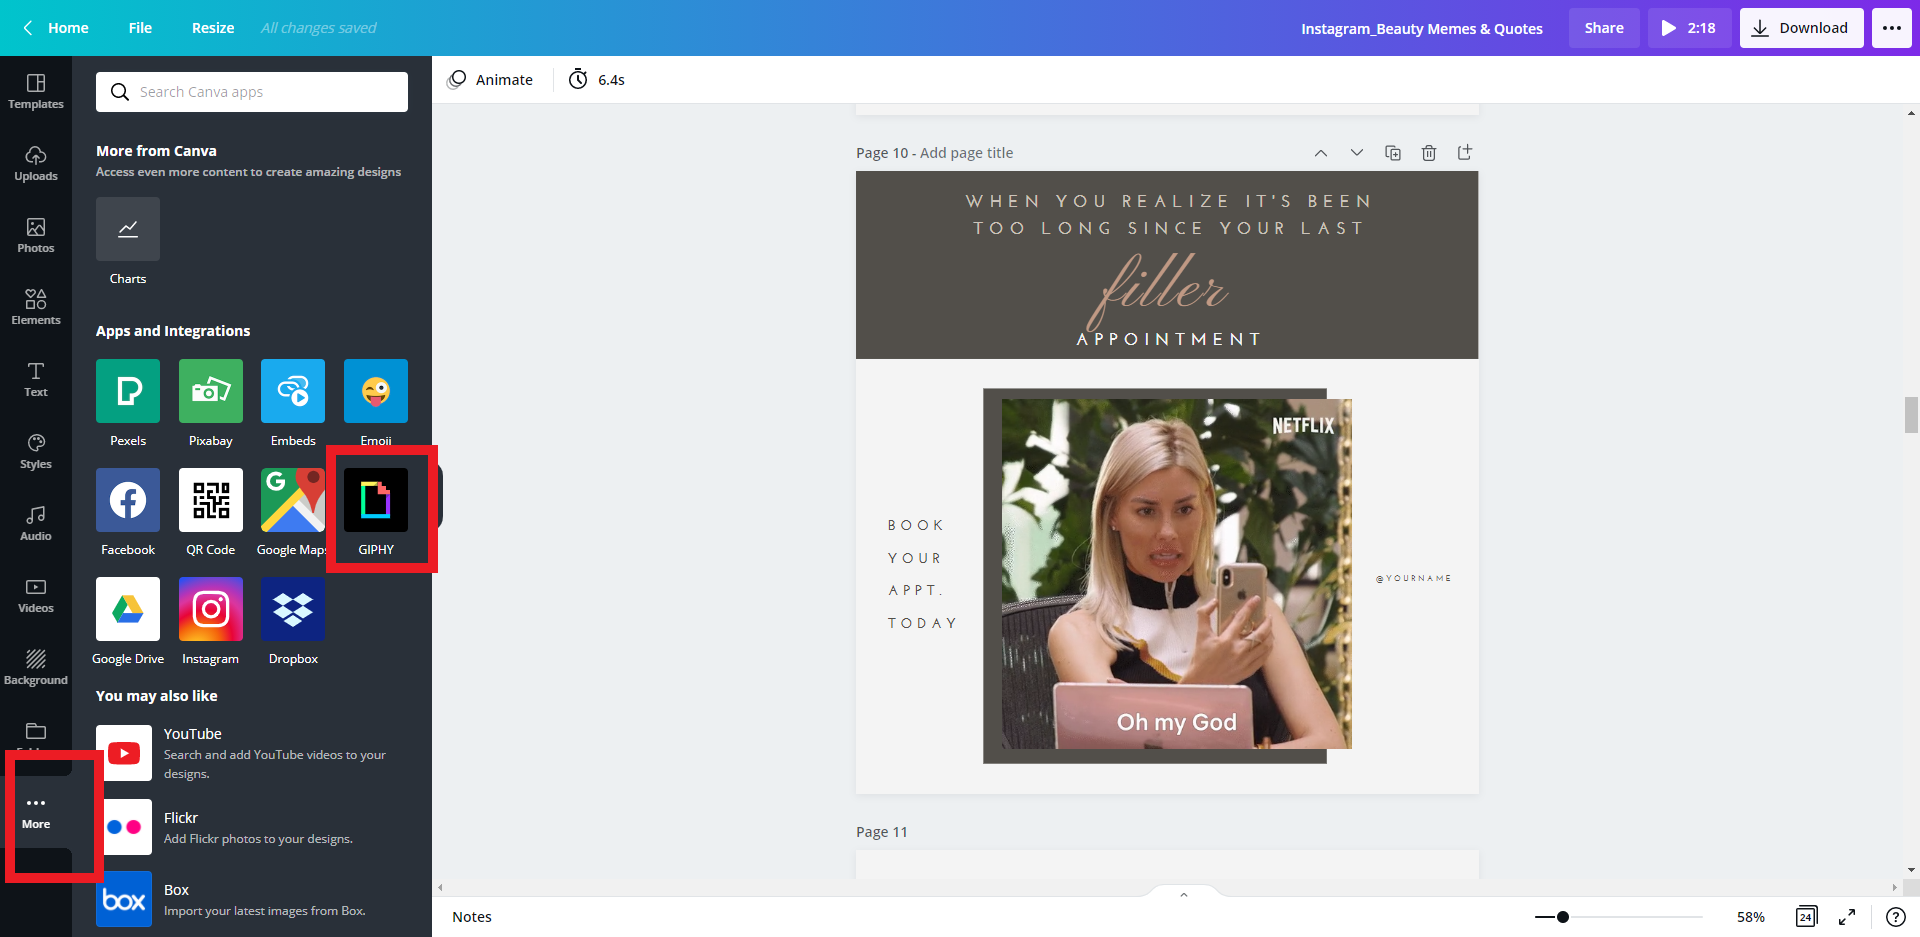
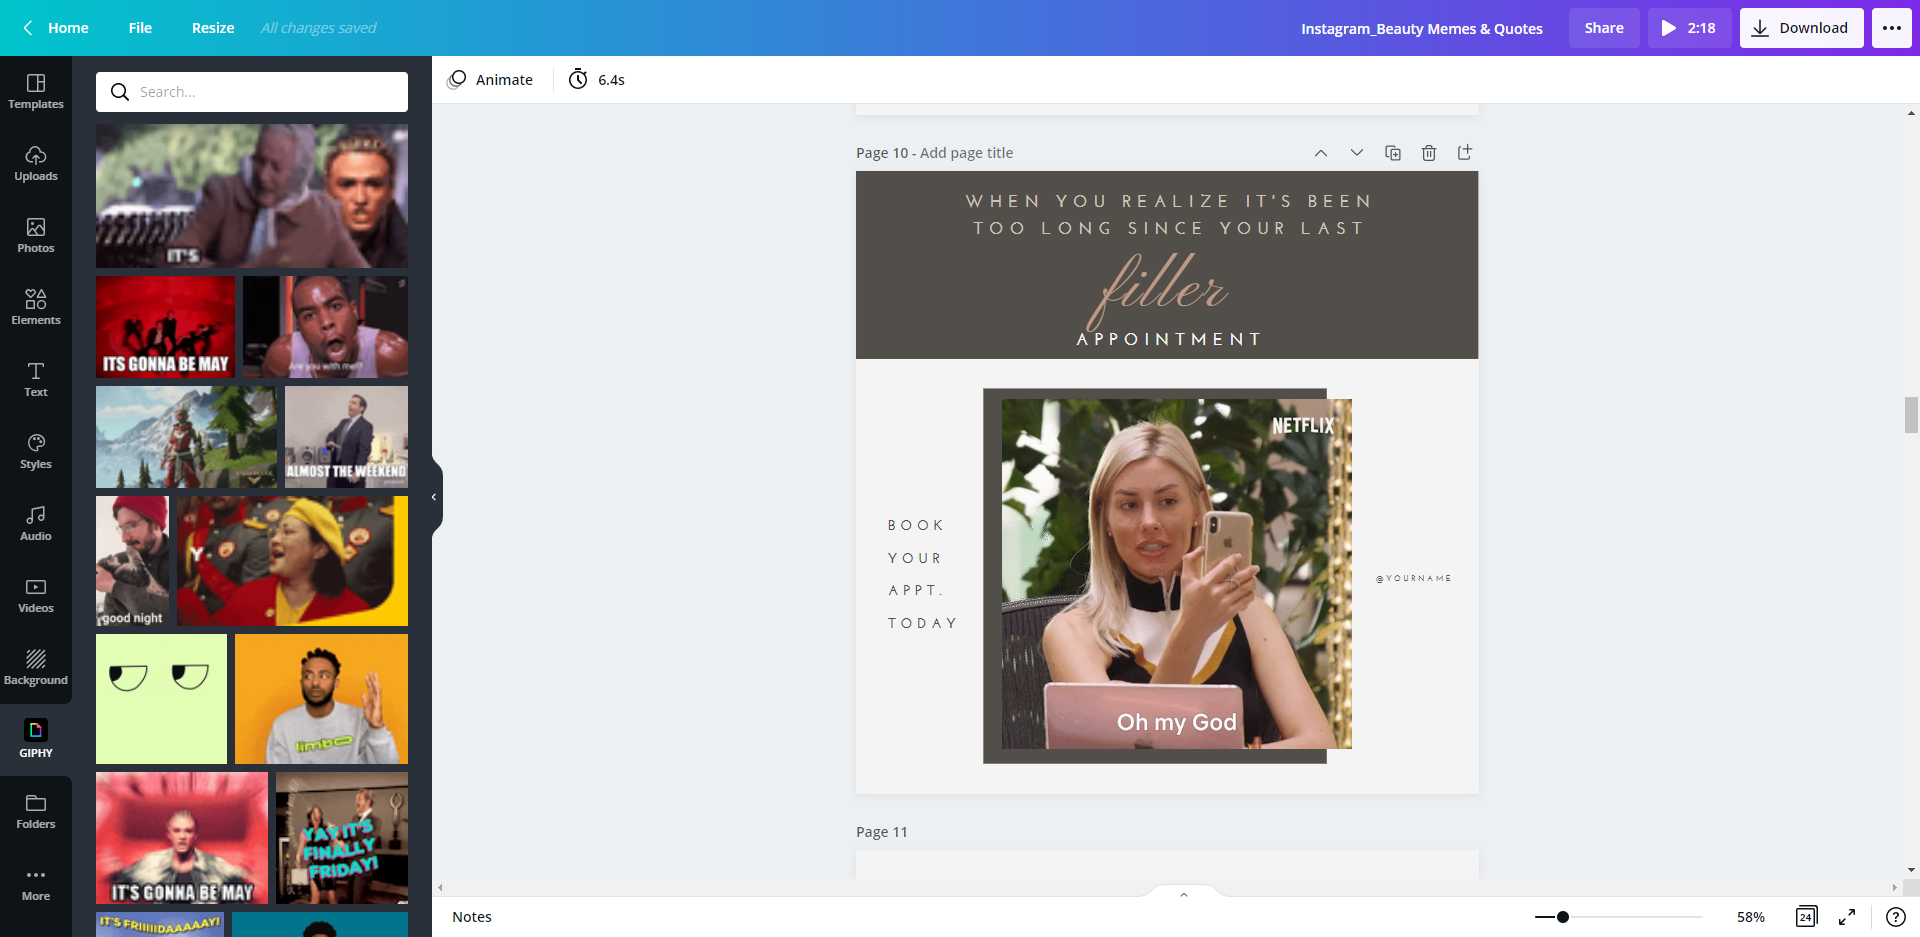
Customizing Template Image or Giphy
To change out the animated image (from giphy), simply:
Click the “more” button on the left toolbar while in the Canva template > Click “giphy” app > type your search into the search bar to find the new giphy animated image you want to replace the current image with > click to select > resize as needed in space > delete old animated image
To change out the animated image with static image:
Delete the existing animated image > select the “photos” option on left toolbar to find a new static image > click to select > resize as needed
or
Drag and drop your image to the uploads area > click to select image into template > resize as needed
Downloading Template (animated or static)
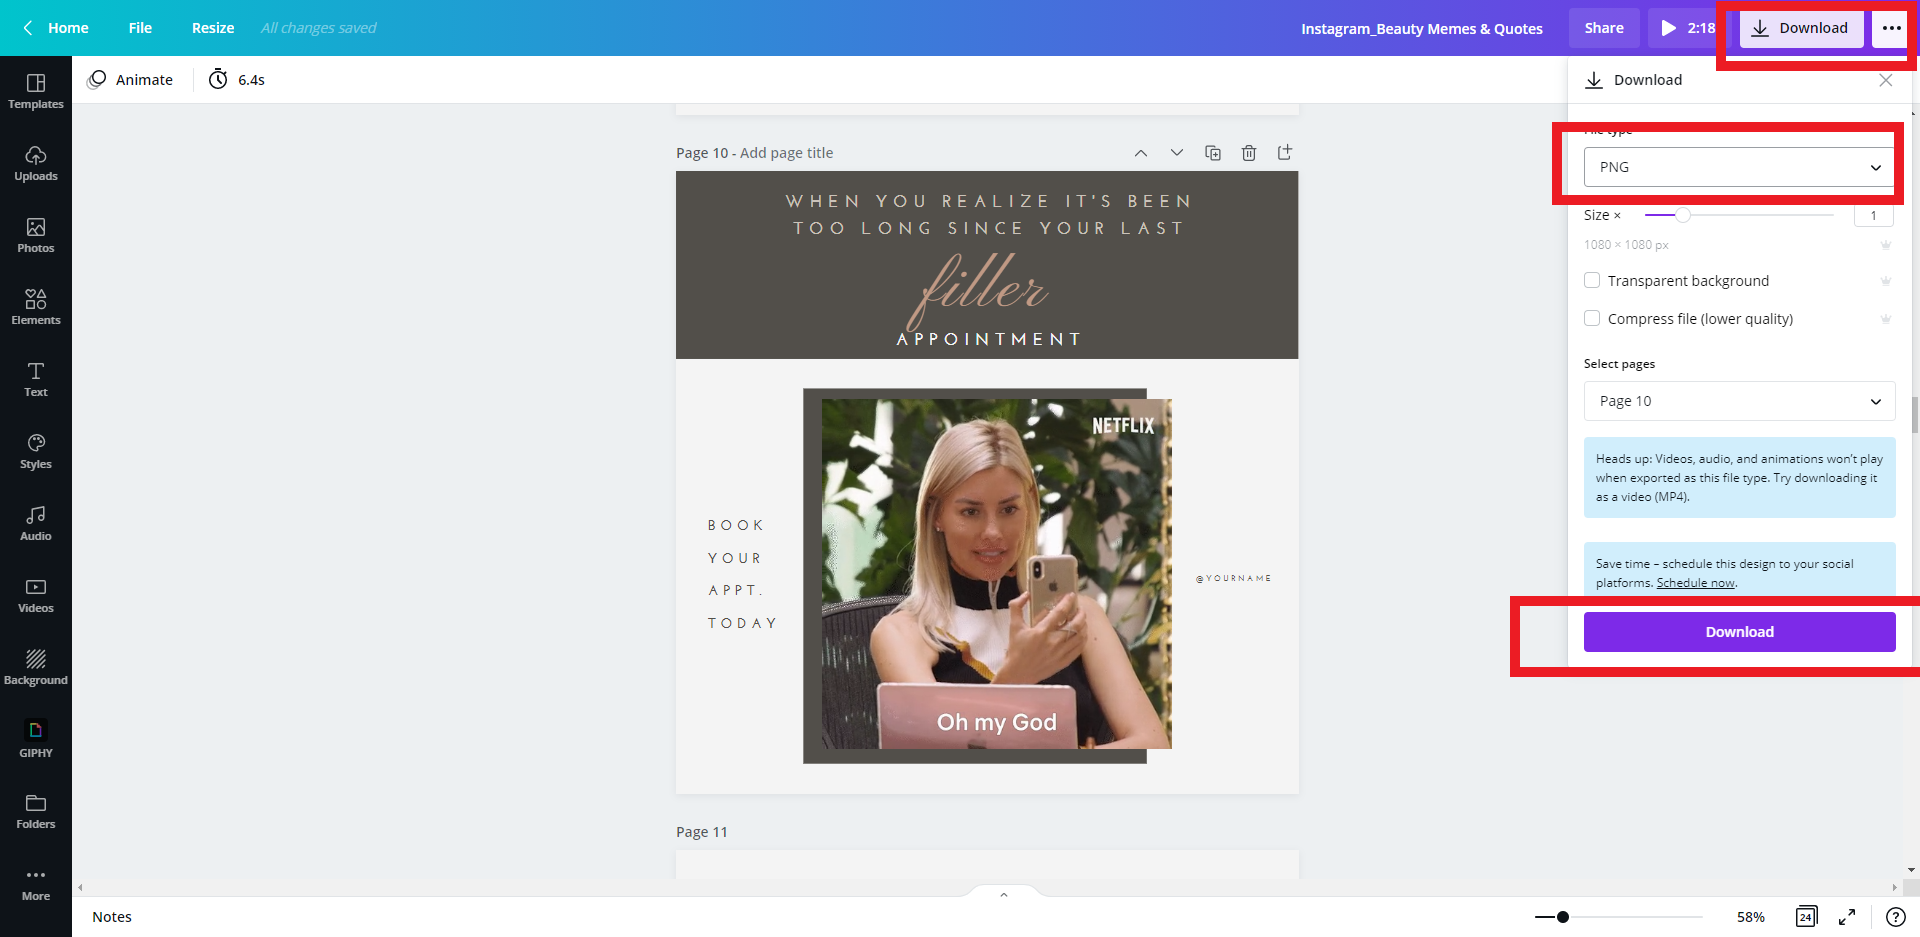
Downloading Template- Animated
To download your new animated meme template, click “download” in the top right corner of your canva template > select “mp4” as your file type > download video > upload to your social media
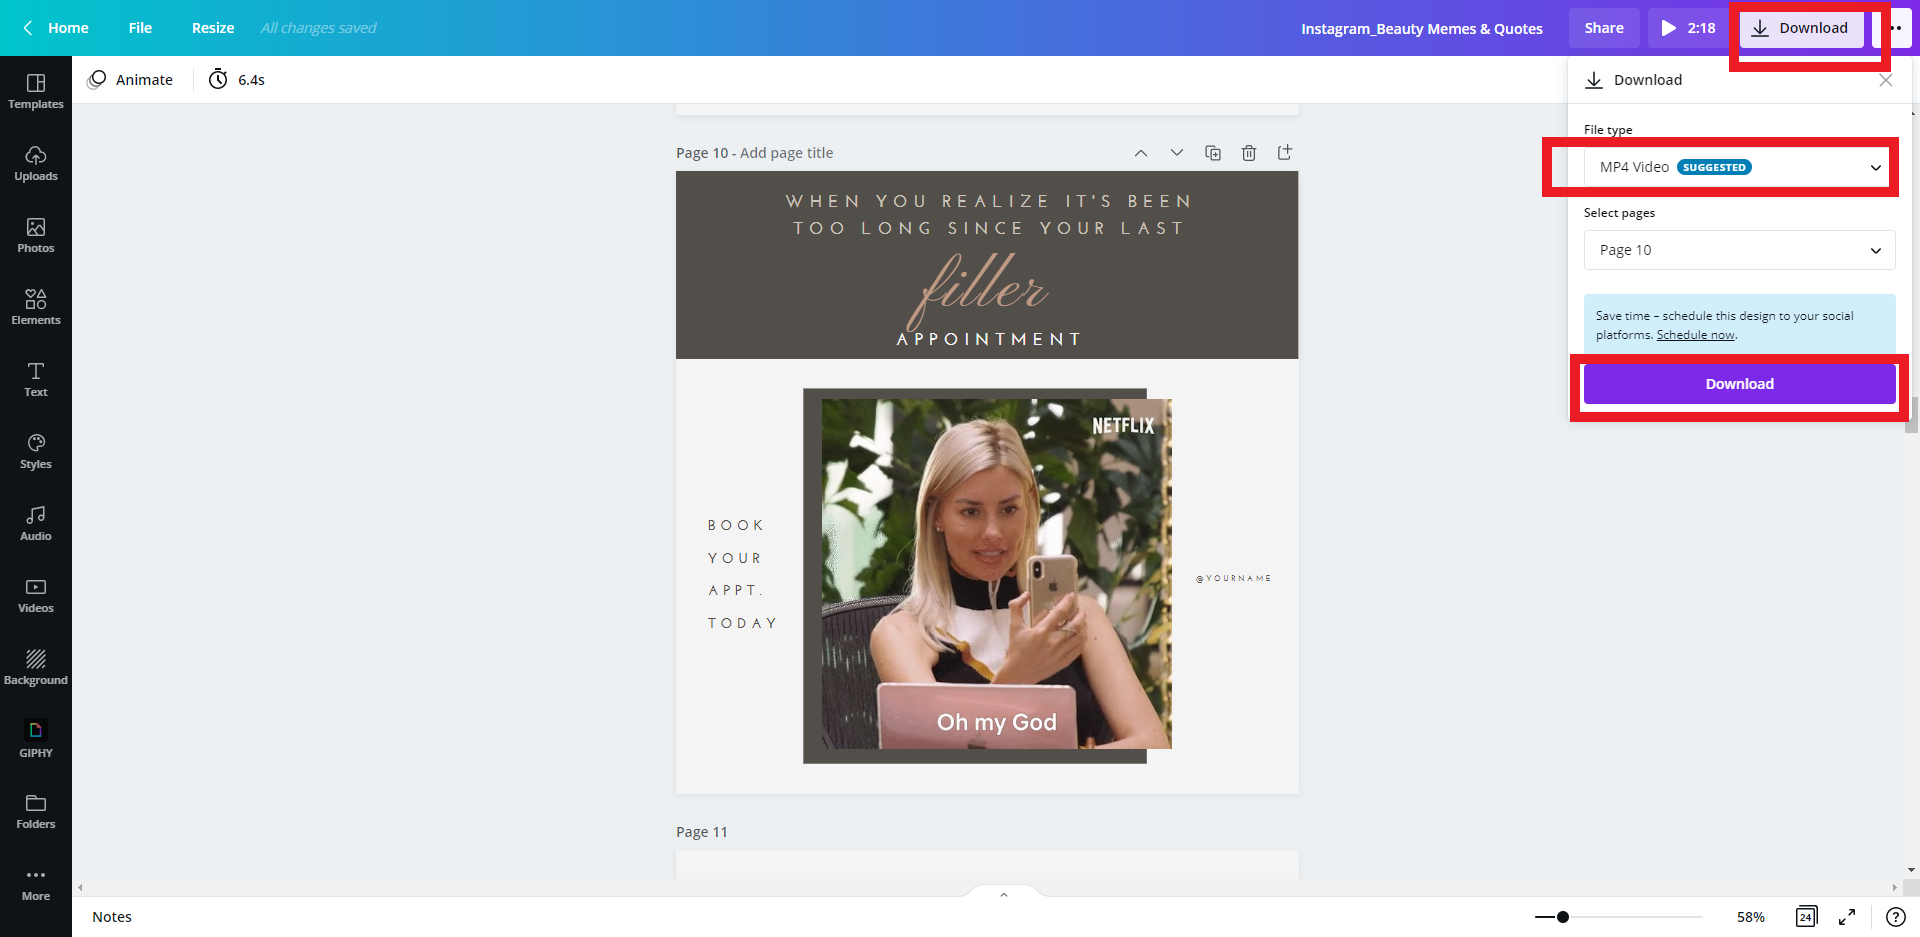
Downloading Template- Static
To download your new meme template as a static image, click “download” in the top right corner of your canva template > select “png” or “jpg” as your file type > download > upload to your social media
Printing or Publishing Canva Cards (Aftercare or Promo Flyers)
How To Print or Publish Canva Template
To learn how to publish as a Canva Website, please click here.
For Canva Basics, please click here.
How To Access Hidden Layers In Canva
Accessing Hidden Layers
Sometimes there are layers that aren’t accessible by simply clicking on them because they are hidden below a bigger top layer. To access these “hidden” layers:
Click top layer of area you want to edit > select “position” in top right corner > select “backwards” until you are able to access to hidden layer> make customization changes. To put the hidden layer back to it’s original position, select the previously hidden layer > click “position” > click “backwards” until it is layered behind the original top layer.
How To Print Using Canva or 3rd Party Printer
Printing at Home/Office or with 3rd Party Service:
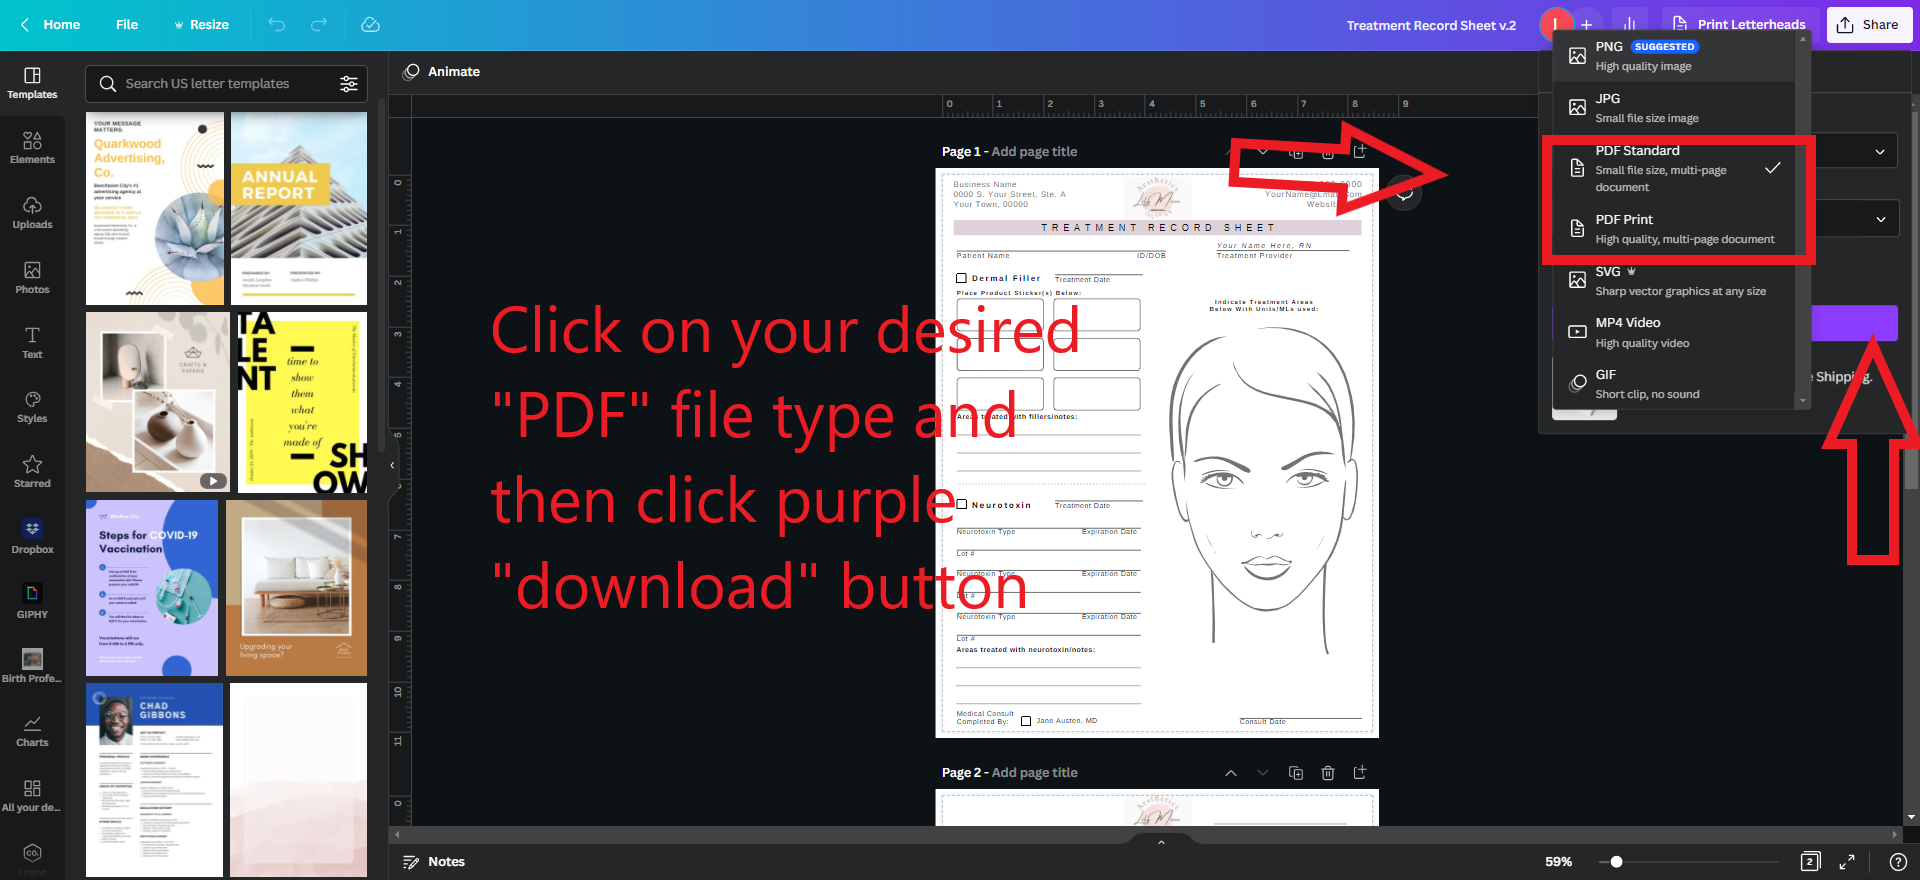
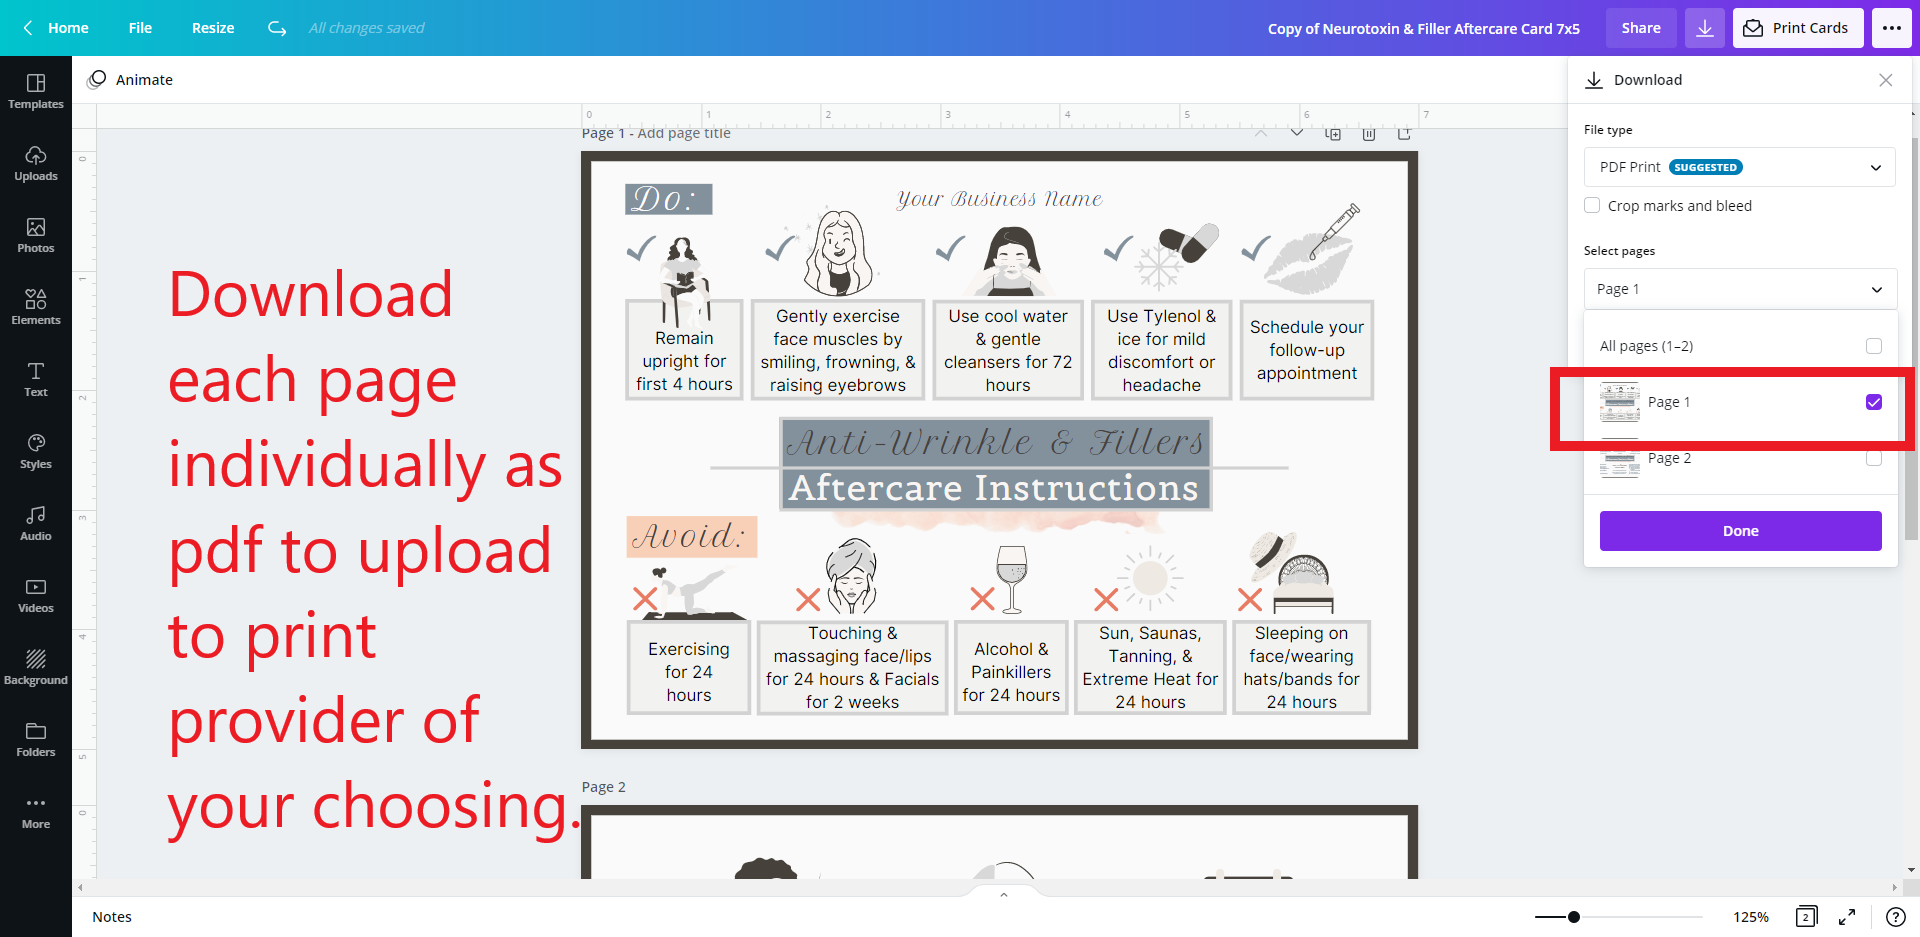
To print at home, office, or with a 3rd party print service, you’ll need to download the design as a pdf to print from home/office or to upload to print service of your choice.
To download your completed design as a pdf :
Click “Share” button at top right corner > click “download” > “pdf for print” or “pdf standard” > select each page individually to download (if uploading to 3rd party print service) > repeat these steps until each page has been downloaded > upload to desired print service
*PDF for print is a higher quality version. It will take more ink to print. Use this option if sending ti 3rd party printer
*PDF Standard is a smaller file size and is great for digital use or printing from home or office
*Each printing service has its own scaling criteria and bleed/crop. Please be sure to check print proof prior to printing to be sure your template is printing to your desire. Some printing services crop off the decorative edging frame, if this happens, simply adjust the edging within the Canva template, redownload, and upload again or “scale to fit” within printer service website.

Printing PDF pages seperately for upload to 3rd party printer
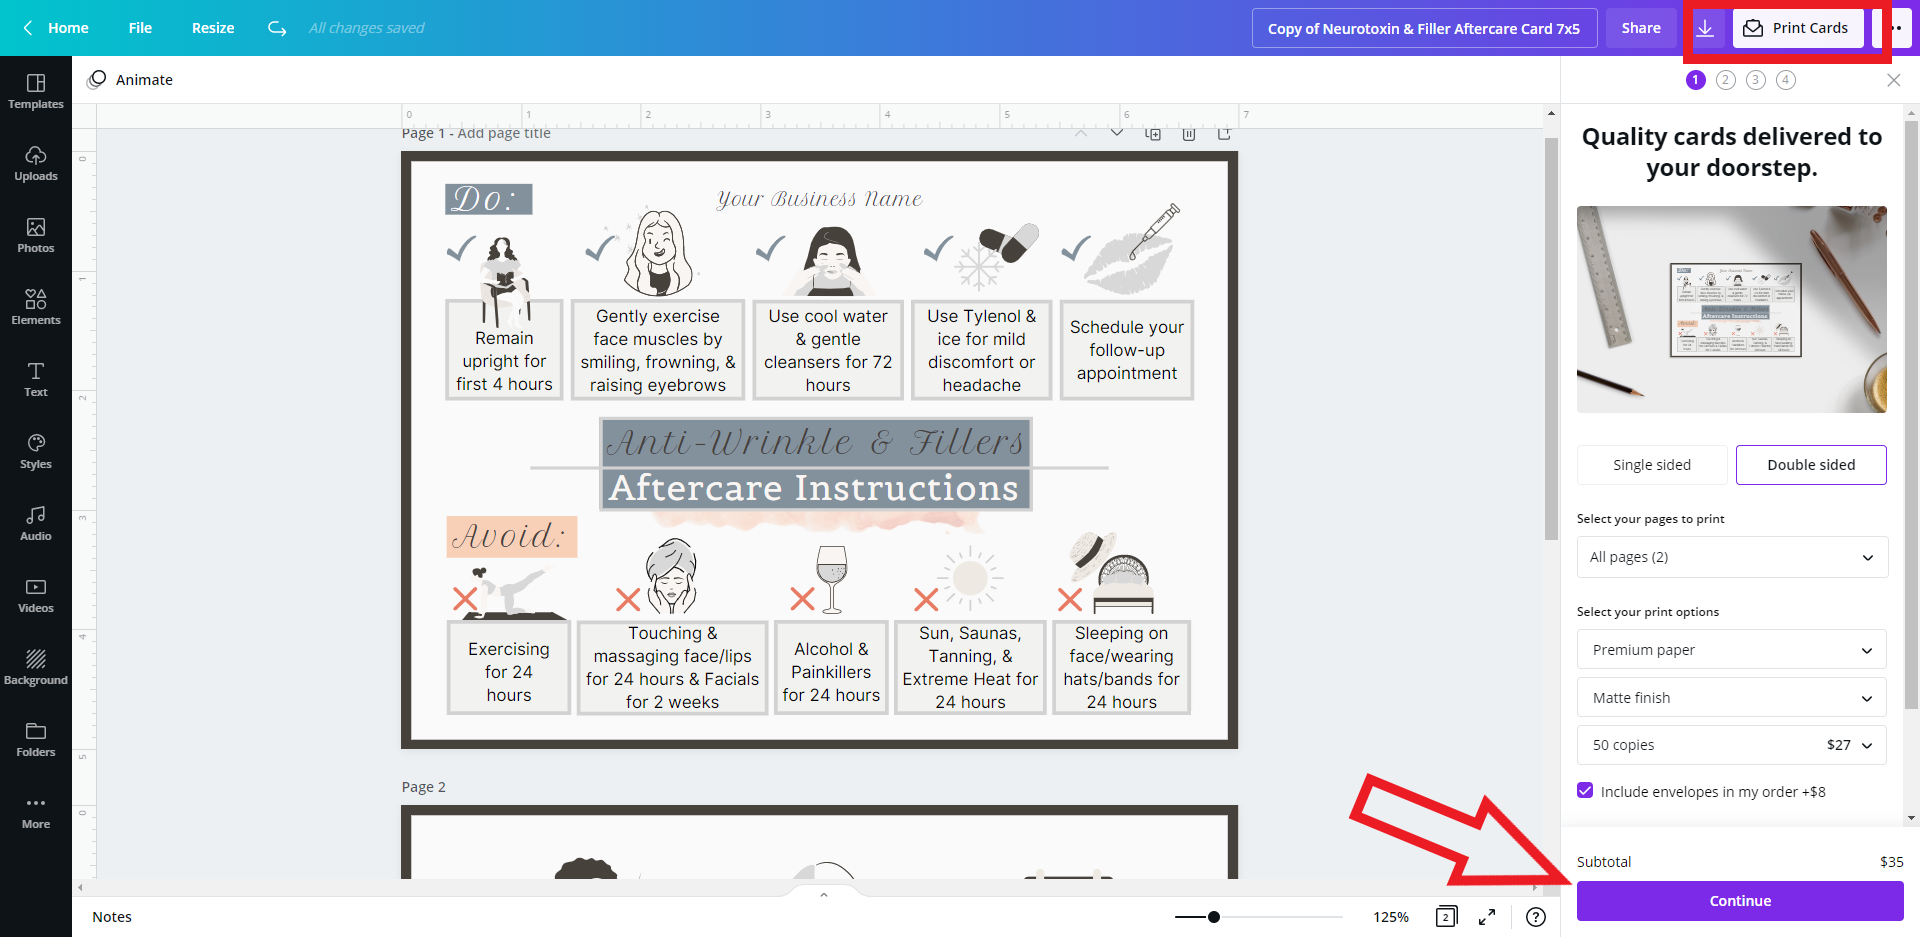
Printing With Canva (additional fees will apply)
*This option is the least cost effective method of printing. Canva print services are on the higher end in terms of pricing. You do not have to use Canva as your printing provider.
Canva offers a mail print service for their designs. Here is how to use it:
Click “print cards” at the top (or letterheads, depending on size of the design) > select desired options > click continue > on page 2 of the ordering options, there are 4 tabs at the top of the order window where you can check print area and adjust to scale for printing, check “red area”, check image quality, and on tab 4, you can download a proof of your print. Be sure to check your printing area closely to be sure the design fits within print space. Continue to payment.
Editing Canva Flyer or Client Form/Treatment Record Template
Overview on how to update printable flyer or treatment templates.
Opening Purchased or Saved Templates
Opening Purchased Template For First Time
Click the link found in your download after purchase > then click “use Template” once you are in Canva. (you must have a canva account to use purchased Template).
Opening Your Templates or Your Saved Designs
Go to Canva.com and click on “your designs”
All designs you’ve saved or worked on will show up in this area. To edit a template, simply click on the desired template.
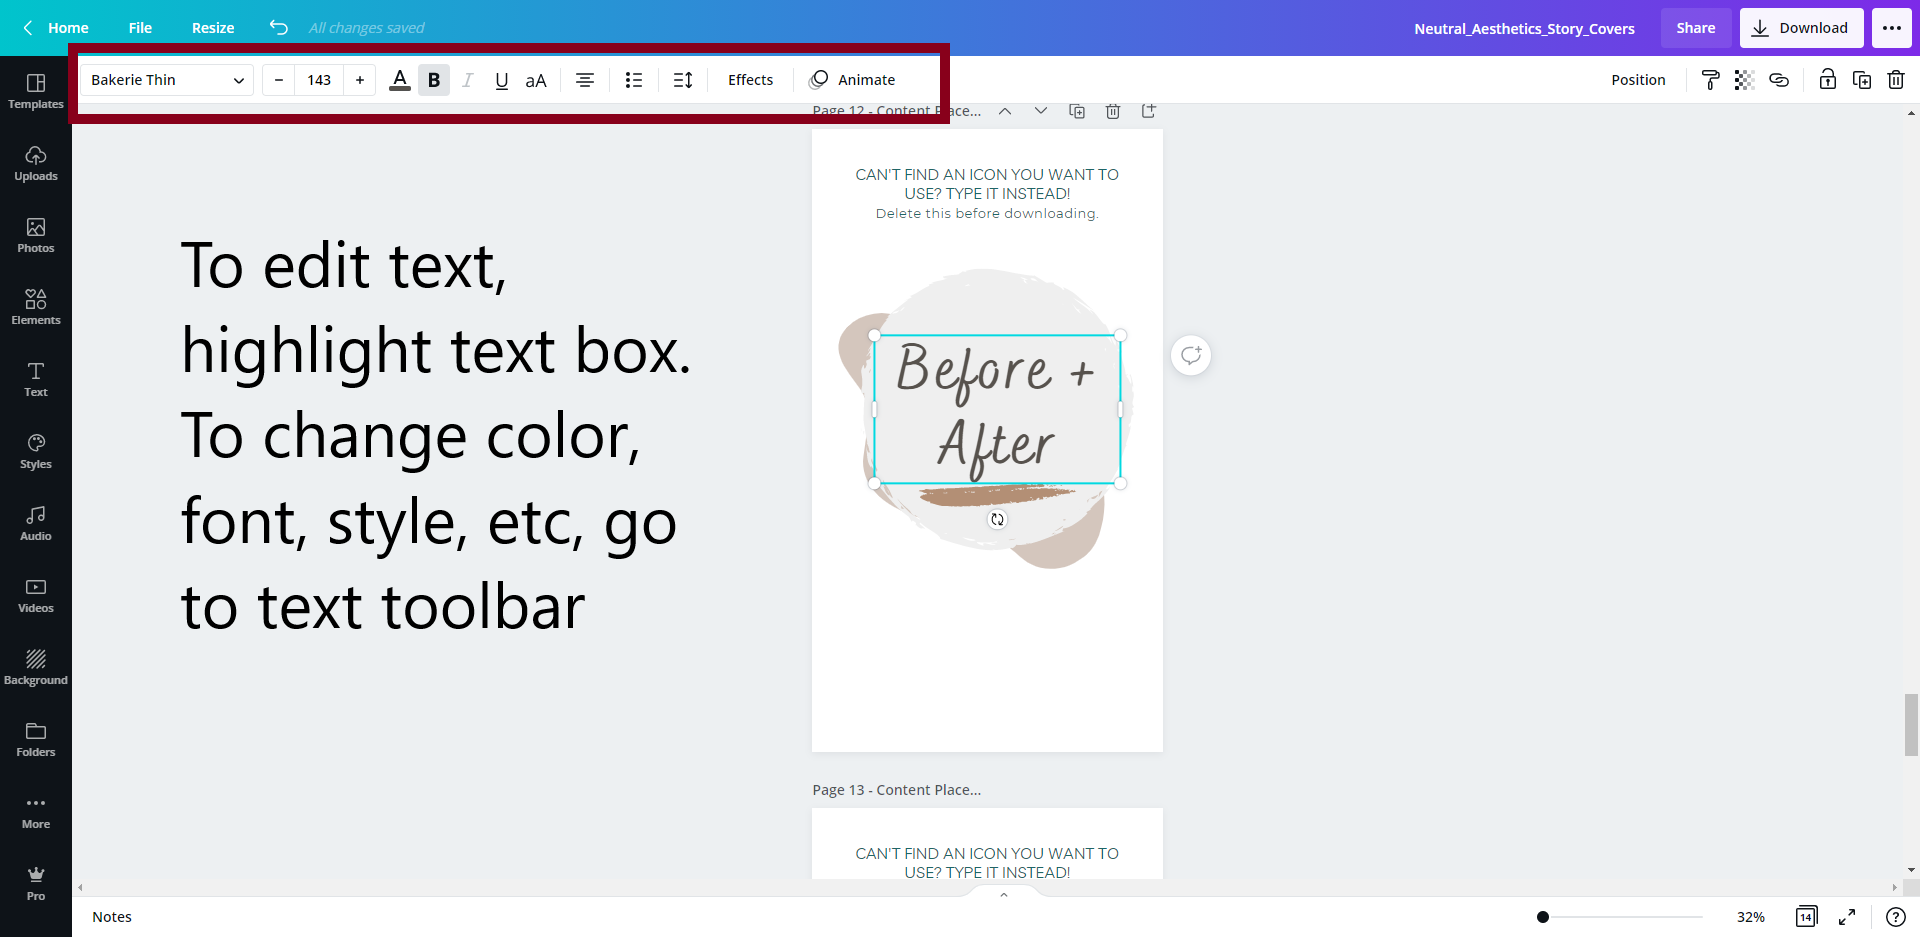
Change Placeholder Text & Styles
Changing placeholder text content & styles
Once you have a template open, simply click each text box area to adjust styles and replace content. Repeat for each text box.
Resizing and Ungrouping Text Boxes
Ungrouping Text Boxes
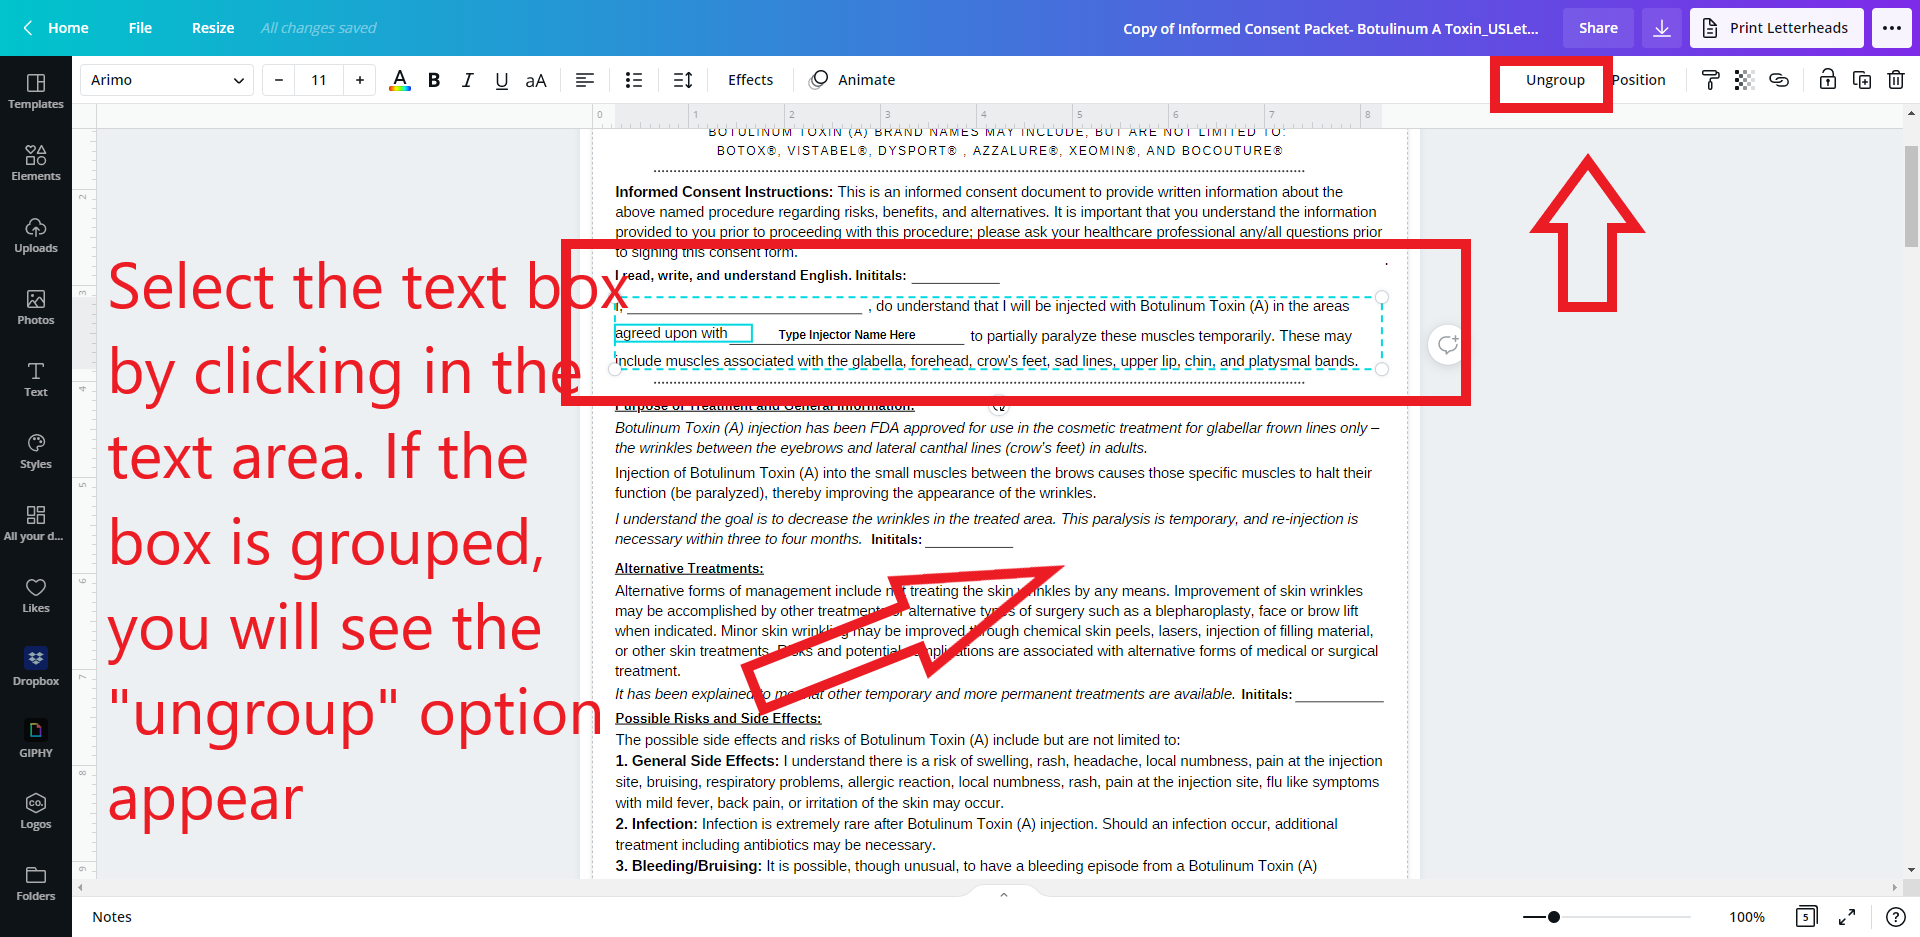
To ungroup a text box or set of text boxes, highlight the area you’d like to ungroup. If the boxes are part of a group, the option to ungroup will appear. Click “ungroup” to ungroup the boxes.

Once the boxes are ungrouped, you will be able to see each individual text box or element highlight in blue. Select the desired box you’d like to edit.
To group boxes or elements back together, hold down the shift key and while holding down the shift key, left-click to select each item you’d like to group together, then click “group”.
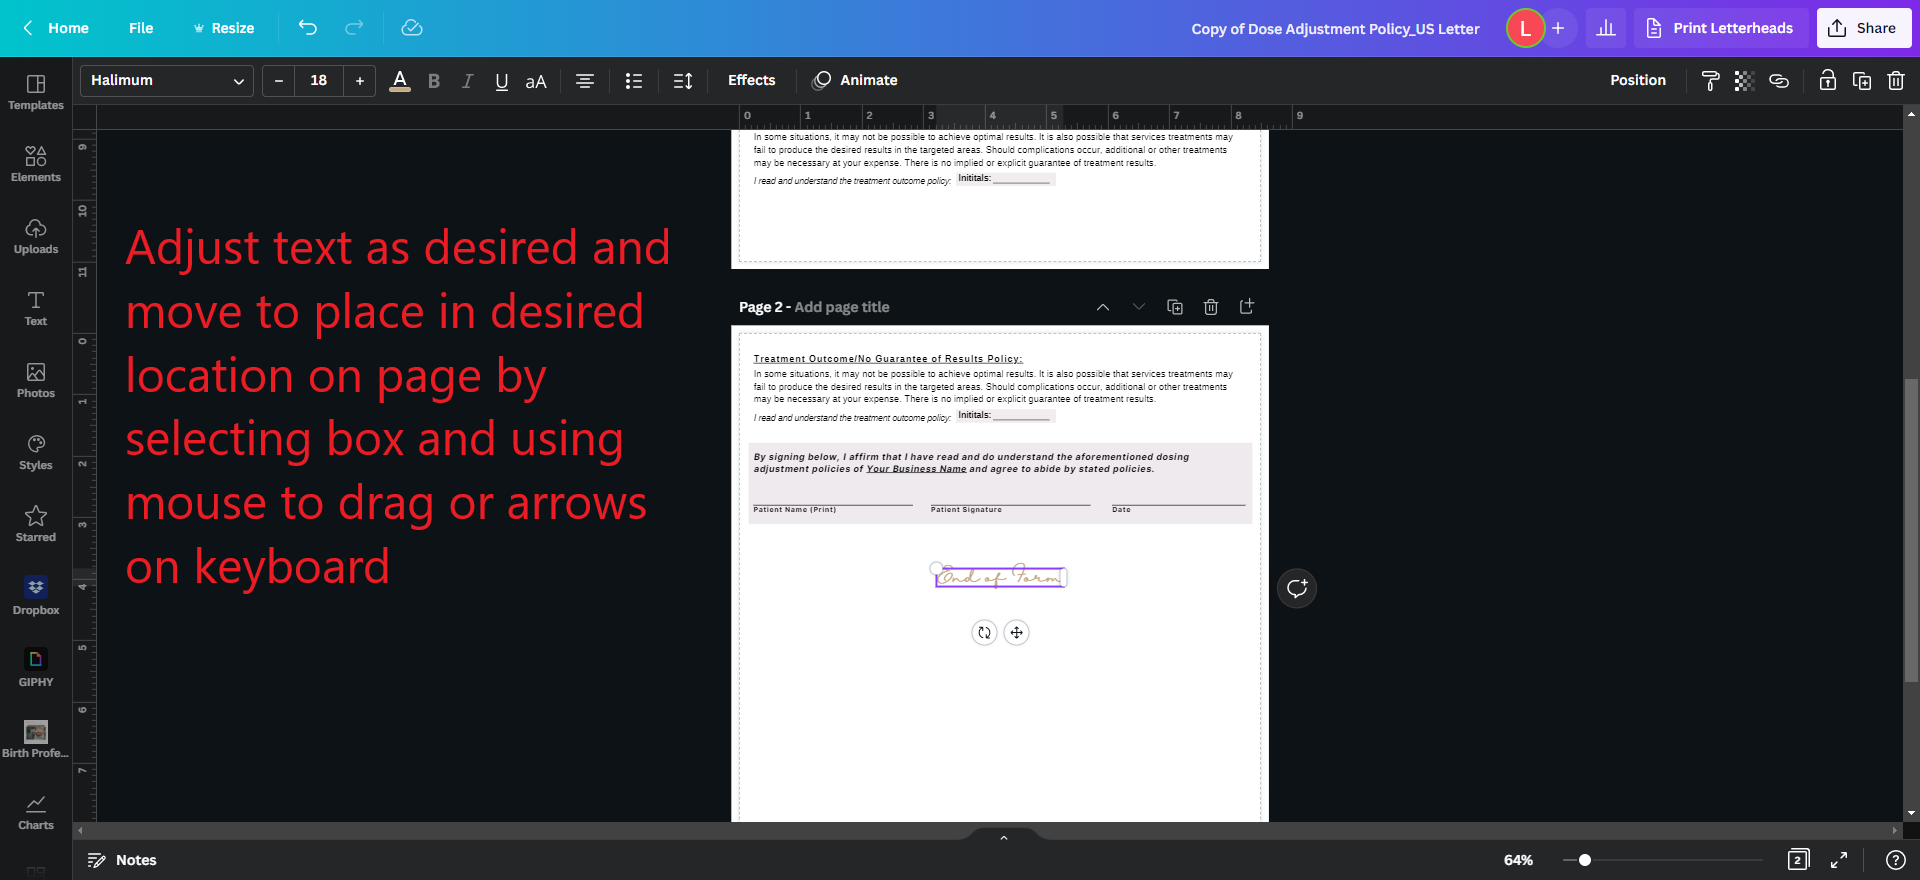
Resizing and Moving Text Boxes
To resize a text box, click the desired box and drag the bar left or right to adjust the sizing. You can also shrink or expand the box by dragging the box corner diagonally up or down.
Move the text box by selecting text box and dragging to desired position or using arrow keys to reposition.
Overflowing Text Boxes and New Text Boxes
Overflowing Text Boxes
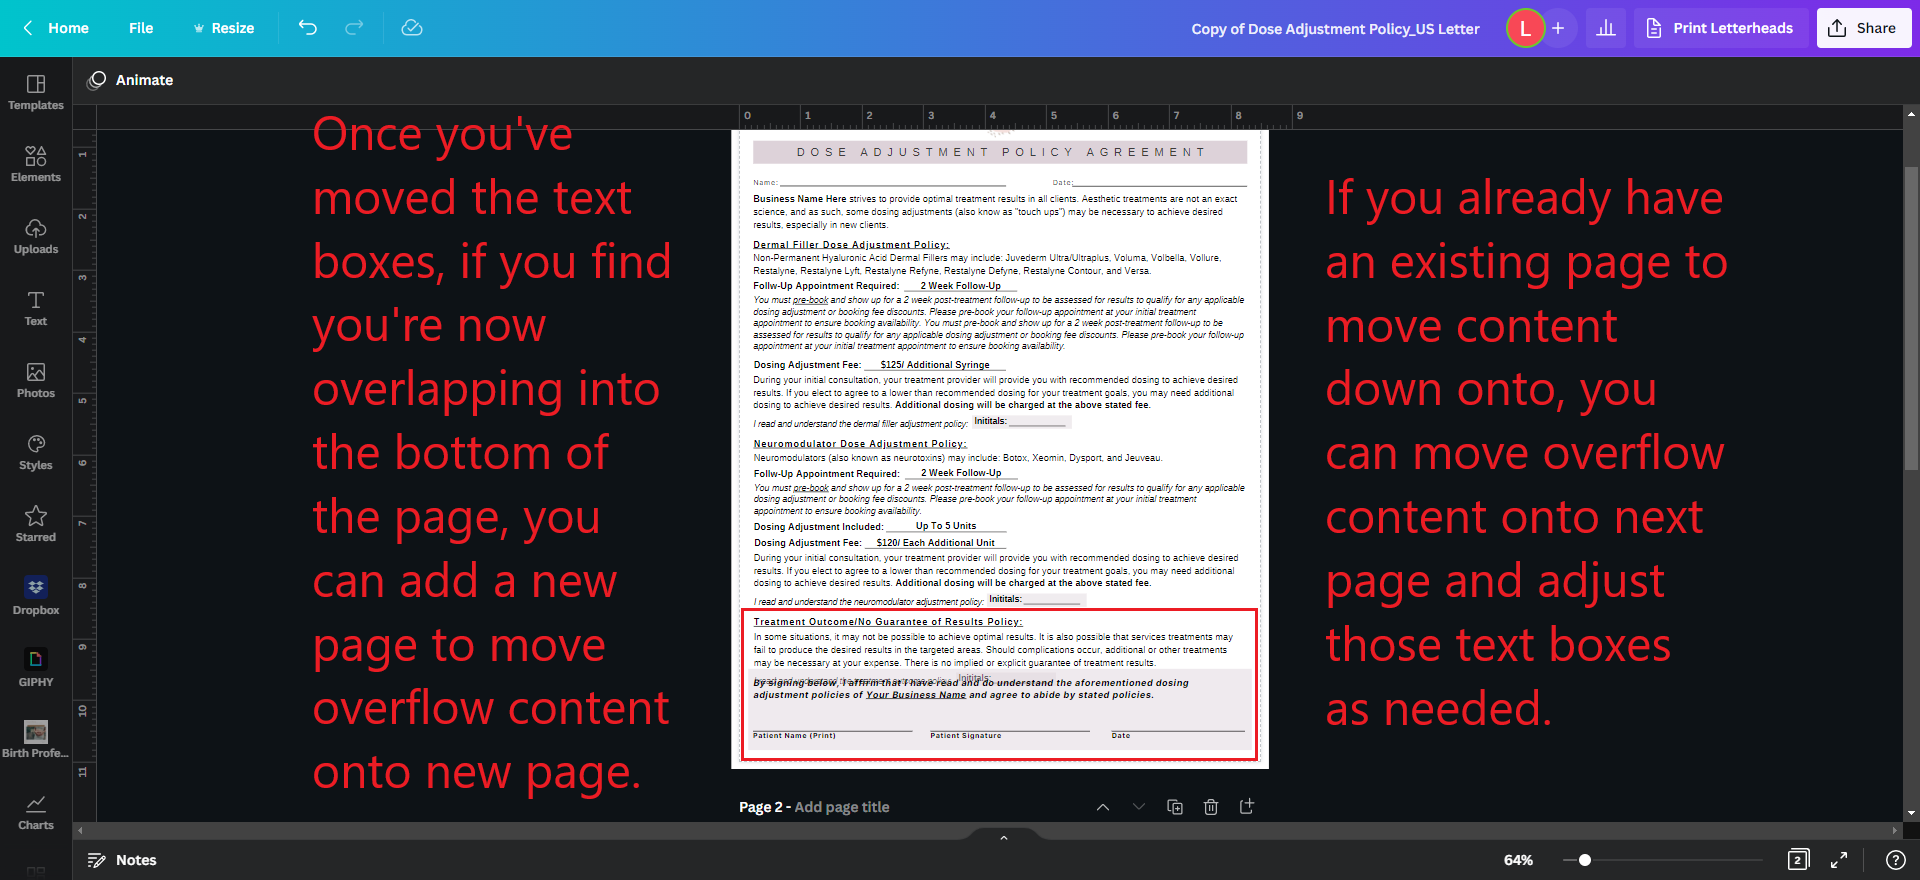
If you need to add additional text to placeholder content within forms and it creates an overflowing text box that bleeds into the text space below it, or off of the page entirely, this is how to resolve the issue:
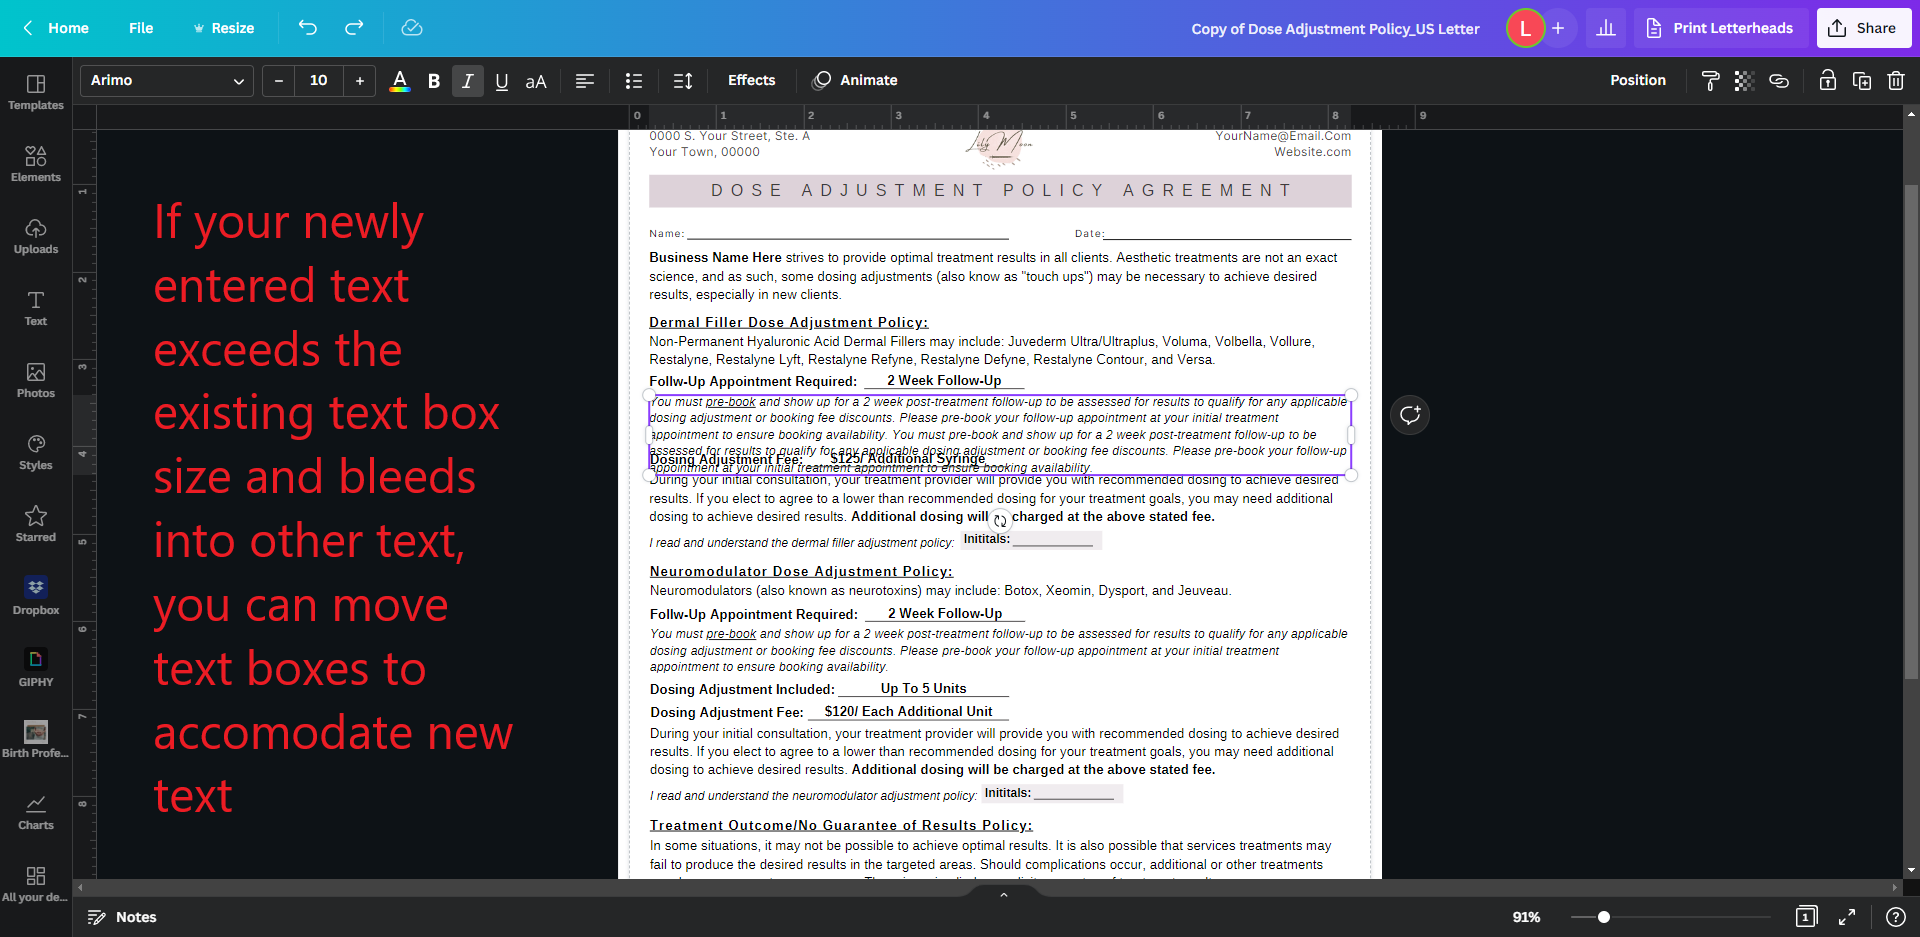
After you have added in your desired text and it is overflowing, you can then:
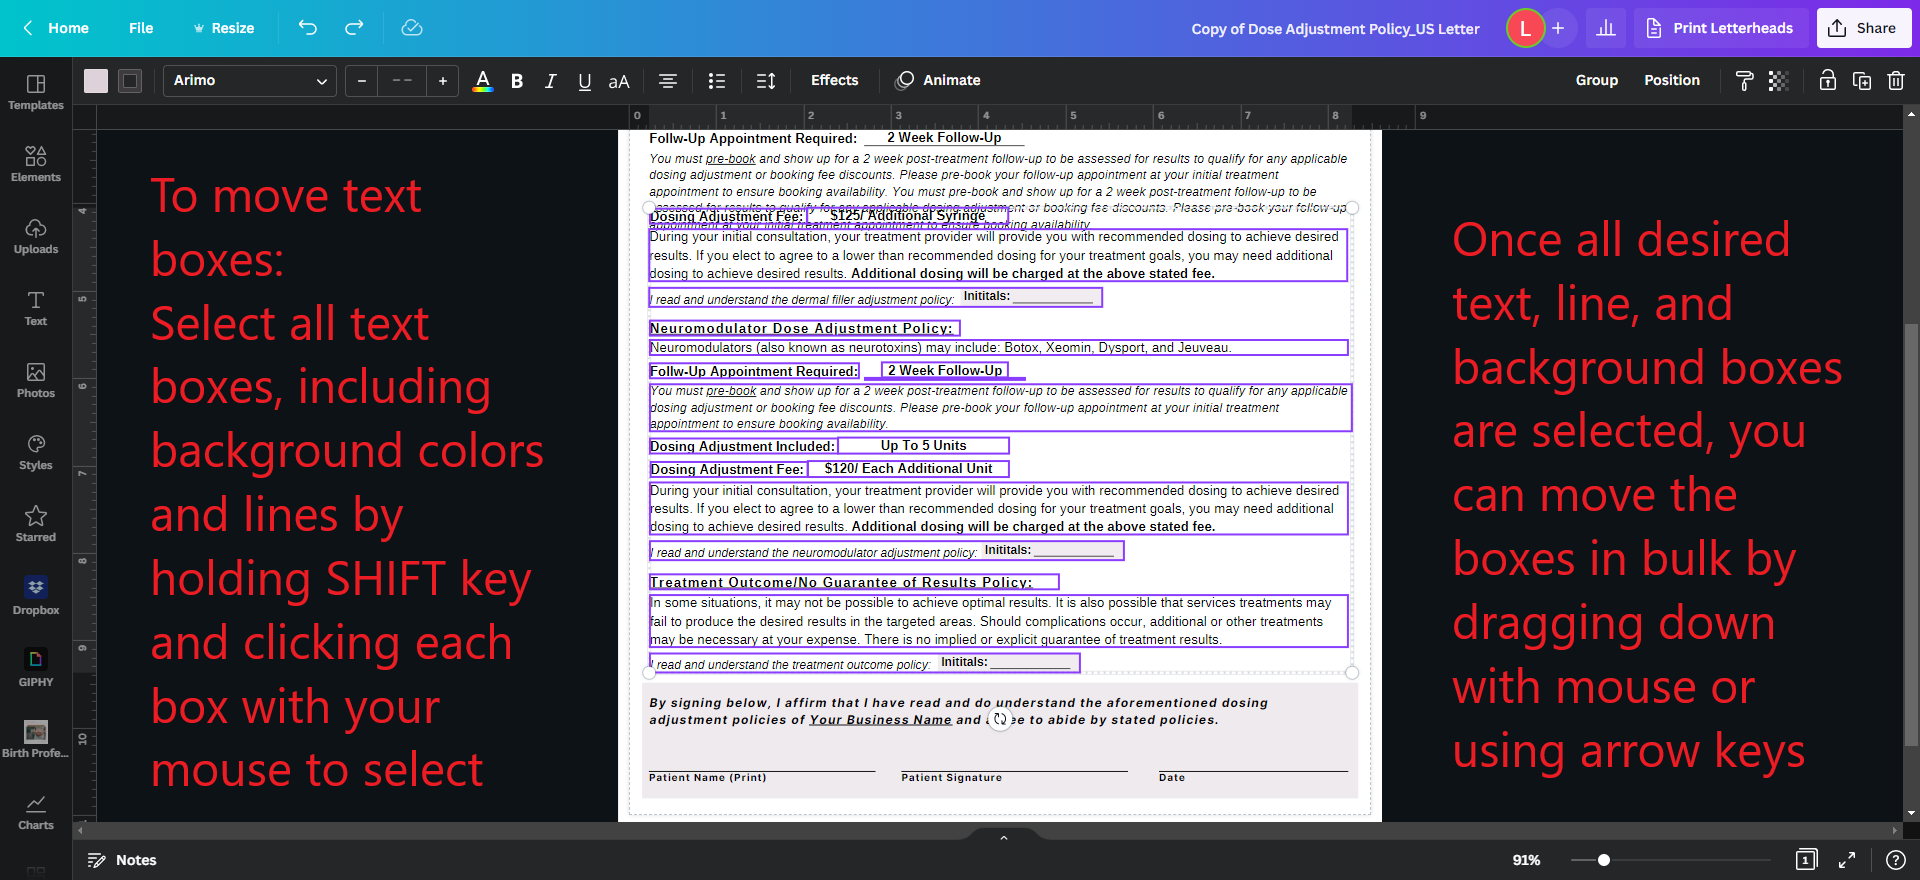
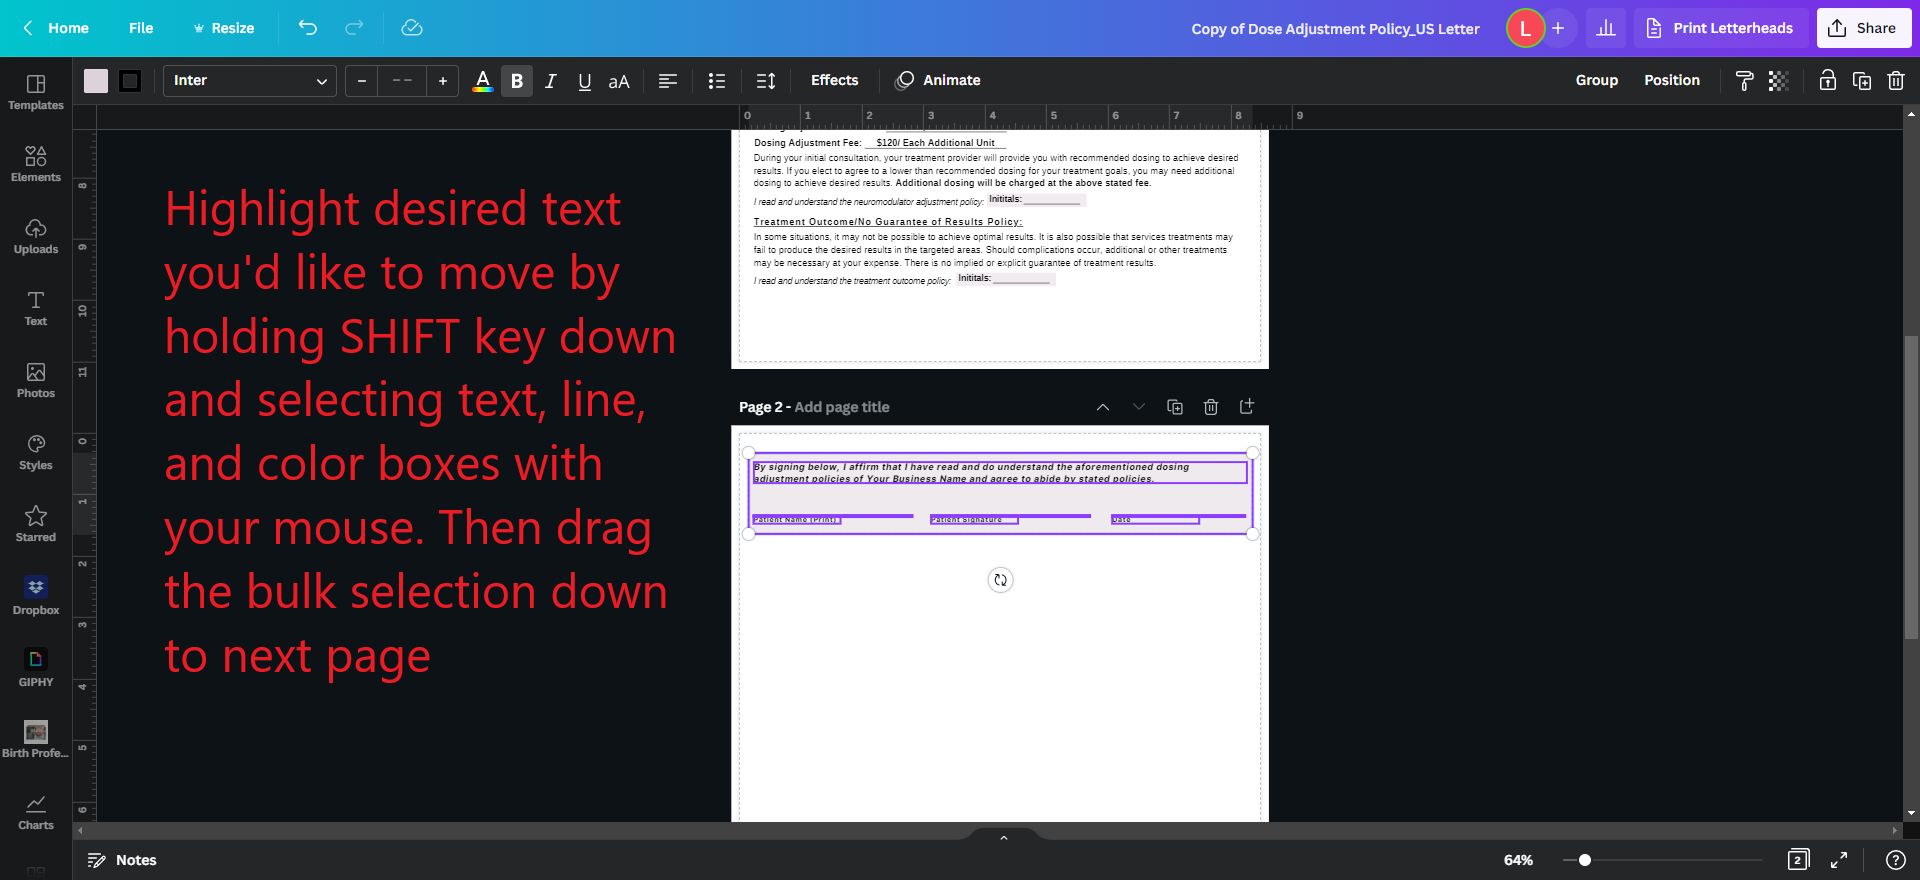
Select all text boxes that are below overflowing text box by holding down SHIFT key on keyboard and using your mouse to click and select ALL text boxes, lines, and background colors below the overflow area > once all desired boxes are selected, move them down in bulk by dragging with mouse or using arrow keys on keyboard
*Be sure that all areas you want to move are highlighted with purple boxes around them. If you start moving and notice you missed a box, you can just move it back up and click to select it while holding shift or move the missed boxes later.
*arrowing down (vs using mouse to move) is the best method to maintain formatting on page
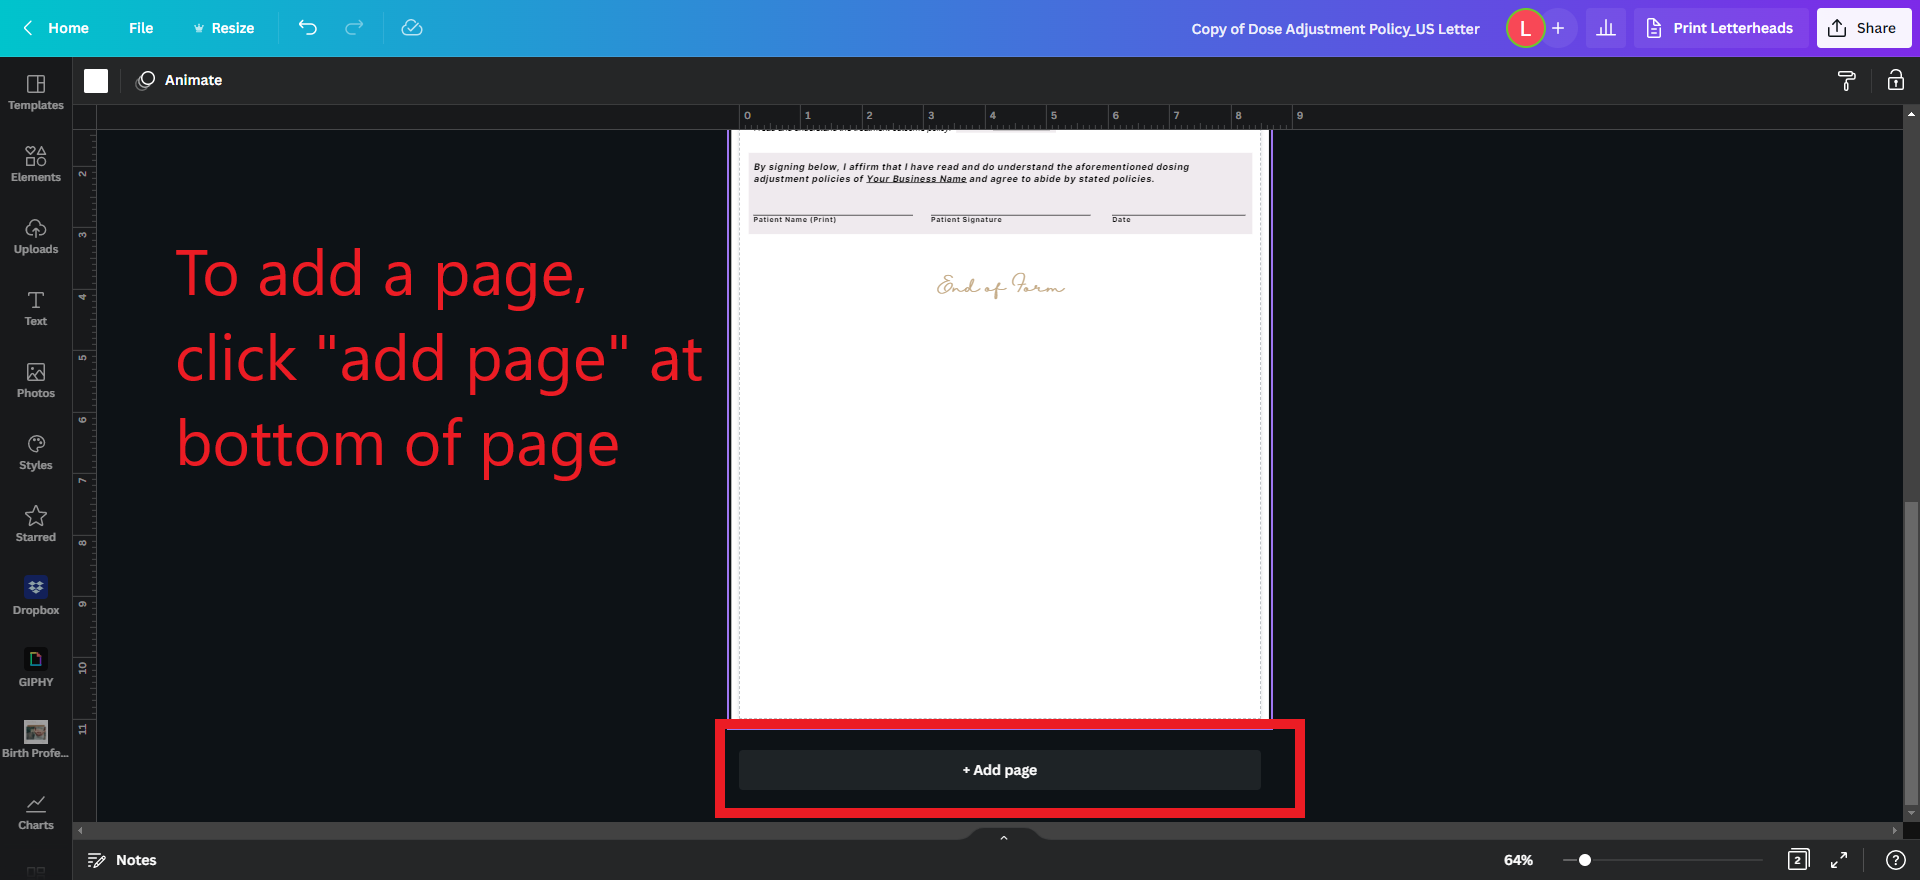
Once you have moved your text boxes, if you find that you have run out of room on that page to move any further or you have elements you need to move that are now overflowed upon, you can ADD A PAGE to move your overflow boxes onto by clicking “Add Page” at bottom of page.
Once you have added a new page for your overflow content, you can then move those text boxes onto new page in the same way you did previously:
holding down SHIFT key on keyboard and using your mouse to click and select ALL text boxes, lines, and background colors below the overflow area > once all desired boxes are selected, move them down in bulk by dragging with mouse or using arrow keys on keyboard
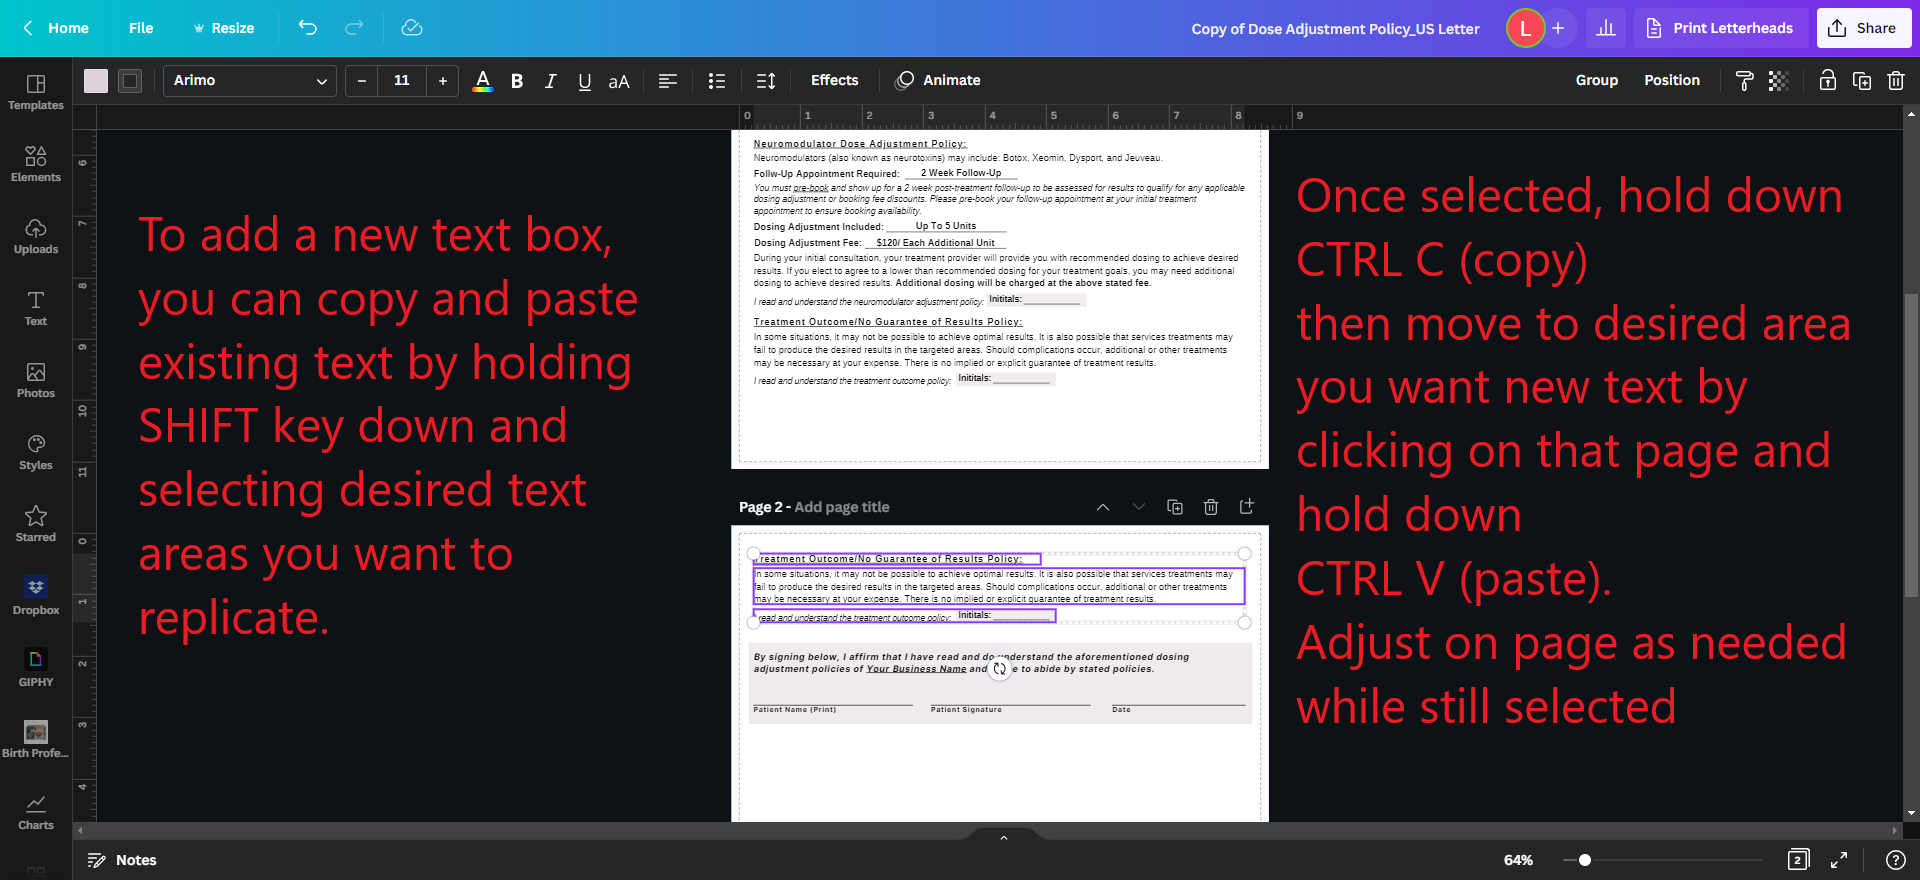
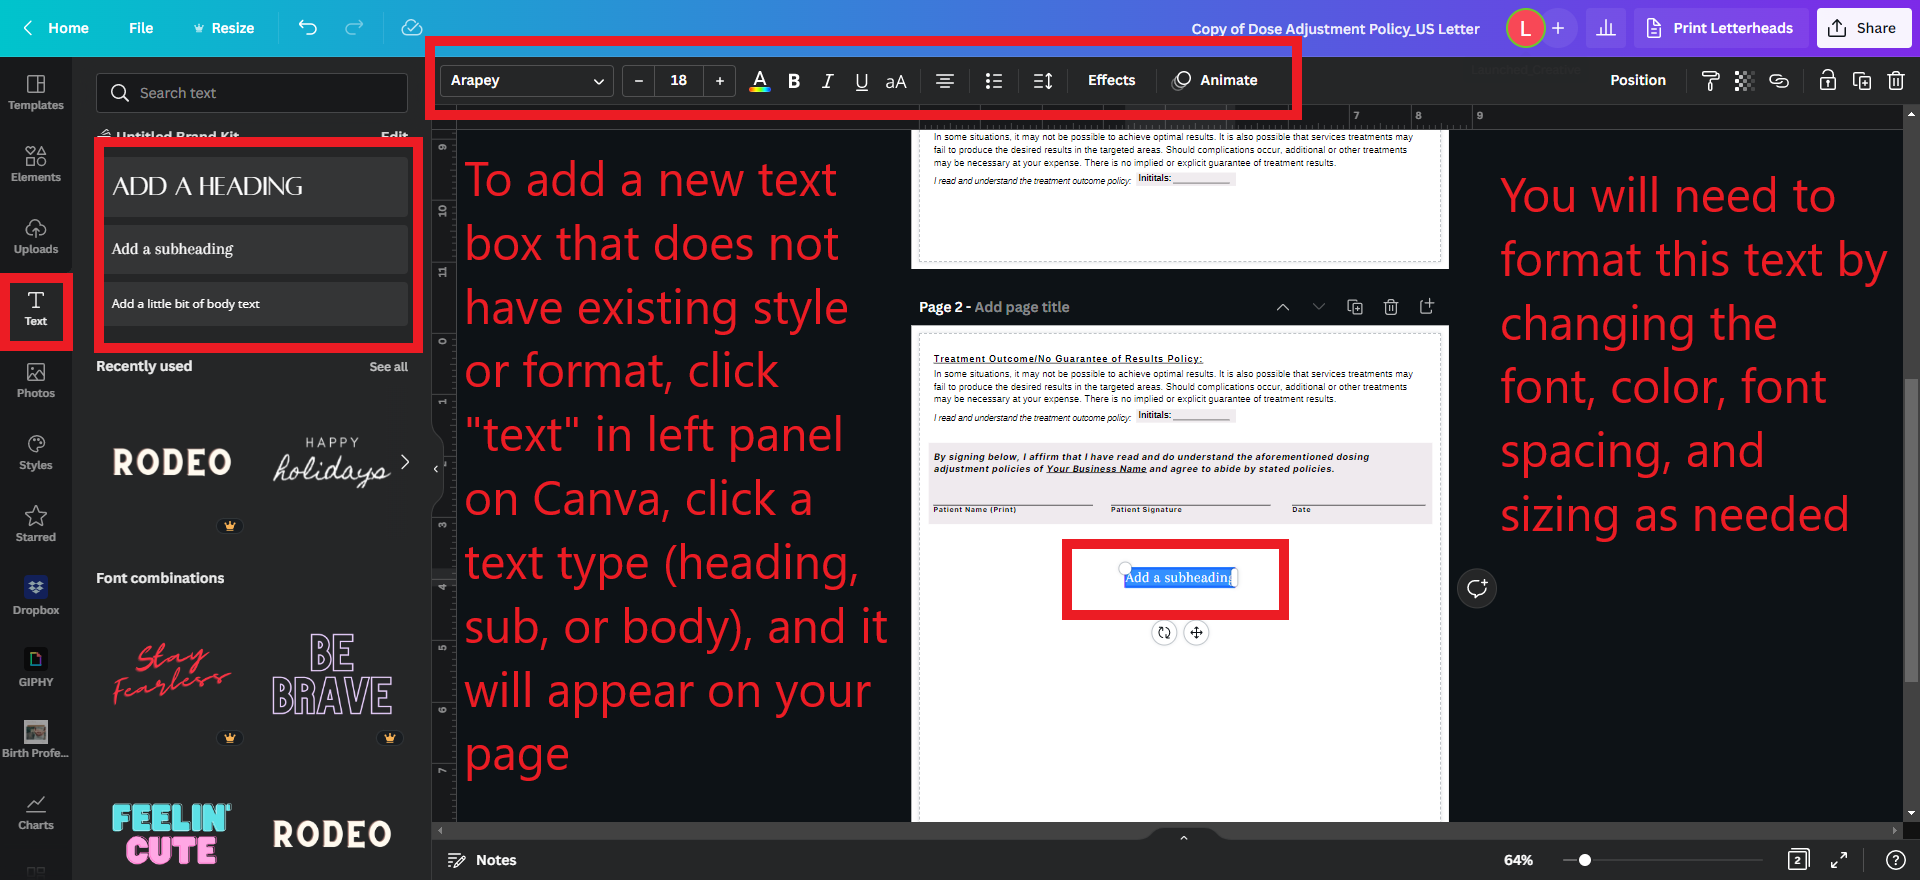
Adding New Text Boxes
To add a new text box, you can do so in two different ways:
Copy and paste an existing text box or group of text boxes and elements (lines, background colors) to maintain current formatting
or
Create a new text box with new formatting
To copy and paste a text box or group of text boxes:
Highlight the desired text boxes and elements you want to replicate by holding down SHIFT key and selecting boxes with your mouse > once selected (all boxes should be purple outlined), hold down CTRL C to copy > then move your mouse cursor to the desired page you want to paste onto and hold down CTRL V to paste > adjust placement on page as needed
To add a new text box without current formatting:
Click text icon on left Canva panel > choose text type > format text as desired
Changing Placeholder Images or Logo
Changing placeholder images or Logo
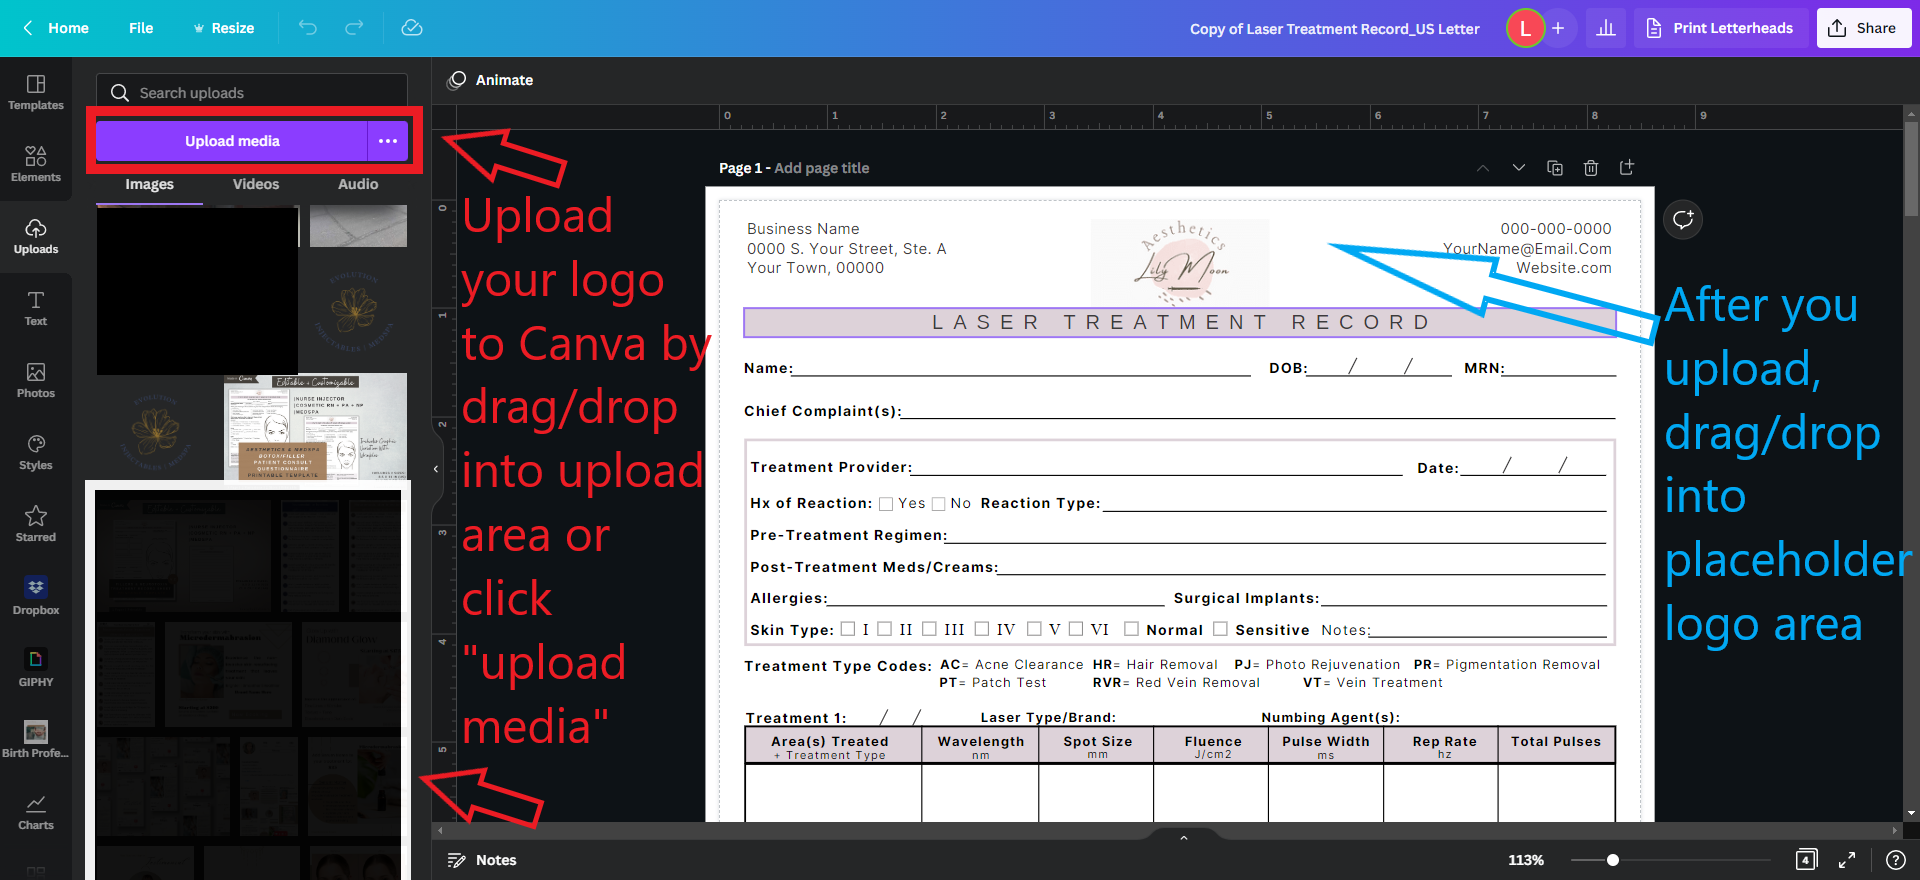
To change a placeholder image with your own image:
> drag and drop an image from your files on your computer to the Uploads area of the left toolbar > once the image has loaded to the Canva uploads, just drag and drop the image to the placeholder image area in your document > you can adjust the image or apply a filter to the image by using the image toolbar at the top.
To replace logo: simply delete existing placeholder logo > upload your logo image (jpg or png) to uploads area described above > drag and drop to placeholder logo area > resize to fit.
Resizing Logo Box
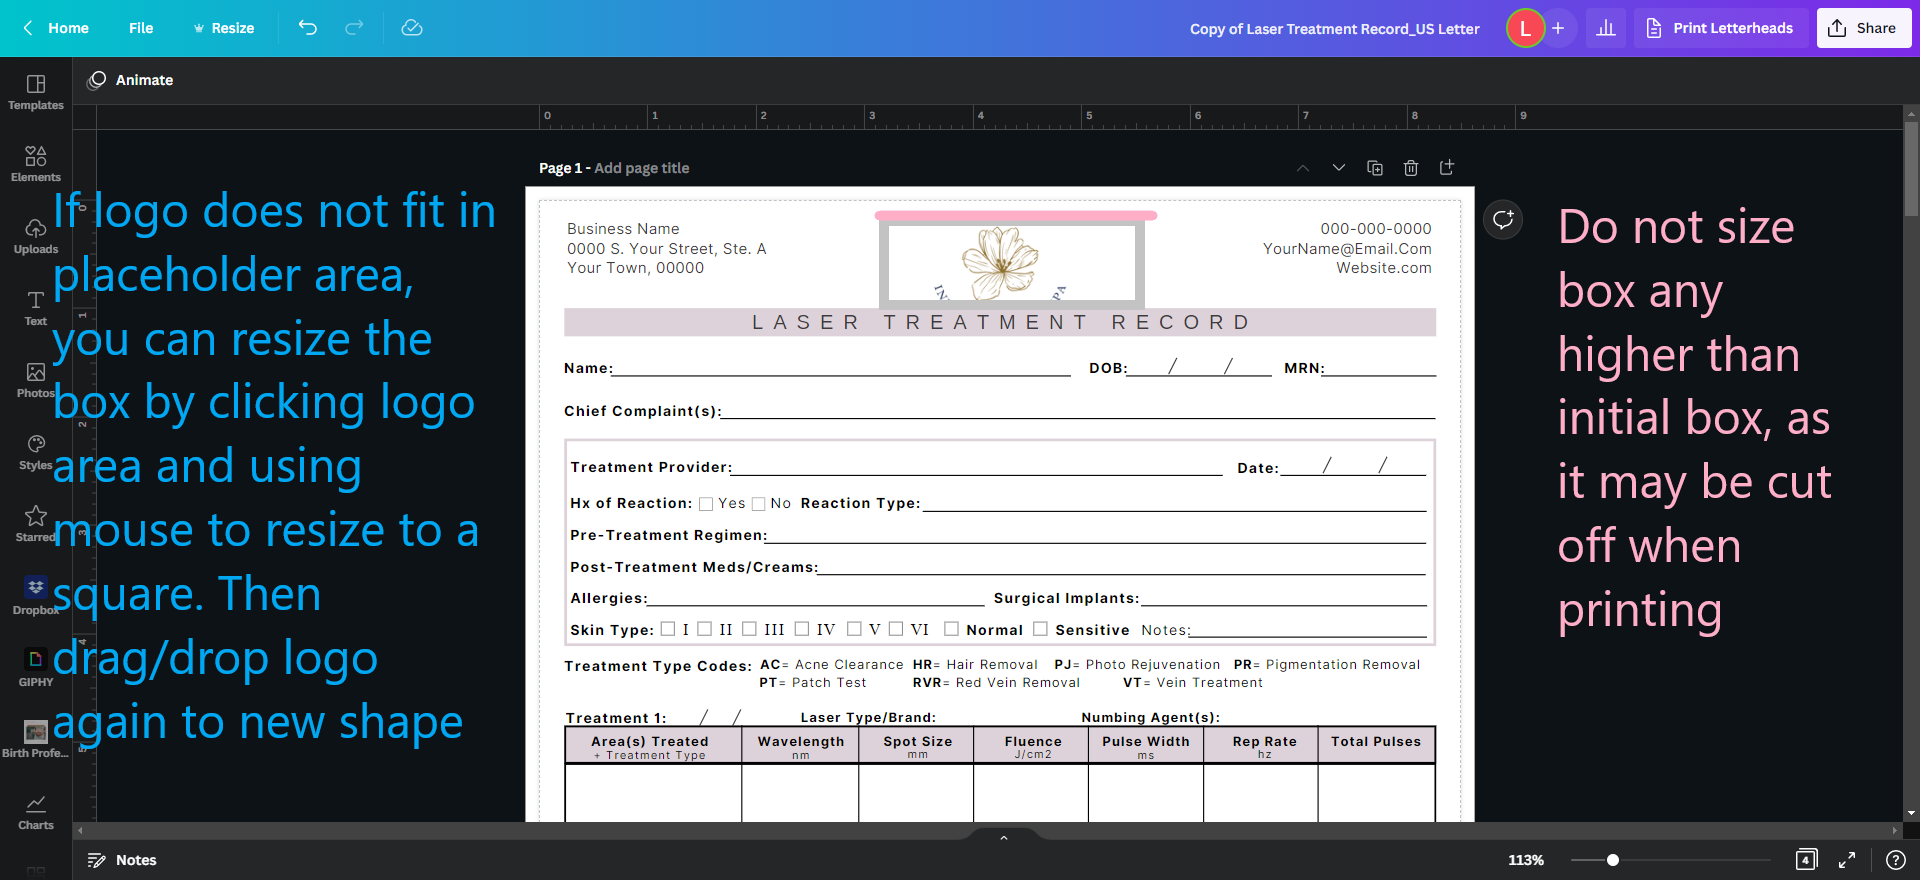
If your logo does not fit the original logo area, you can easily update the shape and size of the box to fit your logo.
To resize: Highlight the logo box > using your mouse, adjust the the sizing box to a square shape > adjust sizing as needed DOWNWARDS (do not adjust box size up beyond original area, as it may be cut off during printing) > drag and drop your logo from the upload area again to your new logo shape
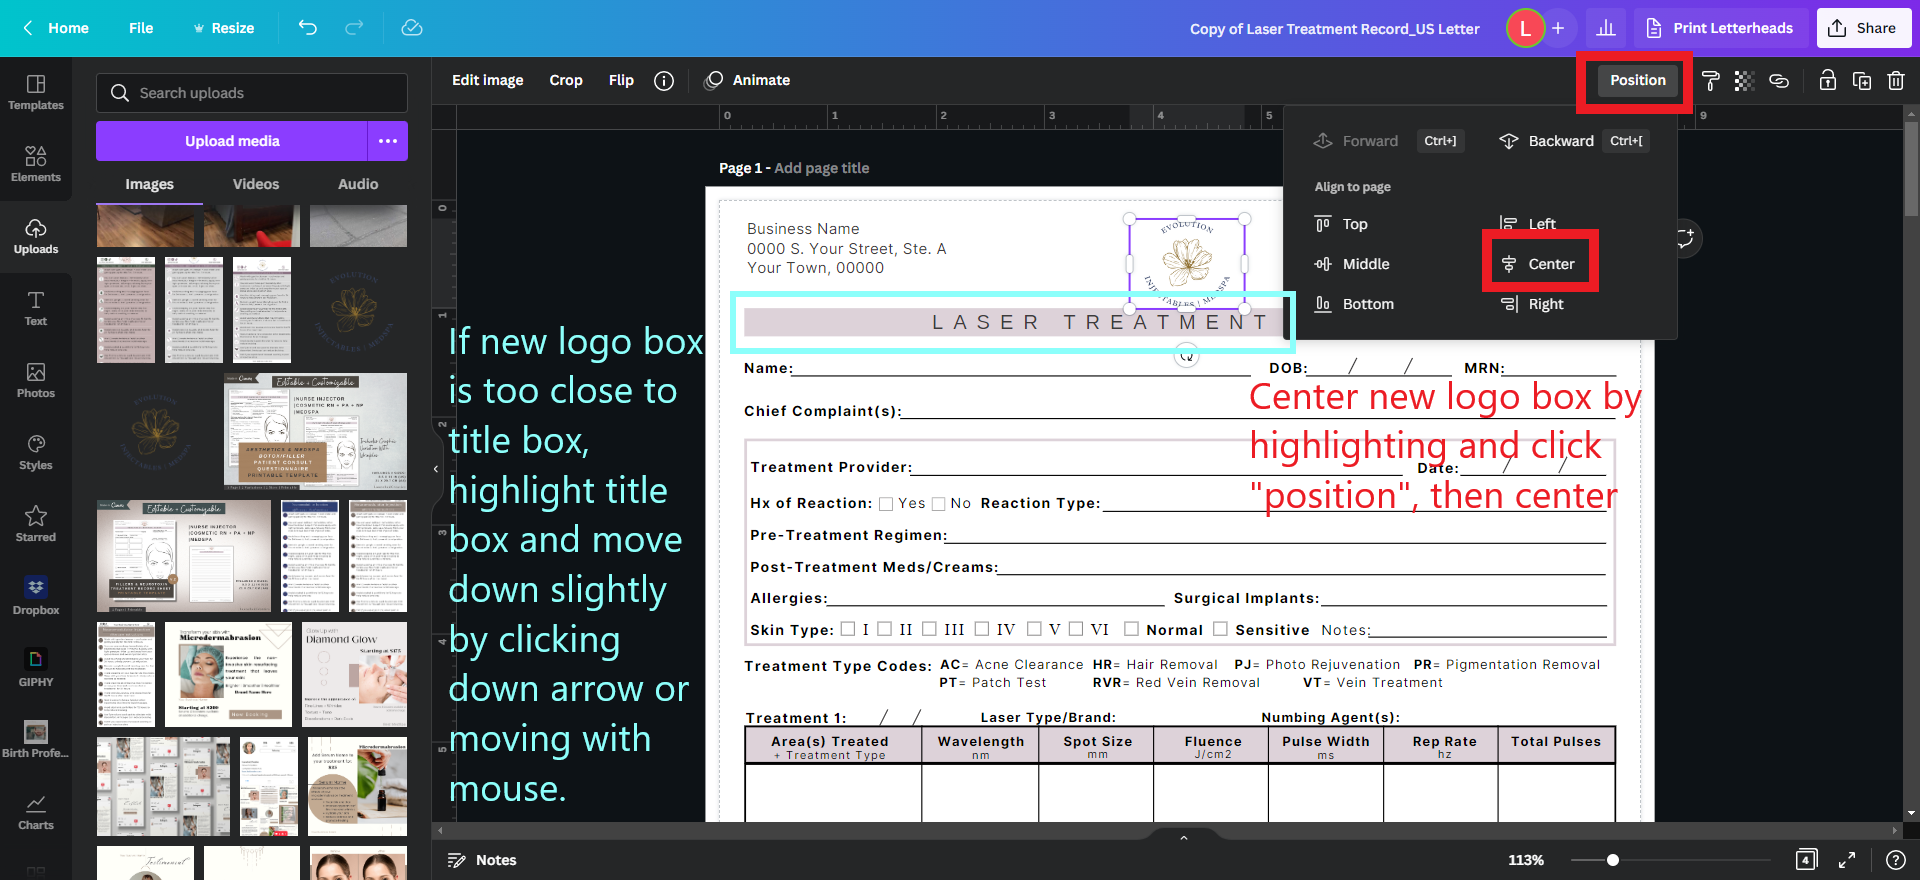
To reposition new logo shape: highlight your logo area and click “position” > center
If your new logo shape had to be resize slightly bigger due to changing shape area, you can move the title box lower to accomodate sizing change by highlighting title area and moving downwards slightly by arrowing down while title box is selected or moving box down with mouse.
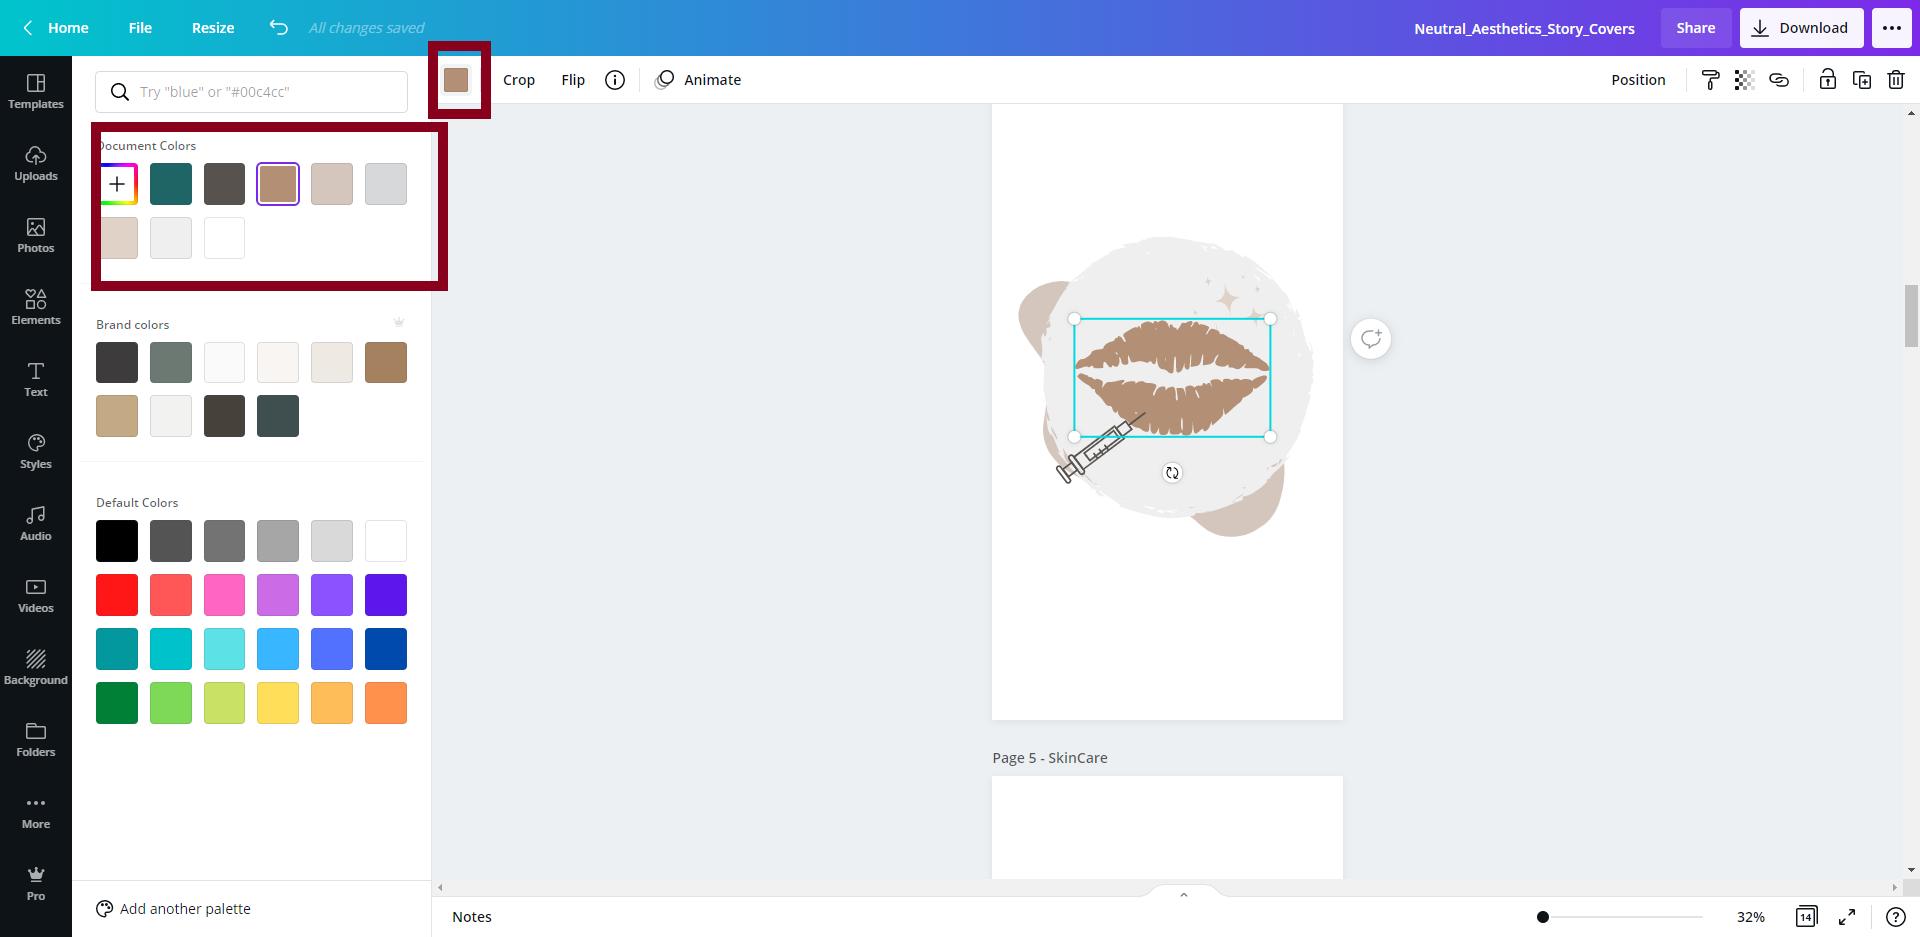
Changing Icon or Shape Colors
Changing icon or shape colors
To edit a shape, background, or icon color:
> click the area you’d like to adjust > the toolbar at the top will pop up with the set colors of the object or background (some objects will consist of multiple colors) > click the color box in the toolbar you’d like to change > in the left toolbox, colors will appear for you to select, or ifyou’d like to enter a custom color hex code or the color picker, select the rainbow box and the color picker will appear
*For objects consisting of multiple colors: once you’ve changed the colors in one color box, simply select the next color box in the top toolbar to adjust that color repeating the same steps above
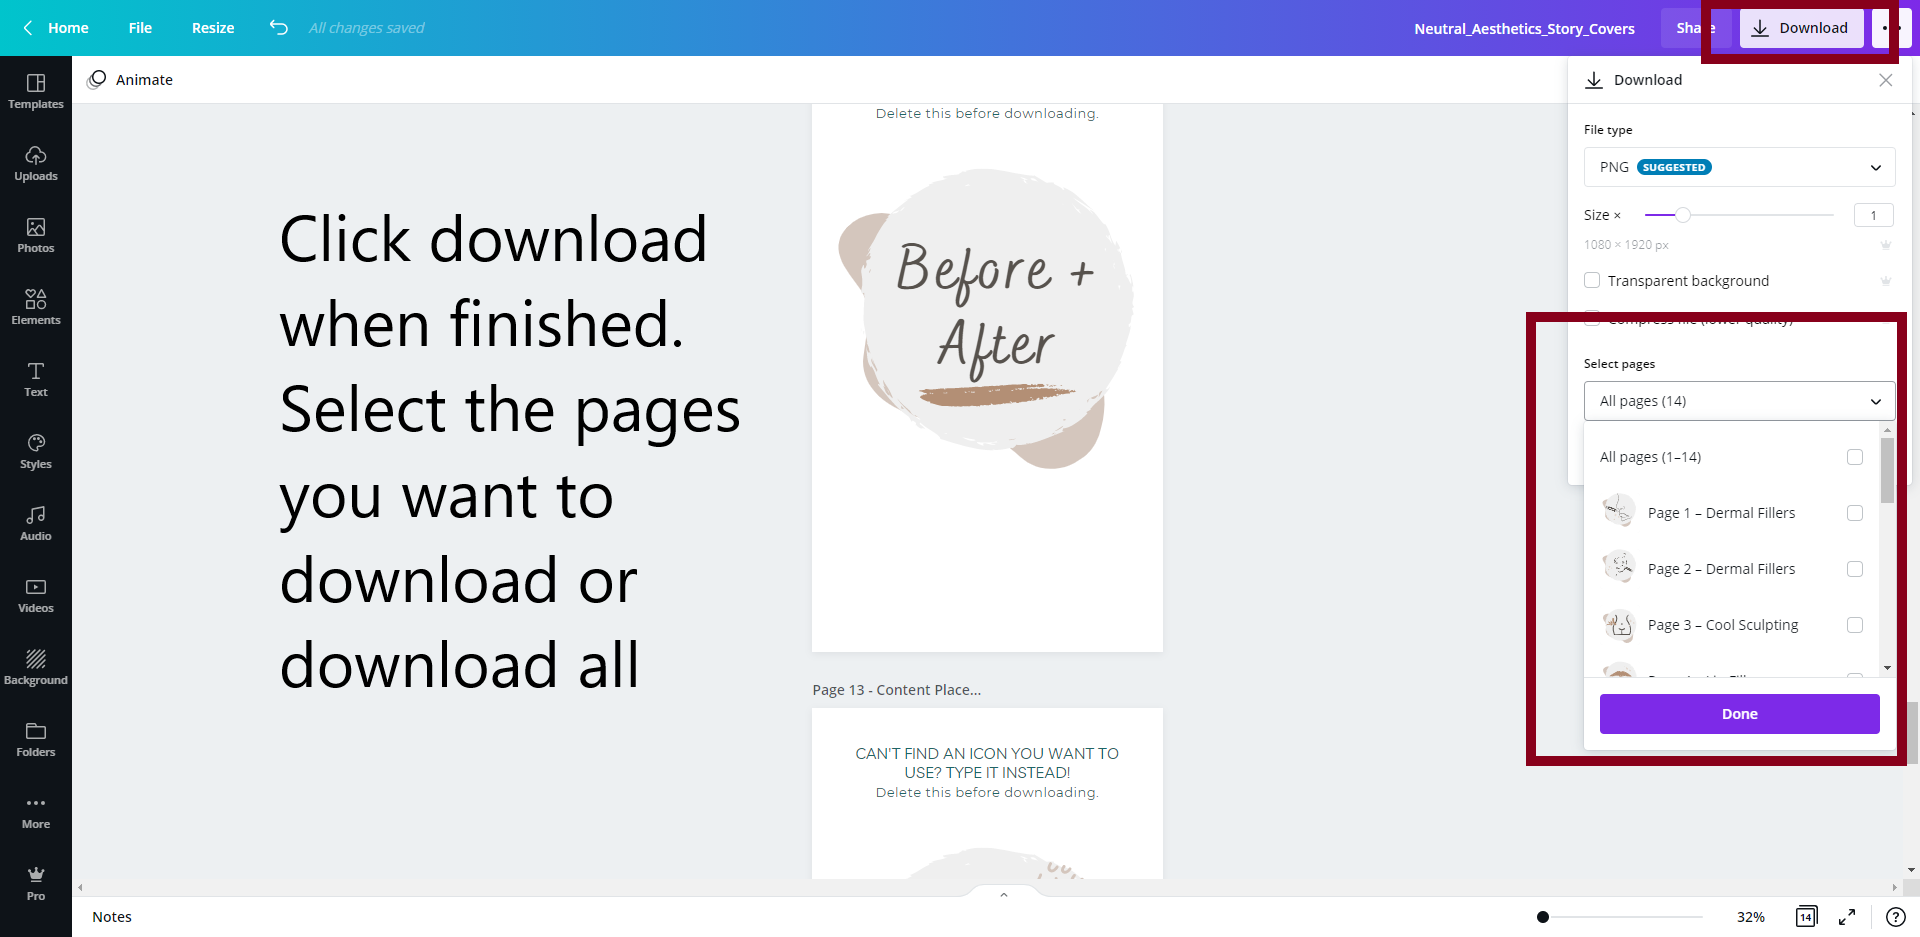
How To Download Finished Form For Print or EMR
Downloading Finished Form
To print at home, office, or with a 3rd party print service, or to use the form digitally in your EMR (not a fillbale form automatically, you will need to convert it using a 3rd party service or your EMR software), you’ll need to download the design as a pdf.
To download your completed design as a pdf :
Click “Share” button at top right corner > click “download” > “pdf for print” or “pdf standard” > select each page individually to download (if uploading to 3rd party print service) > repeat these steps until each page has been downloaded > upload to desired print service
*PDF for print is a higher quality version. It will take more ink to print. Use this option if sending ti 3rd party printer
*PDF Standard is a smaller file size and is great for digital use or printing from home or office
Editing Instagram Story Highlight Covers in Canva
How to customize, download, and upload your Instagram story highlight covers
Customizing & Downloading Highlight Covers
Customizing Highlight Covers
To change the colors of the design or icon, click the area you want to change > click the color box in the left upperhand corner > choose the color using color picker or entering hex code.
To update with new icon, click the “elements” button in left toolbar > search for new icon > replace icon with icon of your choice.
To update the templates with placeholder text > click text box > replace placeholder text with text of your choice.
To duplicate a placeholder text box > click the ++ above the template page

Downloading Highlight Covers
Once you’ve finished customizing the highlight covers, you can download the pages individually (if you only need a few of the covers) or all at once.
Click “download” select the file type (png or jpg) and select the pages you want to download or download all by clicking “download:.
The files will be saved to your camera roll if you are on a phone.
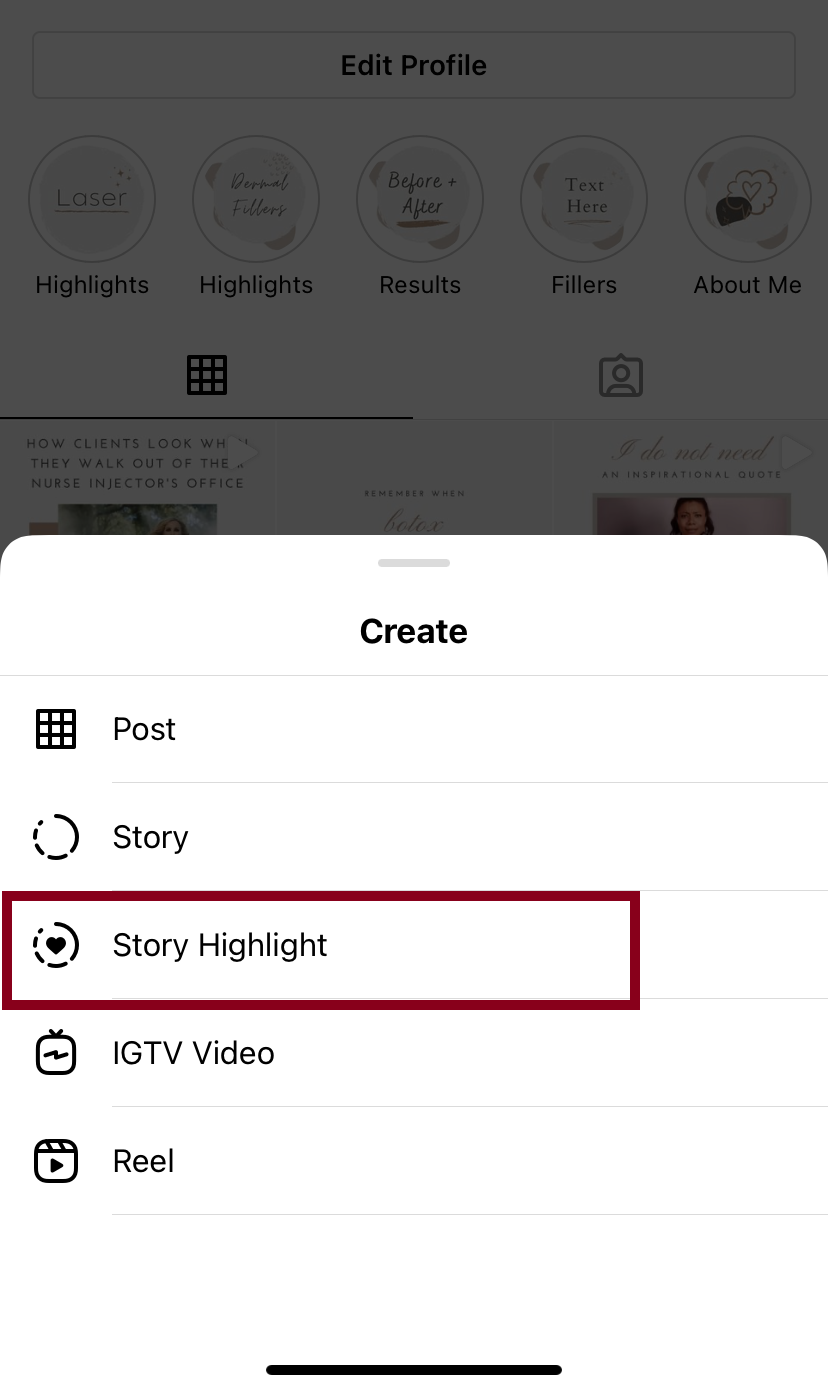
Uploading Highlight Covers To Instagram
Adding Highlight Covers To Instagram
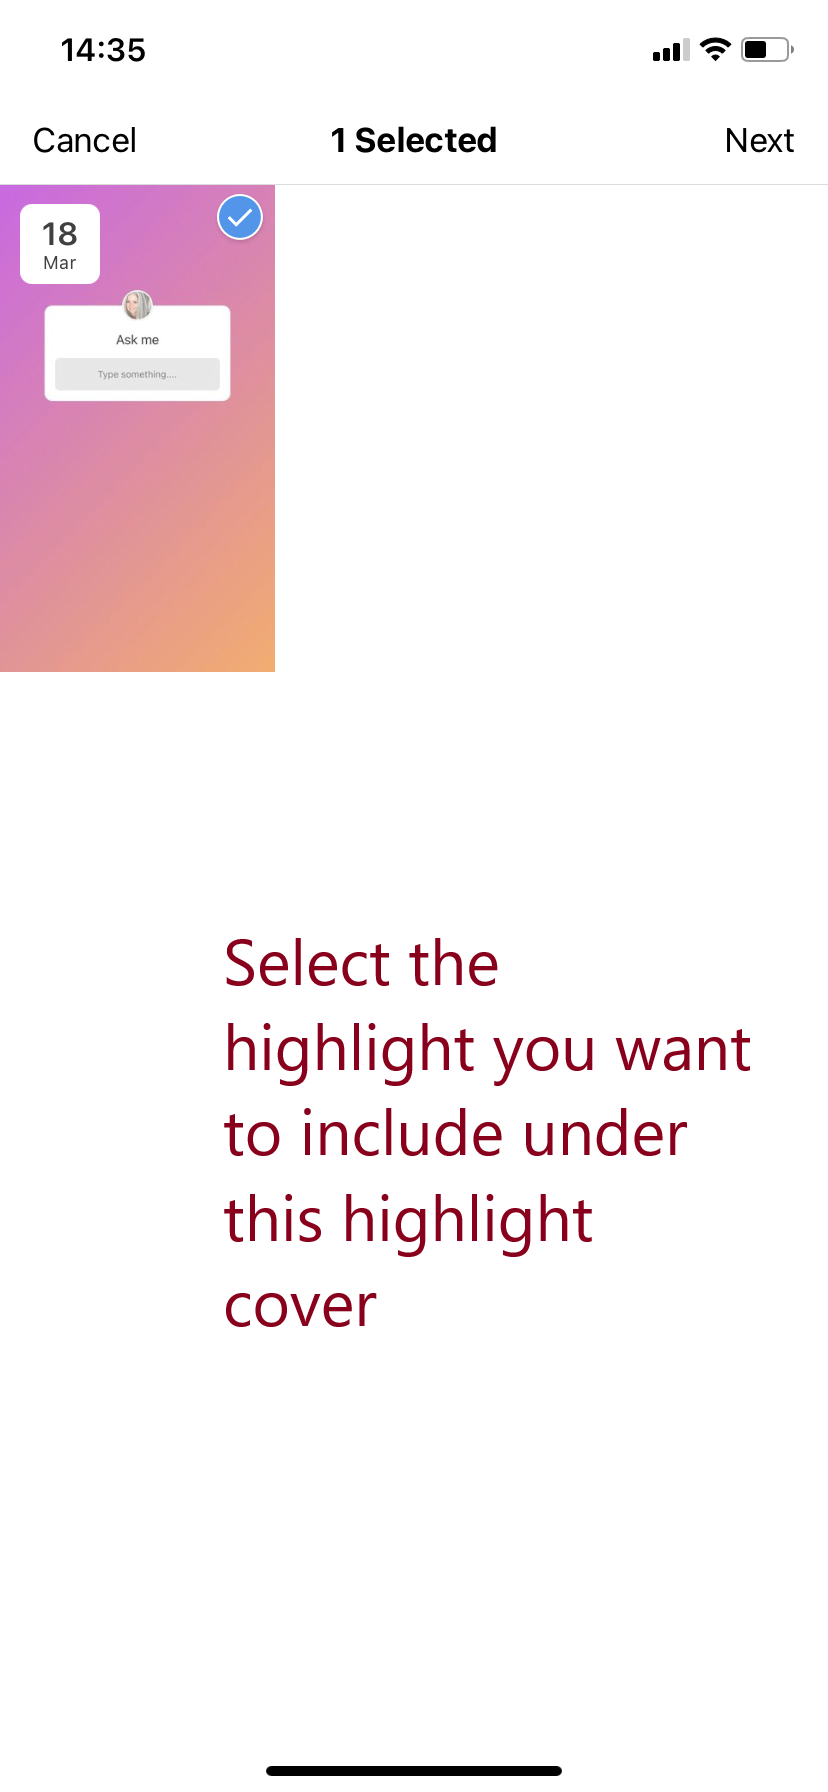
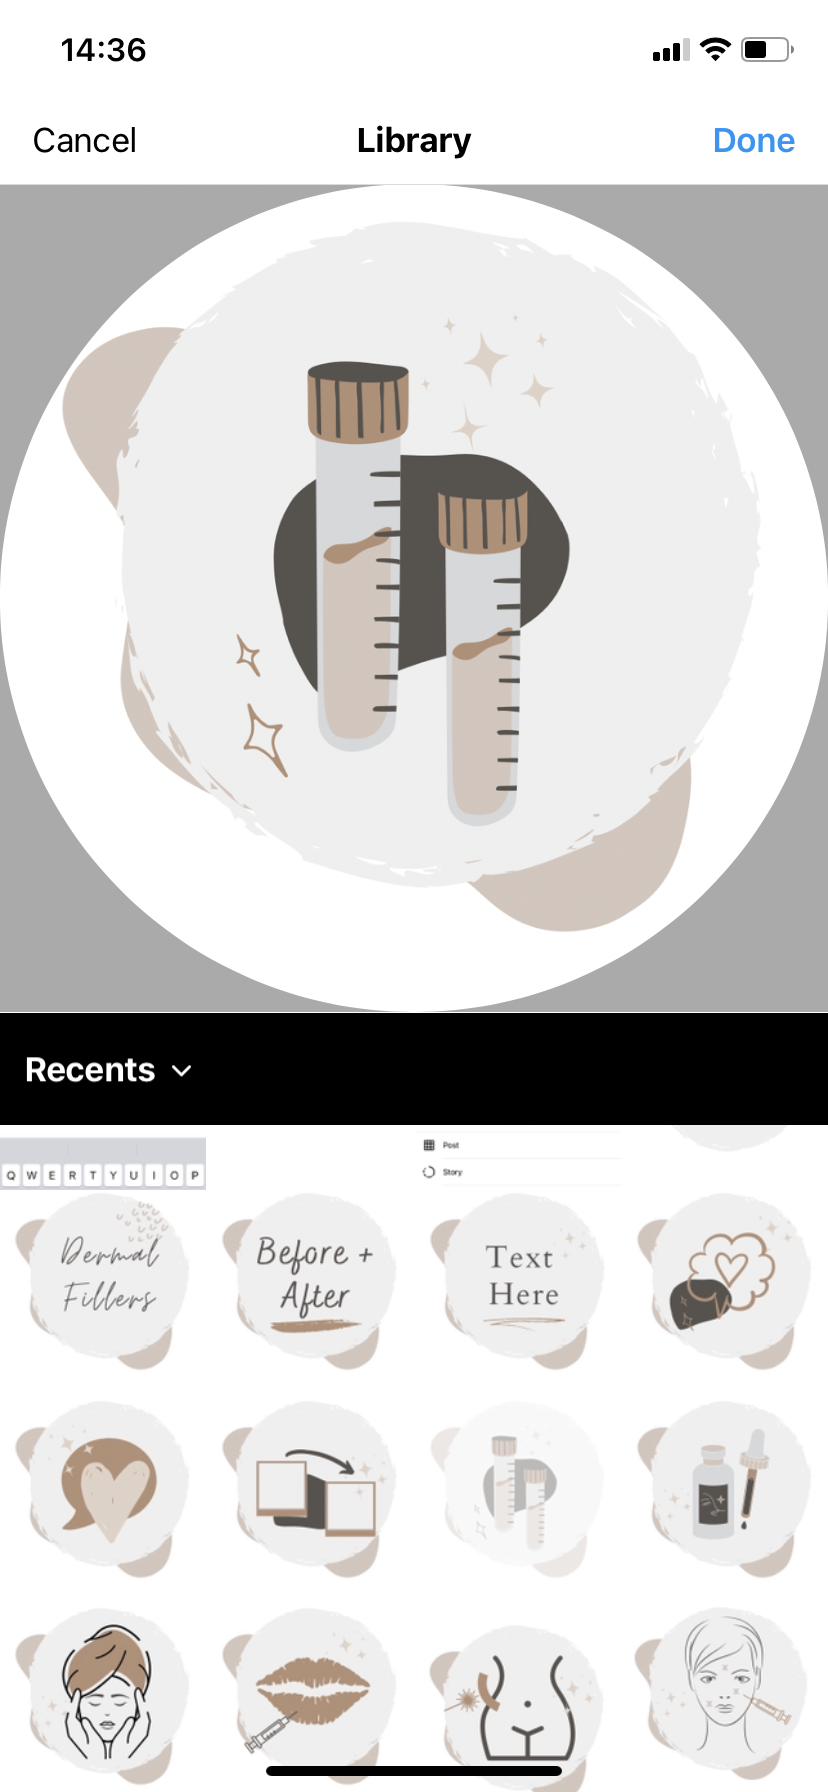
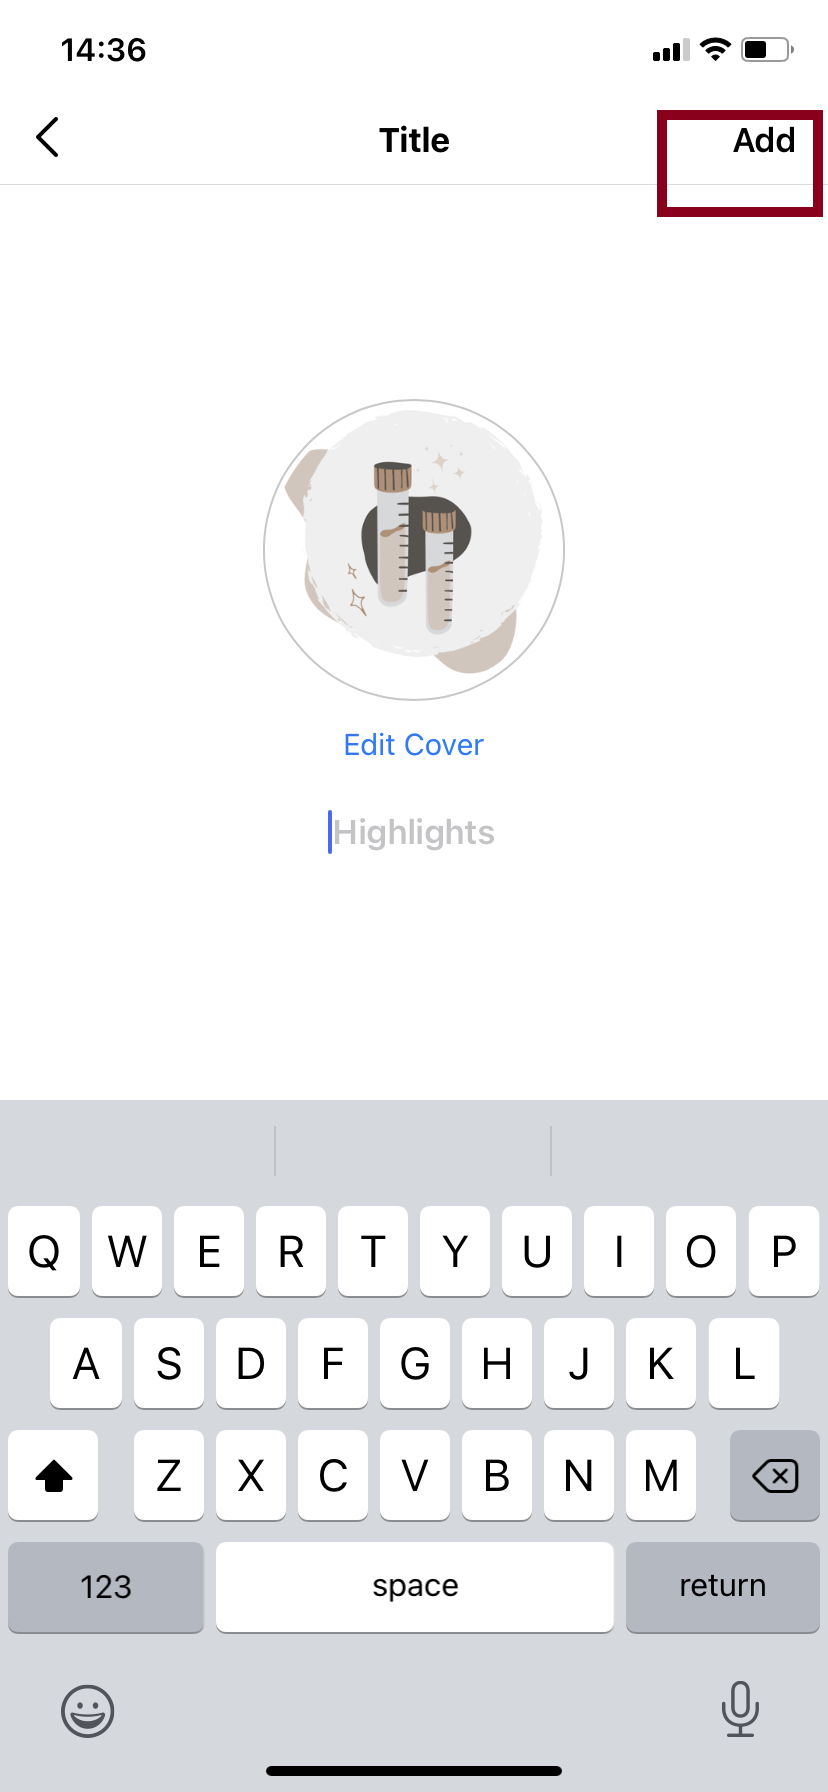
After downloading your instagram highlight covers from Canva, go to your Instagram account on your mobile device and click > + to add > “story highlights” > select the stories you want to include under this highlight cover > select the option to upload highlight cover image from camera roll > select the image you want to add > resize and straighten by pinching to adjust and moving within grid > type in your highlight cover title > click “add”
Customizing & Using Logo Template
How to customize, download, and use your logo template
Customizing & Downloading Logo Template
Customizing Highlight Covers
To change the colors of the design or icon, click the area you want to change > click the color box in the left upperhand corner > choose the color using color picker or entering hex code.
![]()
To update with new icon, click the “elements” button in left toolbar > search for new icon > replace icon with icon of your choice.
To update the templates with placeholder text > click text box > replace placeholder text with text of your choice.
Resize text to fit the area if your name or title contain more (or less letters) than the placeholder text.
![]()
Downloading Logo Template
Once you’ve finished customizing your logo, you can download each logo page individually (if you only need one version) or all at once.
Click “download” select the file type (png or jpg) and select the pages you want to download or download all by clicking “download:.
The files will be saved to your camera roll if you are on a phone.
![]()
Using Logo
Using your new logo
You can use your new logo on your forms, business cards, social media, etc.
If you’re downloading from a free Canva account, you will not be able to download with a transparent background or be able to auto-resize.
If you need a transparent background (for your website or forms) or to crop sizing, you can:
-Sign up for a free trial of Canva Premium to use their premium tools
-Use Adobe Photoshop Express using a free account.
-Use LunaPic free editor
*I am not endorsing or affiliated with any of the above products/services. Using the transparent background tools not within Canva can cause the file to lose quality and is not recommended for print use.
If you need to order business cards:
I recommend designing a business card in Canva and adding your new logo to the design. You can order directly from Canva.
Great Alternatives: