Page Layouts
Divi Page Layout Guide
Welcome to your Comprehensive Installation Guide and Documentation for any Single Page or Layout Pack listed below.
Here you will find everything you need to customize your website and Launch!

Get Started
- Hosting & Divi License
- Install Divi Theme
- Import Page Layouts (How To Upload The Layout You Purchased From Launched)
Customize
Get Started
You will learn to Install & Activate Divi Theme along with the installation instructions for getting your Page Layout(s) uploaded to your website.
Step 1: Hosting & Divi License
To get started with a Website Kit, you need to have:
1- Self-Hosted WordPress
2- A Divi Theme License
Need Step-By Step help setting up Hosting/Domain with Bluehost?
BlueHost Hosting Setup Tutorial (contains affiliate links)
Need Divi Theme License?
Click here to purchase your own Divi Theme website license (affiliate link)
No idea what Divi Theme is and want to learn more?
Read my blog post “5 Reasons Why Divi Theme Is The Ultimate Tool For Beginners and Pros”
Step 2: Install Divi Theme
2-1 Install the Divi Theme
Installing the Divi theme is simple! Watch the following video or read the steps below.
Find The File: Divi.Zip
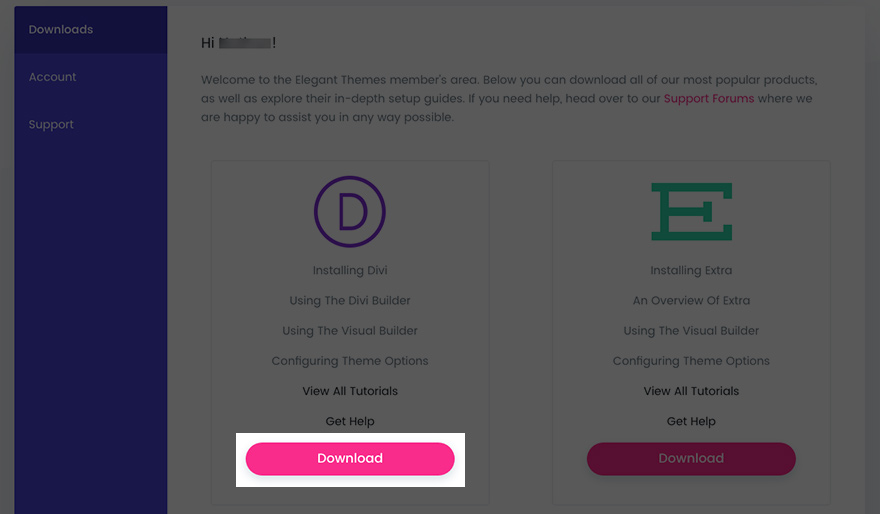
You will need to download the Divi.Zip file located in your Elegant Themes account dashboard to complete the next step.
If you have not yet downloaded your Divi.zip file, you’ll need to: Login to your Divi Account to retrieve it.
In your Elegant Themes dashboard, click, downloads and download under the Divi symbol. Don’t exit your account just yet, you’ll need it for the last step in this process.
Installing Divi Theme on Your WordPress
- Click over to your WordPress Dashboard > Appearance > Themes.
- Next, click “Add New”
- Click “Upload Theme”
- Choose the Divi .zip file and upload.
- Click “Activate”
Divi Theme is now installed!
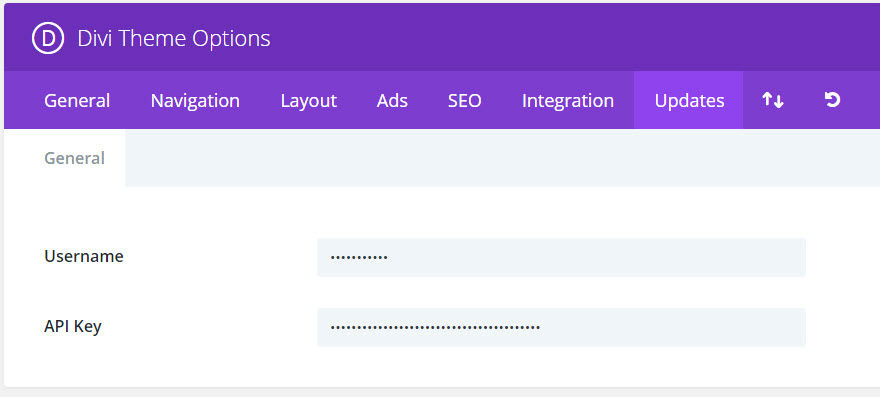
2-2 Add your Username & API key to Divi to receive updates
- In your WordPress Dashboard, scroll down to Divi and click > Theme Options
- Click the tab labeled “Updates”
- Enter your elegant themes username
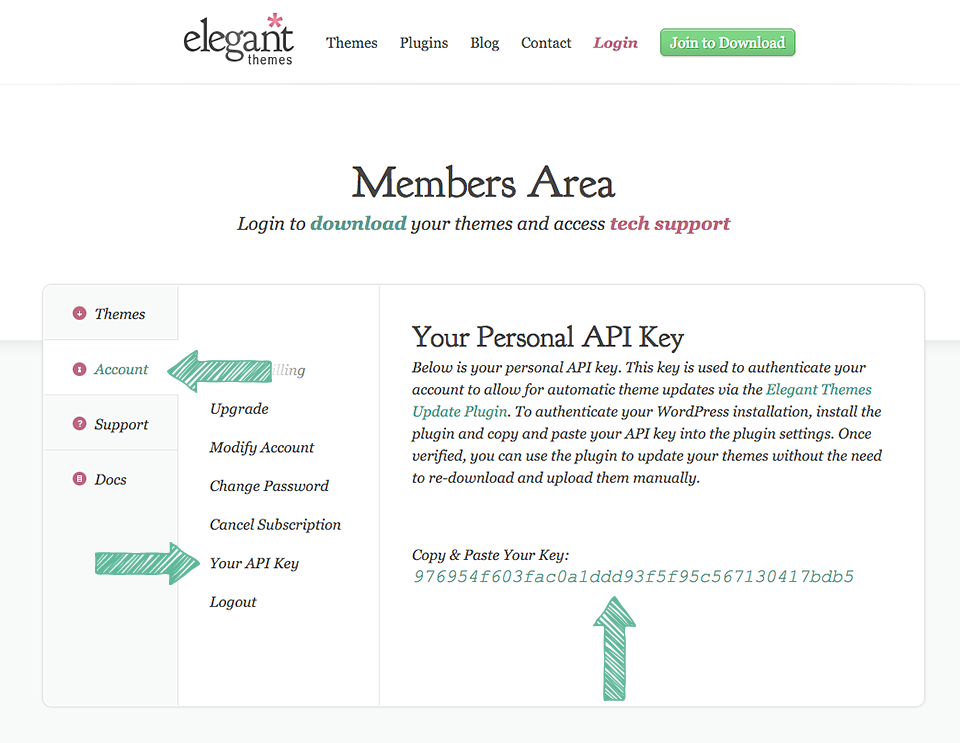
- Enter your API Key (found in your Elegant Themes account and pictured below)
- Click “Save Changes”
Your Divi Theme will now be able to accept updates as they come through.
Step 3: Import Page Layout (The Layout You Purchased)
Import Page Layouts
How to upload the Page Layouts you purchased from Launched Creative
3-1 Import Divi Builder Layouts
Find The File: Landing Page.json
- In your WordPress Dashboad, scroll down to Divi and click > Library
- Click the Import/Export button on the top right hand corner of the page.
- Click “Import”.
- Upload “Divi Builder Layouts.json”
You can expect these files to take several minutes to load. If your screen goes blank and hangs for a while, you can click refresh. If your files have uploaded, they will show in your Divi Library.
Customize Page Layout(s)
You will learn to customize your Page Layout(s). Every Page Layout for sale is different and may or may not contain all elements listed below.
Video Tutorials:
Step 1- Changing Placeholder Text & Divider Color
1-1 Replacing Headings and Text with Your content
- Hover over each text module that you want to replace the text > click grey gear/setting icon > Content > replace the content with your text > click save
- Alternatively, you can click the text area you would like to change and start typing directly into the box > click save changes at bottom of page.
1-2 Resizing Placeholder Text
Most placeholder body text is set to the default font size of 16px. Some placeholder content is set to 18px to emphasize importance. If you would like to change these areas that are are not set to default, or to change any area you prefer to make larger:
- Hover over the text module you’d like to change > click grey settings icon > click Design Tab > text > text size > input your desired text size > click save.
- To change heading sizes, follow the steps above and scroll to > heading text to change sizing > click save.
1-3 Changing Divider Line Color
- To change divider line color, hover over the divider line > click settings icon > Design Tab > Line > Line Color > select your line color by inputting RGB color code > click save.
Step 2- Changing Placeholder Images
2-1 Changing Placeholder Images
- Hover over grey Image Module setting icon > click image > replace with your uploaded image or from your library > click save.
2-2 Changing Image Frame Color
- While still in the image module settings, click > design >scroll down to border > change border color to desired color
Step 3- Services Module Content & Links
3-1 To Changing Out Placeholder Content
- In the Services Section on your Home Page, hover over the desired service box and > click grey blurb settings icon > Input your title > Input your content (be sure to keep the descriptions the same length to maintain equal box sizing) > image/icon to change the placeholder icon if you desire.
3-2 To Change The Service Link
- While still in the Blurb Module Settings, scroll down to link > Title Link > insert YOUR website link to YOUR services Page. Complete this step for each service link.
Ex: https://yourpage.com/services
Step 4- Changing Background Colors
4-1 To Change the background of a Section
- Click the blue section settings > Content Tab > background > input your desired background color.
4-2 To Change the background of a Module
- Click the grey module settings > Content Tab > background > input your desired background color.
4-3 To change background color of a row
- Click the green row settings > Content Tab > background > input your desired background color.
Step 5- Testimonial Sliders
5-1 To Change Slider Settings
- Click Grey Slider Module Settings Icon > click grey icon for testimonial > click “text” to input your customer name and testimonial text
- To change background color of testimonial box: In main slider settings area (where all testiminials are listed) > Click Design > click Overlay > input your color > click save
- This will apply color changes to ALL testimonial sliders. To change each individual slider to a different color overlay or text settings, follow the directions above in each slide.
5-2 To add Additional Testimonials
- While still in the Slider settings module above > click the copy button on the slide above and follow the steps in 5-1 to change to your content.
5-3 To change image next to slider
- Click the image settings button > replace with your image
Step 6- Staff Info
6-1 To Change Staff Placeholder Images & Border
- Hover over grey Image Module setting icon > click image > replace with your uploaded image or from your library > click save.
- While still in the image module settings, click > design >scroll down to border > change border color to desired color
6-2 To Change Staff Title Box
- Background color of box: Click the grey module settings > Content Tab > background > input your desired background color.
- Border color of box: While still in the text module settings, click > design >scroll down to border > change border color to desired color
- Change placeholder text to desired text
- Change Text Styling: While still in Text module settings > Design > Text > change to desired color and size > scroll down to Heading text > click H1 > change to desired color and size > repeat for H2 styling
6-3 To change Staff Detailed Info “Get To Know Me” Toggle settings
- Hover over grey Toggle Module setting icon > Change Placeholder Title > Change Placeholder Body content
- Background Color: Scroll down to background > change to desired color
- Icon Color/Size (+): Click Design Tab > Icon > change to desired color and size
- Background Color (open): Toggle > Open toggle background (the color of the background when the toggle + icon is hit) > change to desired color
- Title Text (open): Click Title Text > Open title text color > change to desired color > change to desired font
- Title Text (closed): scroll down to Closed Title text > Open title text color > change to desired color and size > change to desired font
- Body Text: scroll down to body text > change to desired color, font, size
- Border: scroll down to border > change to desired color
Step 7- Mail Opt-In Module
7-1 To Add Your Mailing List Credentials
- Click the “Email Optin” Module Settings > Scroll down to Email Account > Select your service provider from drop down list > Add your account name > add your account API (this will be found within your mailing list account) > click submit to load.
- Click “Success Actions” to set what you’d like your successful list opt-in to say
- To Change the background colors of the mail module: click the grey gear icon > content settings > background > color
- To change button style: Click “Design” tab and scroll to “button” to change button color and font
7-2 To Change the background colors of entire the section:
- Click the blue section settings > background > color
Adding Pages
Add new pages to your website and add the pre-built page templates by following along below.
To Get Started:
- In Your WordPress Dashboard, scroll tp pages > add new page
You are now ready to follow the steps below.
Step 1- Add New Page
1-1 Add New Page
- Click “add page” > enter Page Title (this will be the page identifier that shows up in your hyperlink ex: yoursite.com/home) > click edit with divi builder > select “choose pre-made layout” > select corresponding pre-built layout from Your Library > save draft after upload complete > follow steps above for each page you want to add to your website.
Available Pre-Built Templates For Transcend Theme
- Home
- About
- Services
- Contact
- Blog
- Privacy Policy
Creating Blog Posts
Create Blog Posts For Your Business! Follow along to see how to make these changes in the easy steps below.
To Get Started Creating A New Blog Post:
Navigate To Your WordPress Dashboard > Posts > Add New
You are now in the Posts area of your WordPress Website.
**To see how to change Blog Post author info, please visit Blog Page tutorial.**
Video Tutorial For Step 1 & Step 2:
Step 1- Creating/Renaming Categories For Blog Posts
1-1 Renaming Categories
- In your WordPress Dashboard, hover over “Posts” > Categories > Click Categories
- In Categories Page, you can rename the existing placeholder categories in right column by clicking “quick edit” > change name > change slug to match new name > update category
- To delete existing category > click delete
1-2 Adding New Categories
- In left column > add new category name > add slug to match > if this is a “sub category” pick the “parent” category > if not a sub category, leave that section alone > add new category
Step 2- Creating A New Blog Post
2-1 New Post
- In the “posts” area of your website, click “Add New”
- Type in the title of your Blog Post where it says “add title”
- In the right hand column of the blog post back-end editor, there is a tab labeled “categories” > click categories > choose the selected category for this post.
- Click “featured image” tab to add the image that will display on your blog post feed page > select or add image > “set featured image”
- Click “save draft” after completing steps above then click > Use Divi Builder to be taken to the front-end visual editor to create your blog post
2-2 Adding Content To Your Blog Post
- Once in the front-end editor detailed above, you will be see that the blog post already has some pre-defined content like categories, featured image placeholder, and the “about” the author section (detailed in the blog page how-to). All you need to do is add the content you’d like for your blog post.
2-3 Using Pre-Made Blog Post Layout
- “Transcend” Website Kit comes with a pre-made blog post layout. You can access this layout one of two ways:
- To access this layout after clicking “use divi builder” > clone existing page > click one of the placeholder blog posts to use its format. > change placeholder images and content out with your content and images.
- To access this layout from the library > click the blue “add new section” + icon > click “add from library” tab > blog post > load blog post > change our placeholder content and images with your images and content > click save draft when done and > publish when ready for the world to see.